Magnavox 37MD359B User manual, English (US) - Page 16
Cable Management, Plug In the AC Power Cord
 |
View all Magnavox 37MD359B manuals
Add to My Manuals
Save this manual to your list of manuals |
Page 16 highlights
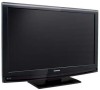
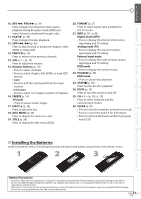
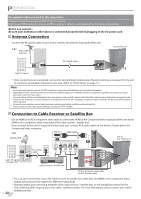
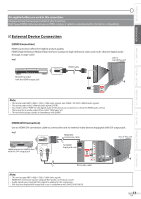
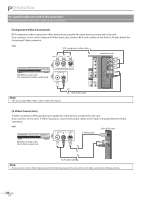
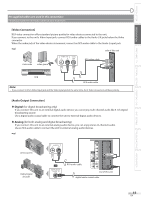
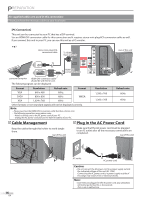
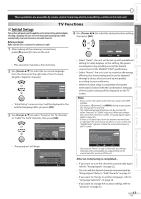
PREPARATION No supplied cables are used in this connection: Please purchase the necessary cables at your local store. [PC Connection] This unit can be connected to your PC that has a DVI terminal. Use an HDMI-DVI conversion cable for this connection and it requires stereo mini plug-RCA conversion cable as well. If you connect this unit to your PC, you can use this unit as a PC monitor. e.g.) stereo mini plug-RCA conversion cable To HDMI1 Input jack only rear of this unit DVI OUT HDMI-DVI conversion cable personal computer HDMI-DVI conversion cable should be with ferrite core. The following signals can be displayed: Format Resolution Refresh rate Format Resolution Refresh rate VGA SVGA XGA 640 x 480 800 x 600 1,024 x 768 60Hz 60Hz 60Hz WXGA 1,280 x 768 1,360 x 768 60Hz 60Hz Other formats or non-standard signals will not be displayed correctly. Note: • Please purchase the HDMI-DVI conversion cable that has a ferrite core. • The following operations may reduce noise. - Attach a ferrite core to the AC power cord of your PC. - Unplug the AC power cord and use the built-in battery of your PC. Cable Management Plug In the AC Power Cord Keep the cables through this holder to avoid tangle them. rear of this unit Make sure that the AC power cord must be plugged to an AC outlet after all the necessary connections are completed. rear of this unit 16 EN AC outlet AC power cord Caution: • Do not connect the AC power cord to a power supply outside the indicated voltage of this unit (AC 120V). Connecting the AC power cord to a power supply outside of this range may result in fire or electrical shocks. Note: • Each time you plugged in the AC power cord, any operations will not be performed for a few seconds. This is not a malfunction.
-
 1
1 -
2
-
3
-
4
-
5
-
6
-
7
-
8
-
9
-
10
-
 11
11 -
 12
12 -
 13
13 -
 14
14 -
 15
15 -
 16
16 -
 17
17 -
 18
18 -
 19
19 -
 20
20 -
 21
21 -
22
-
23
-
24
-
25
-
26
-
27
-
28
-
29
-
30
-
31
-
32
-
33
-
34
-
35
-
36
-
37
-
38
-
39
-
40
-
41
-
42
-
43
-
44
-
45
-
46
-
47
-
48
-
49
-
50
-
51
-
52
-
53
-
54
-
55
-
56
-
57
 |
 |