Magnavox DP170MW8B User manual, English (US) - Page 19
DISPLAY Setting, RGB RANGE: Default: NORMAL - reset
 |
UPC - 053818570944
View all Magnavox DP170MW8B manuals
Add to My Manuals
Save this manual to your list of manuals |
Page 19 highlights
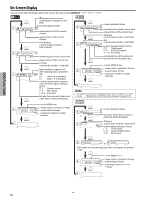
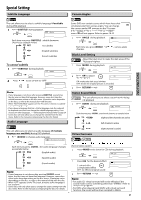
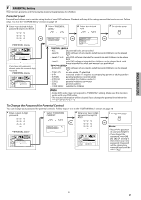
B DISPLAY Setting You can change the display functions. Follow steps 1 to 3 in the "CUSTOM Menu" section on page 18. 4 Select the desired item. 5 TV ASPECT: QUICK (Default: 4:3 LETTER BOX) See note on the right. or DISPLAY menu Select the TV ASPECT STILL MODE 4:3 LETTERBOX AUTO TV ASPECT 4:3 LETTER BOX 4:3 PAN & SCAN desired setting. OK PROGRESSIVE OFF 16:9 WIDE HDMI MODE 480p 16:9 SQUEEZE PROGRESSIVE MODE AUTO 1 FORMAT RGB or RGB RANGE NORMAL DISPLAY TV ASPECT 4:3 LETTER BOX STILL MODE AUTO PROGRESSIVE OFF HDMI MODE 480p OK PROGRESSIVE MODE AUTO1 FORMAT RGB RGB RANGE NORMAL page 20 OK STILL MODE: (Default: AUTO) See note on the right. TV ASPECT STILL MODE PROGRESSIVE HDMI MODE 4:3 LETTERBOX AUTO OFF 480p STILL MODE AUTO FIELD FRAME Select the desired setting. OK PROGRESSIVE MODE AUTO 1 or FORMAT RGB RGB RANGE NORMAL OK QUICK (Default: 480p) See note on the right. Select the TV ASPECT 4:3 LETTERBOX HDMI MODE 480p desired setting. STILL MODE AUTO 780p PROGRESSIVE OFF 1080i OK HDMI MODE 480p 1080p PROGRESSIVE MODE AUTO 1 or FORMAT RGB RGB RANGE NORMAL OK PROGRESSIVE MODE: (Default: AUTO1) See note on the right. Select the TV ASPECT STILL MODE PROGRESSIVE HDMI MODE PROGRESSIVE MODE 4:3 LETTERBOX AUTO OFF 480p AUTO 1 PROGRESSIVE MODE AUTO1 AUTO2 VIDEO desired setting. or FORMAT RGB OK RGB RANGE NORMAL OK FORMAT: (Default: RGB) See note on the right. TV ASPECT STILL MODE PROGRESSIVE HDMI MODE PROGRESSIVE MODE FORMAT RGB RANGE 4:3 LETTERBOX AUTO OFF 480p AUTO 1 RGB NORMAL 4:3 LETTERBOX AUTO OFF 480p AUTO1 YCbCr NORMAL OK RGB RANGE: (Default: NORMAL) See note on the right. TV ASPECT STILL MODE PROGRESSIVE HDMI MODE PROGRESSIVE MODE FORMAT RGB RANGE 4:3 LETTERBOX AUTO OFF 480p AUTO 1 RGB NORMAL OK 4:3 LETTERBOX AUTO OFF 480p AUTO1 RGB ENHANCED - 19 - 6 To exit the menu SETUP Note: TV ASPECT: • Select "4:3 LETTER BOX", so that black bars may appear on the top and bottom of the screen. • Select "4:3 PAN & SCAN" for a full height picture with both sides adjusted. • Select "16:9 WIDE" if a widescreen TV is connected to this unit. • Select "16:9 SQUEEZE" when the TV screen is too large horizontally at "16:9 WIDE" setting and when it is possible to adjust the screen size using the TV's controls. STILL MODE: • Select "AUTO" usually. • If you select "AUTO", it automat- ically selects the best resolution setting ("FRAME" or "FIELD") based on the data characteristics of the pictures. (default) • If you select "FIELD", the picture in the still mode will be stabilized. • If you select "FRAME", the picture in the still mode will be highly defined. • An individual picture on TV screen is called a "frame", which consists of two separate images called as "field". • Some pictures may be blurred at the "AUTO" setting in the still mode due to their data characteristics. HDMI MODE: • 480p: Video output from the HDMI OUT jack at 480p • 720p: Video output from the HDMI OUT jack at 720p • 1080i: Video output from the HDMI OUT jack at 1080i • 1080p: Video output from the HDMI OUT jack at 1080p • When the HDMI/DVI video can be output, the setting change can be done. • If the TV is not compatible with newly selected HDMI output mode, press and hold [PLAY B] on the front of the unit for more than 5 seconds to reset the setting to default. PROGRESSIVE MODE: • You can select a mode below for the progressive scan output. • AUTO1: mode suitable for images on the film material. • AUTO2: mode for images on the material of 30-frame film. • VIDEO: mode for video material. FORMAT: • Select an HDMI output mode between "YCbCr" and "RGB". • When the connected device is not compatible with YCbCr, HDMI signal is output as RGB regardless of the setting. • This setting is effective only when you use the HDMI connection. RGB RANGE: • Select a HDMI picture mode between "NORMAL" and "ENHANCED". • Select "ENHANCED" if the blackwhite contrast is not clear. • This setting is effective only for HDMI RGB output. EN DVD FUNCTIONS
-
 1
1 -
2
-
3
-
4
-
5
-
6
-
7
-
8
-
9
-
10
-
11
-
12
-
13
-
 14
14 -
 15
15 -
 16
16 -
 17
17 -
 18
18 -
 19
19 -
 20
20 -
 21
21 -
 22
22 -
 23
23 -
 24
24 -
25
-
26
-
27
-
28
 |
 |
