Magnavox MBP5210 Setup Manual - Page 1
Magnavox MBP5210 Manual
 |
View all Magnavox MBP5210 manuals
Add to My Manuals
Save this manual to your list of manuals |
Page 1 highlights
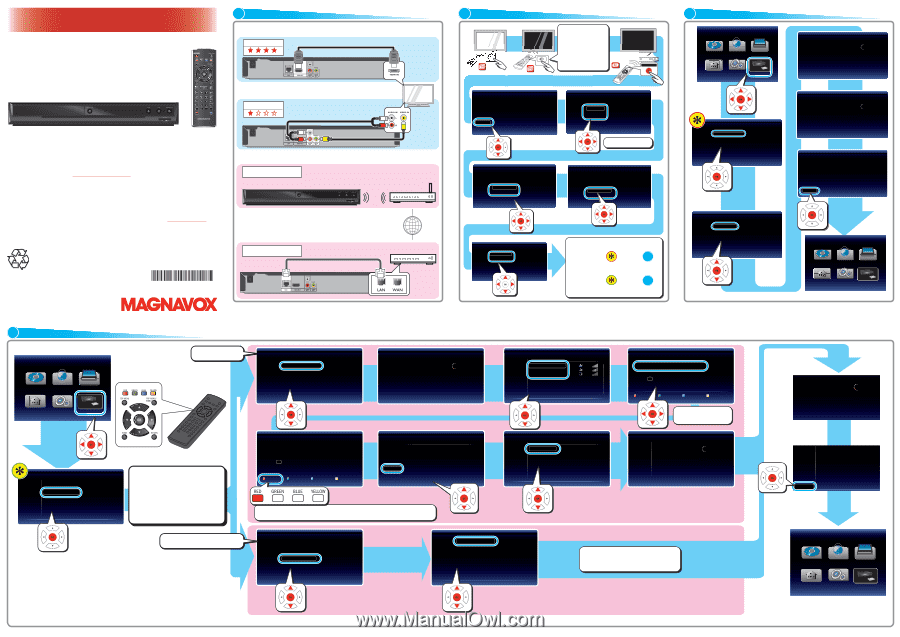
SETUP MANUAL 1 CONNECTIONS Connection to the TV HDMI Out HDMI cable (not supplied) See the Online Owner's Manual for details: www.MAGNAVOX.com Step 1 Please visit by web www.MAGNAVOX.com Step 2 Select Download. Step 3 Type in the Model # "MBP5210", and click "Search". Step 4 Select the Manual, and click on "Download". MBP5210 If you have any questions or issues with our product, please refer to the "TROUBLESHOOTING" section of this "SETUP MANUAL", or visit our website for the Online Owner's Manual at www.magnavox.com. If additional support is required please contact our Customer Service line at 1-800-605-8610. MAGNAVOX is a registered trademark of Philips Electronics North America Corporation and is used by Funai Electric Co. Ltd. and Funai Corporation, Inc. under license from Philips Electronics North America. For product recycling information, please visit - www.magnavox.com or Video & Audio Out Audio cable (supplied) Video cable (supplied) Wired and Wireless Connections Wireless Connection For a wireless router, use a router which supports IEEE 802.11 b/g/n. ("n" type is recommended for stable operation of the wireless network.) Wireless broadband router or Active Internet connection is required to your modem or broadband router. Please check with your Internet Service Provider (ISP) for further assistance. Internet Wired Connection LAN cable (not supplied) Modem / Router © 2011 Funai Electric Co., Ltd. Printed in China E5U20UD 1VMN31693 * 1 VMN 3 1 6 9 3 * See the Online Owner's Manual for details: www.MAGNAVOX.com 2 INITIAL SETUP Power Button AV/SOURCE Please locate the input/ video button on TV's remote control. The button may vary on the brand and model of the TV. Once you located the button, press until you see the Initial Setup menu on the screen. Please Wait... STANDBY/ON Initialization Welcome!! This unit is ready for initialization now. Please follow instructions to make correct settings. Then the settings are initialized. Next Cancel Quick Start Mode Would you like to set on the Quick start mode? The unit will set on quicker, but will consume more power in standby mode. On Off Back Language Please select your language for on-screen display. English Español Français Back Select your language. Back Automatically check for latest software Would you like to set on the Auto software update feature? When connected to the internet, the unit will automatically check for the latest software. On Off Network Selection Please select the connection method. Wired Wireless Cancel 1/7 If you select "Wired", please go to in step 3 . If you select "Wireless", please go to in step 4 . See the Online Owner's Manual for details: www.MAGNAVOX.com 3 WIRED SETUP 4% 4% Network Settings (Auto) Please wait for a while. State : Setting... Network Setup Network Selection Please select the connection method. Wired Wireless Cancel 1/7 Network Settings Please select the setting mode. Auto Manual Cancel 4/7 6/7 It may take a few minutes. Network Settings (Auto) Please wait for a while. State : Connecting... 6/7 It may take a few minutes. Network Settings (Auto) State : Pass Network connection succeeds. End 7/7 4% 4% Network Setup Enjoy network applications. See the Online Owner's Manual for details: www.MAGNAVOX.com 4 WIRELESS SETUP 4% 4% Network Setup "Auto Scan" Network Selection Please select the connection method. Wired Wireless Cancel 1/7 Confirm if your router is compatible with our "Easy Connect (WPS)" This is PBC (Push Button Configuration) button located on most routers. If the router does not have it, please use the "Auto Scan" setup. "Easy Connect (WPS)" If you have any questions or issues with your Internet connection, please contact your Internet service provider. For the network applications, please contact each service provider. Access Point Setting Please select the setting mode. Auto Scan Manual Easy Connect (WPS) Cancel 2/7 Access Point Setting (Auto Scan) Please wait for a while. State : Searching... 2/7 It may take a few minutes. Access Point Setting (Auto Scan) Please input the WEP/WPA Key with software keyboard. XXXXXXX 1 2 3 4 5 6 7 8 9 0 SP a b c d e f g h i j a/A/@ h l m n o p q r s t CLR u v w x y z Done Done Cancel Clear a/A/@ 3/7 Next Retry Cancel Access Point Setting (Auto Scan) Please confirm the setting. SSID : Access 1 Security : XXXXX WEP/WPA Key : XXXXXXX 3/7 RED :Accept the Pass Key entered. GREEN : Cancel the option. BLUE : Delete any character entered. YELLOW : Shift to other characters in the menu. Access Point Setting (Auto Scan) Please select the access point. Access 1 Access 2 Access 3 Retry Cancel 3/7 Network Settings Please select the setting mode. Auto Manual Cancel 4/7 Access Point Setting(Auto Scan) Please input the WEP/WPA Key with software keyboard. 1 2 3 4 5 6 7 8 9 0 SP a b c d e f g h i j a/A/@ h l m n o p q r s t CLR u v w x y z Done Done Cancel Clear a/A/@ 3/7 Please enter the security key of the wireless router. Network Settings (Auto) Please wait for a while. State : Setting... 6/7 It may take a few minutes. Please wait for a while. State : Connecting... It may take a few minutes. State : Pass Network connection succeeds. End Access Point Setting Please select the setting mode. Auto Scan Manual Easy Connect (WPS) Cancel 2/7 Access Point Setting(Easy Connect) Push Button Method Please push the PBC(push button configuration) on the wireless router and select 'Push Button Method' button on screen. Cancel PIN Code Method Please input the PIN number into the wireless router and select 'PIN Code Method' button on screen. PIN Code is : xxxxxxx 2/7 Please push the PBC (Push Button Configuration) on the wireless router. 4% 4% Network Setup Enjoy network applications. If you select "Manual" or "PIN Code Method", please see the Online Owner's Manual for details. See the Online Owner's Manual for details: www.MAGNAVOX.com
-
 1
1 -
 2
2
 |
 |