Magnavox MCR140 User Manual - Page 5
English - clock radio
 |
UPC - 609585109124
View all Magnavox MCR140 manuals
Add to My Manuals
Save this manual to your list of manuals |
Page 5 highlights
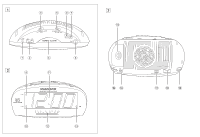
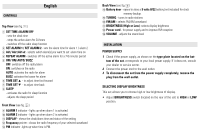
CONTROLS English Top View (see fig. 1 ) 1 SET TIME /ALARM OFF - sets the clock time - stops the active alarm for 24 hours - switches off the radio sleep function 2 SET ALARM 1 / SET ALARM 2 - sets the alarm time for alarm 1 / alarm 2 3 AL1/ AL2 /AL1+2 - selects which alarm(s) you want to set alarm time on 4 REPEAT ALARM - switches off the active alarm for a 7-8 minutes period 5 OFF/ ON/ AUTO/ BUZZ OFF: switches off the radio/alarm ON: switches on the radio AUTO: activates the radio for alarm BUZZ: activates the buzzer for alarm 6 TIME SET 3 - to adjust time fast forward 7 TIME SET 4 - to adjust time back 8 SLEEP - activates the radio for sleep function - adjusts the sleep period Front View (see fig. 2 ) 9 ALARM 1 indicator - lights up when alarm 1 is activated. 0 ALARM 2 indicator - lights up when alarm 2 is activated. ! DISPLAY - shows the clock/alarm time and status of the setting @ Frequency pointer - shows the radio frequency of your selected waveband # PM indicator -lights up when time is PM. Back View (see fig. 3 ) $ Battery door - opens to store a 9 volts 6F22 battery (not included) for clock memory backup. % TUNING - tunes to radio stations ^ FM/AM - selects FM/AM waveband & BRIGHTNESS (High or Low) -selects display brightness * Power cord - for power supply and to improve FM reception ( VOLUME - adjusts the sound level INSTALLATION POWER SUPPLY 1 Check if the power supply, as shown on the type plate located on the bot- tom of the set, corresponds to your local power supply. If it does not, consult your dealer or service center. 2 Connect the power cord to the wall outlet. 3 To disconnect the set from the power supply completely, remove the plug from the wall outlet. SELECTING DISPLAY BRIGHTNESS This set allows you to choose high or low brightness of display. • Adjust BRIGHTNESS switch (located on the rear of the set) to HIGH or LOW position.
-
 1
1 -
 2
2 -
 3
3 -
 4
4 -
 5
5 -
 6
6 -
 7
7 -
 8
8
 |
 |