Magnavox MCR230SL User Manual - Page 1
Magnavox MCR230SL - Portable Audio Manual
 |
View all Magnavox MCR230SL manuals
Add to My Manuals
Save this manual to your list of manuals |
Page 1 highlights
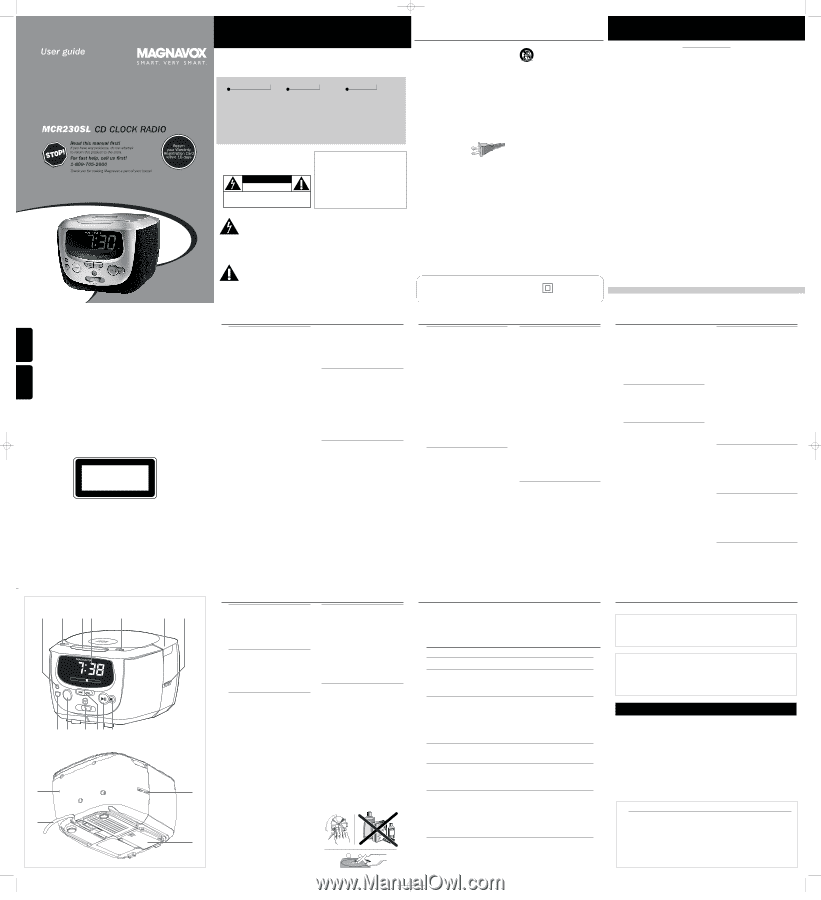
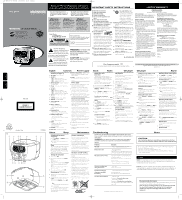
XP MCR 230/17 E+S 4x3 15-11-2002 13:23 Pagina 1 English Español T I MCR 230SL CLASS 1 LASER PRODUCT W Printed in China 1 1 2 34 5 R E P E AT ALARM PM AL1 SET TIME FM 88 93 AM 530 630 98 1000 104 1300 108 MHz 1700 kHz SLEEP AL POWER ARM RESE MIN HOUR AL2 ALARM RESET FM•AM•BUZZ•CD # @ ! 09 8 & % MPORTAN SEE WHY INSIDE T! Return your Warranty Registration card today to ensure you receive all the benefits you're entitled to. • Once your Magnavox purchase is registered, you're eligible to receive all the privileges of owning a Magnavox product. • So complete and return the Warranty Registration Card enclosed with your purchase at once. And take advantage of these important benefits. Warranty Verification Registering your product within 10 days confirms your right to maximum protection under the terms and conditions of your Magnavox warranty. Owner Confirmation Your completed Warranty Registration Card serves as verification of ownership in the event of product theft or loss. Model Registration Returning your Warranty Registration Card right away guarantees you'll receive all the information and special offers which you qualify for as the owner of your model. Know these safety symbols CAUTION RISK OF ELECTRIC SHOCK DO NOT OPEN CAUTION: TO REDUCE THE RISK OF ELECTRIC SHOCK, DO NOT REMOVE COVER (OR BACK). NO USER-SERVICEABLE PARTS INSIDE. REFER SERVICING TO QUALIFIED SERVICE PERSONNEL. For Customer Use Enter below the Serial No. which is located on the bottom of the cabinet. Retain this information for future reference. Model No Serial No This "bolt of lightning" indicates uninsulated material within your unit which may cause an electrical shock. For the safety of everyone in your household, please do not remove product covering. The "exclamation point" calls attention to features for which you should read the enclosed literature closely to prevent operating and maintenance problems. WARNING: TO PREVENT FIRE OR SHOCK HAZARD, DO NOT EXPOSE THIS EQUIPMENT TO RAIN OR MOISTURE. CAUTION: To prevent electric shock, match wide blade of plug to wide slot, and fully insert. IMPORTANT SAFETY INSTRUCTIONS LIMITED WARRANTY 1. Read these instructions. 2. Keep these instructions. 3. Heed all warnings. 4. Follow all instructions. 5. Do not use this apparatus near water. 6. Clean only with dry cloth. 7. Do not block any ventilation openings. Install in accordance with the manufacturer´s instructions. 8. Do not install near any heat sources such as radiators, heat registers, stoves, or other apparatus (including amplifiers) that produce heat. 9. Do not defeat the safety purpose of the polarized or AC Polarized Plug grounding-type plug. A polarized plug has two blades with one wider than the other. A grounding type plug has two blades and a third grounding prong.The wide blade or the third prong are provided for your safety. If the provided plug does not fit into your outlet, consult an electrician for replacement of the obsolete outlet. 10.Protect the power cord from being walked on or pinched, particularly at plugs, convenience receptacles, and the point where they exit from the apparatus. 11.Only use attachments/accessories specified by the manufacturer. 12. Use only with the cart, stand, tripod, bracket, or table specified by the manufacturer or sold with the apparatus. When a cart is used, use caution when moving the cart/apparatus combination to avoid injury from tip-over. 13. Unplug this apparatus during lightning storms or when unused for long periods of time. 14. Refer all servicing to qualified service personnel. Servicing is required when the apparatus has been damaged in any way, such as power-supply cord or plug is damaged, liquid has been spilled or objects have fallen into the apparatus, the apparatus has been exposed to rain or moisture, does not operate normally, or has been dropped. 15.Battery usage CAUTION - To prevent battery leakage which may result in bodily injury, property damage, or damage to the unit: G Install all batteries correctly, + and - as marked on the unit. G Do not mix batteries (old and new or carbon and alkaline, etc.). G Remove batteries when the unit is not used for a long time. EL 6475-E004: 02/8 PORTABLE AUDIO 90 Days Free Exchange This product must be carried in for an exchange. WHO IS COVERED? You must have proof of purchase to exchange the product. A sales receipt or other document showing that you purchased the product is considered proof of purchase. Attach it to this owner's manual and keep both nearby. WHAT IS COVERED? Warranty coverage begins the day you buy your product. For 90 days thereafter, a defective or inoperative product will be replaced with a new, renewed or comparable product at no charge to you.A replacement product is covered only for the original warranty period.When the warranty on the original product expires, the warranty on the replacement product also expires. BEFORE REQUESTING EXCHANGE... Please check your owner's manual before requesting an exchange. Adjustments of the controls discussed there may save you a trip. EXCHANGING A PRODUCT IN U.S.A., PUERTO RICO, OR U.S.VIRGIN ISLANDS... Contact 1-800-705-2000 to arrange an exchange. Or, ship the product, insured and freight prepaid, and with proof of purchase enclosed, to the address listed below. Magnavox Exchange Program Suite A 406 North Irish Street Greeneville TN 37745 WHAT IS EXCLUDED? Your warranty does not cover: • labor charges for installation or setup of the product, adjustment of customer controls on the product, and installation or repair of antenna systems outside of the product. • product repair and/or part replacement because of misuse, accident, unauthorized repair or other cause not within the control of Magnavox. • reception problems caused by signal conditions or cable or antenna systems outside the unit. • a product that requires modification or adaptation to enable it to operate in any country other than the country for which it was designed, manufactured, approved and/or authorized, or repair of products damaged by these modifications. • incidental or consequential damages resulting from the product. (Some states do not allow the exclusion of incidental or consequential damages, so the above exclusion may not apply to you.This includes, but is not limited to, prerecorded material, whether copyrighted or not copyrighted.) • a product used for commercial or institutional purposes. WHERE IS EXCHANGE AVAILABLE? You may exchange the product in all countries where the product is officially distributed by Magnavox. In countries where Magnavox does not distribute the product, the local Magnavox service organization will attempt to provide a replacement product (although there may be a delay if the appropriate product is not readily available). (In U.S.A., Puerto Rico, and U.S.Virgin Islands, all implied warranties, including implied warranties of merchantability and fitness for a particular purpose, are limited in duration to the duration of this express warranty. But, because some states do not allow limitations on how long an implied warranty may last, this limitation may not apply to you.) EXCHANGING A PRODUCT IN CANADA... Please contact Magnavox at: 1-800-661-6162 (French Speaking) 1-800-705-2000 (English or Spanish Speaking) (In Canada, this warranty is given in lieu of all other warranties. No other warranties are expressed or implied, including any implied warranties of merchantability or fitness for a particular purpose. Magnavox is not liable under any circumstances for any direct, indirect, special, incidental or consequential damages, howsoever incurred, even if notified of the possibility of such damages.) REMEMBER... Please record below the model and serial numbers found on the product. Also, please fill out and mail your warranty registration card promptly. It will be easier for us to notify you if necessary. MODEL SERIAL Class II equipment symbol This symbol indicates that the unit has a double insulation system. This warranty gives you specific legal rights.You may have other rights which vary from state/province to state/province. Magnavox, P.O. Box 520890, Miami, FL 33152, USA, (402) 536-4171 EL6516T001 / 5-02 CMM/0243 67 $ ^ English Controls Power supply Controls (see figure 1) 1 SET TIME - adjusts clock time 2 ALARM 1 - ON - switches on ALARM 1 - SET - adjusts alarm time of ALARM 1 - OFF - switches ALARM 1 off 3 REPEAT ALARM - switches off alarm for a 6 minute period 4 Display - shows the clock or alarm time or CD tracks 5 ALARM 2 - ON - switches on ALARM 2 - SET - adjusts alarm time of ALARM 2 - OFF - switches ALARM 2 off completely 6 CD Door - lift here to open / close CD door 7 TUNING - tunes to a radio station 8 STOP 9 - stops CD playback 9 PLAY / PAUSE ); - starts / pauses CD playback 10 MIN ∞ / HOUR § - adjusts clock / alarm time - skips CD tracks / searches for a particular passage 11 FM•AM•BUZ•CD - selects FM, AM or CD sound source - selects radio, buzzer or CD alarm mode 12 POWER/ ALARM RESET - switch the set ON / OFF - stops the active buzzer, radio or CD alarm for 24 hours - switch off the sleep timer 13 SLEEP - switches on radio, CD for timer mode - adjusts timer options for radio / CD playback 14 VOLUME - adjusts sound level 15 Power cord - connects to wall outlet 16 Battery compartment - insert a 9 volt battery, type 6F22 (not supplied) for clock memory backup 17 RESET - use ballpointpen to press button if the set/display does not react on any of the controls Power supply 1 Check if the power voltage as shown on the type plate on the base of the set corresponds to your local power supply. 2 Connect the power plug to the wall outlet. The power supply is now switched on and the numbers on the display shows 12:00. You will need to set the correct time. 3 To disconnect the set from the power supply completely, unplug from the wall outlet. Clock memory backup When a power failure occurs, the complete clock radio will be switched off. When the power supply returns, the time display shows 12:00 and you will need to reset the correct time on the clock. To retain the clock time and the set alarm time(s) in the event of an AC power failure or disconnection, insert a 9 volt battery, type 6F22 (not supplied) into the battery compartment: this will act as a clock memory backup. However, the time will not be illuminated on the clock display. Operation of the alarms, FM/ AM radio and CD are also excluded. As soon as the power supply returns, the display will indicate the correct time. 1 Connect the power plug to the wall outlet. 2 Insert the battery into the battery compar tment. • Replace the battery once a year, or as often as necessary. Alarm Sleep Maintenance Switching off the alarm General maintenance completely • If you do not intend to use the CD clock Push the ALARM 1 or ALARM 2 switches radio for a long time, withdraw the power to the OFF position. cord from the wall outlet. ➜ The alarm indicator will disappear from the display. • Do not expose the set or CDs to humidity, rain, sand or excessive heat caused by heating equipment or direct sunlight. Sleep The CD clock radio has a built-in sleep timer, • To clean the set, use a soft dry cloth. Do not use any cleaning agents containing alcohol, which enables the set to be automatically switched off during radio or CD playback ammonia, benzene or abrasives as these may harm the housing. after a set period of time.There are 3 sleep times: 90, 60 or 30 minutes. CD player and CD handling Setting the sleep time 1 Set the unit to OFF. 2 Set your timer by pressing on the SLEEP button. ➜ Display shows "--". 3 Select your timer option by pressing SLEEP once or more until the desired option is shown. ➜ Display shows 90 (minutes) -> 60 -> 30 -> -- -> 90... 4 After a few seconds, the set turns ON. ➜ For CD mode is selected, press PLAY/PAUSE 2; to start playback. 5 The set will turn off automatically after the selected time. 6 To cancel the timer function, either press the SLEEP button one or more until "--" appears or press POWER to switch OFF. • The lens of the CD player should never be touched! • Sudden changes in the surrounding temperature can cause condensation to form and the lens of your CD player to cloud over. Playing a CD is then not possible. Do not attempt to clean the lens but leave the set in a warm environment until the moisture evaporates. • Always shut the CD door to keep the CD compartment dust-free.To clean, dust the compartment with a soft dry cloth. • To clean the CD, wipe in a straight line from the center towards the edge using a soft, lintfree cloth. Do not use cleaning agents as they may damage the disc. • Never write on a CD or attach any stickers to it. Note: - The sleep function does not affect your alarm time setting(s). - If you have an alarm set in the radio or CD mode, make sure you have adjusted the volume loud enough to wake you up before you X set the sleep time. Clock Radio CD player Setting the clock CD playback Clock display The time is shown and the display also indicates whether you have switched on the alarm(s), and these indicators will light up respectively next to ALARM 1 and ALARM 2 This CD clock radio can play only audio discs including CD-recordables. Do not try to play a CD-ROM, CD-RW, CDI,VCD, DVD or computer CD. on the display. 1 Open the CD door. The time is displayed using 12 hours clock (PM indicator lights up = PM, off = AM) 2 Insert a CD with printed side facing up, and close the CD door. 1 Press and hold down the SET TIME button. 3 Press POWER to switch ON. 2 Simultaneously press and hold down ➜ POWER button lights up. HOUR § or MIN ∞ to adjust the hours or minutes. 4 Select CD by using the FM•AM•BUZ•CD selector. 3 Release HOUR § or MIN ∞ when you have reached the desired setting. 5 Press PLAY/PAUSE 2; to start playback. 6 Adjust the sound with the VOLUME Standby power consumption (clock mode 4.5W control. 7 To interrupt, press 2;. 8 Press 2; again to resume playback. Radio 9 Press STOP 9 to stop playback. 1 Press POWER to switch ON. ➜ POWER button lights up. 10 Press POWER to switch off. ➜ POWER button light will turn off. 2 Use FM•AM•BUZ•CD to select FM or AM Note: Press POWER will also stop CD playback. waveband. 3 Use TUNING (on the side panel) to find your station. Selecting a different track during playback 4 Adjust the sound with the VOLUME control. • Press § once or more to skip to the next track(s). To improve reception: FM: Extend and adjust power cord for • Press ∞ once and playback will return to the beginning of the current track. optimum reception. • Press ∞ more than once to skip to previous AM: Uses a built-in antenna. Direct the tracks. antenna by adjusting the position of your The track number appears briefly in the unit. display when you press ∞, § to skip tracks. 5 Press POWER to switch OFF. ➜ POWER button light will turn off. Troubleshooting If a fault occurs, first check the points listed below before taking the set for repair. If you are unable to remedy a problem by following these hints, consult your dealer or service center. WARNING: Do not open the set, as there is a risk of electric shock. Under no circumstances should you try to repair the set yourself, as this will invalidate the warranty. Problem No sound Solution - Volume not adjusted. Adjust the VOLUME Buttons fail to react - Electrostatic discharge. Press RESET button or disconnect the set from the power supply and reconnect the set after 5 minutes. CD playback does not work - CD badly scratched or dirty. Replace/clean CD. - Laser lens steamed up. Wait until lens has adjusted to room temperature. - Laser lens dirty. Clean lens by playing a CD lens cleaning disc. - CD-R is non-finalized. Use a finalized CD-R. Occasional cracking sound during FM broadcast - Weak signal. Extend power cord fully. Continuous cracking/hiss disturbances during AM broadcasting - Electrical interference from TVs, computers, fluorescent lamps, etc. Move set away from other electrical equipment. The alarm does not function - Alarm set not set. See section on Setting the alarm time. - Alarm mode not selected. See section on Selecting alarm mode options. - No CD is inserted as CD is selected as Alarm mode. Insert a CD. The typeplate is located on the bottom of the set. CD player Alarm Finding a passage within a track 1 During playback, press and hold down ∞ or §. ➜ The CD is played at high speed and low volume. 2 Release ∞ or § when you recognize the passage you want. ➜ Normal CD playback resumes. Using the alarm option General Two different alarm times ALARM 1 and ALARM 2 can be set in the CD, radio or buzzer modes. Setting the alarm time 1 Push the ALARM 1 or ALARM 2 switch to SET. ➜ Display shows Alarm 1 or Alarm 2 time and flashes. Note: Do not intend to push both ALARM to SET at the same time. 2 Press and hold down HOUR § or MIN ∞ to fast adjust both the hours and minutes settings. 3 Release HOUR § or MIN ∞ when you have reached the desired setting. ➜ If you need to adjust the time slowly, minute by minute, press and release MIN ∞ / HOUR § repeatedly. 4 Push the ALARM 1 or ALARM 2 switch to OFF. ➜ The clock display goes back to clock time. To review your set alarm time, slide the ALARM 1 or ALARM 2 switches to SET. Selecting alarm mode options 1. Press POWER to switch OFF. 2. Select your choice of alarm mode: either FM, AM, CD or buzzer by using the FM/AM/BUZZER/CD source selector. 3. Push the ALARM 1 or ALARM 2 switch to ON. ➜ The respective ALARM indicator lights up on the display. • At the set alarm time, the radio, CD or buzzer will switch on and it will automatically switch off around 60 minutes later. Note: - If CD alarm mode is selected, a CD must be inserted. CD will play from first track. - If you have chosen Radio or CD as sleep mode, this will then be your alarm mode. Switching off the alarm There are three ways of switching off the alarm. Unless you choose to cancel the alarm completely, the DAILY ALARM RESET option will be automatically selected after around 60 minutes from the time your alarm time first goes off. Daily alarm reset If you want the alarm mode to be stopped immediately but also wish to repeat the alarm call at the same time for the following day: ➜ Press POWER/ALARM RESET during the alarm call. Repeat alarm This will repeat your alarm call at 6-minute intervals. 1 During the alarm call, press REPEAT ALARM. 2 Repeat as desired up to an hour. Notes CAUTION Use of controls or adjustments or performance of procedures other than herein may result in hazardous radiation exposure or other unsafe operation. The set complies with the FCC-Rules, Part 15 and with 21 CFR 1040.10. Operation is subject to the following two conditions: 1.This device may not cause harmful interference, and 2.This device must accept any interference received, including interference that may cause undesired operation. Canada English: This digital apparatus does not exceed the Class B limits for radio noise emissions from digital apparatus as set out in the Radio Interference Regulations of the Canadian Department of Communications. Français: Cet appareil numérique n'émet pas de bruits radioélectriques dépassant les limites applicables aux appareils numériques de Classe B prescrites dans le Règlement sur le Brouillage Radioélectrique édicté par le Ministère des Communications du Canada. Environmental information All unnecessary packaging material has been omitted.The packaging can be easily separated into two materials: cardboard and paper pulp. Your set consists of materials which can be recycled if disassembled by a specialized company. Please observe the local regulations regarding the disposal of packaging, dead batteries and old equipment.
-
 1
1
 |
 |