Magnavox US2-MANT901 User manual, English (US) - Page 3

Included with Antenna, Safety Instructions, Assembly

Page 3 highlights

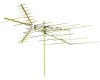
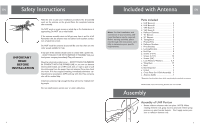
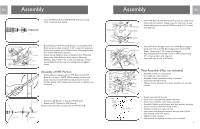
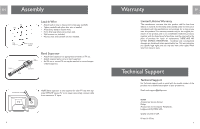
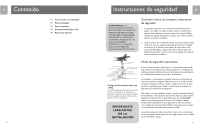
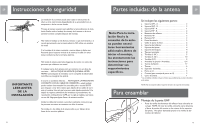
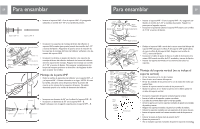
EN Safety Instructions IMPORTANT READ BEFORE INSTALLATION Take the time to plan your installation procedure. Do all assembly work on the antenna on the ground. Raise the completed antenna after assembly. Do NOT work on a wet, snowy or windy day or if a thunderstorm is approaching. Do NOT use a metal ladder. If the antenna assembly starts to fall, get away from it and let it fall. Remember that the antenna mast and cable are all excellent conductors of electrical current. Do NOT install the antenna by yourself. Be sure that there are two other people available for help. If any part of the antenna should come in contact with a power line . . . DON'T TOUCH IT OR TRY TO REMOVE IT YOURSELF. Call your local power company immediately.They will remove it. Should an electrical accident occur . . . DON'TTOUCHTHE PERSON IN CONTACT WITH THE POWER LINE, or you too can become electrocuted. Instead, use a DRY board, stick, or rope to push or pull the victim away from the power lines and antenna. Once clear, check the victim. If he has stopped breathing, immediately administer cardiopulmonary resuscitation (CPR) and stay with him. Have someone else call for medical help. Install wire antennas high enough that they will not be "walked into" by people. Do not install antenna wire(s) over or under utility lines. 4 Included with Antenna EN Note: For final installation and connection of your antenna, additional hardware may be required. Before starting assembly, please read through the instructions carefully to determine your specific requirements. Parts included: a. UHF Boom-A 2 b. UHF Boom-B 2 c. VHF Boom-A 1 d. VHF Boom-B 2 e. Reflector Elements 2 f. 46˝ Element 2 g. 50˝ Element 2 h. Tubing Brace 2 j. Phasing Wire 2 k. Reflector Brackets 2 l. Pivot Brackets 4 n. Locking Brackets 4 p. End Caps 8 q. Screws (1-3/4 5 r. Screws (1-1/2 10 s. Screws (3/4 2 t. Lock Washers/ Washers 6, 4 u. Wing-Nuts 17 v. Nuts 6 w. Band Separator 1 x. U-Bolt 3 y. Cross Piece (for U-Bolt Assembly) 3 z. Antenna Saddle 1 *Quantities listed include those which may already be attached to antenna NOTE: Cable, mast and mounting brackets are not included. Assembly Assembly of UHF Portion • Rotate reflector element rods into place. NOTE: When rotating element rods, grasp close to pivot and relieve spring pressure on pivot bracket detents. Don't apply excess pressure to reflector element rods. 5

  • 1
  • 2
  • 3
  • 4
  • 5
  • 6
  • 7
  • 8
  • 9
  • 10
  • 11
  • 12
  • 13
  • 14
  • 15

5
EN
Parts included:
a.
UHF Boom-A . . . . . . . . . . . . . . . . .
2
b.
UHF Boom-B . . . . . . . . . . . . . . . . .
2
c.
VHF Boom-A . . . . . . . . . . . . . . . . .
1
d.
VHF Boom-B
. . . . . . . . . . . . . . . . .
2
e.
Reflector Elements . . . . . . . . . . . . .
2
f.
46˝ Element
. . . . . . . . . . . . . . . . . .
2
g.
50˝ Element
. . . . . . . . . . . . . . . . . .
2
h.
Tubing Brace . . . . . . . . . . . . . . . . . .
2
j.
Phasing Wire . . . . . . . . . . . . . . . . . .
2
k.
Reflector Brackets . . . . . . . . . . . . .
2
l.
Pivot Brackets
. . . . . . . . . . . . . . .
4
n.
Locking Brackets . . . . . . . . . . . . . . .
4
p.
End Caps . . . . . . . . . . . . . . . . . . . . .
8
q.
Screws (1-3/4˝) . . . . . . . . . . . . . . . .
5
r.
Screws (1-1/2˝) . . . . . . . . . . . . . . .
10
s.
Screws (3/4˝)
. . . . . . . . . . . . . . . . .
2
t.
Lock Washers/ Washers . . . . . . .
6, 4
u.
Wing-Nuts
. . . . . . . . . . . . . . . . . .
17
v.
Nuts
. . . . . . . . . . . . . . . . . . . . . . . .
6
w. Band Separator . . . . . . . . . . . . . . . .
1
x.
U-Bolt . . . . . . . . . . . . . . . . . . . . . . .
3
y.
Cross Piece (for U-Bolt Assembly)
3
z.
Antenna Saddle
. . . . . . . . . . . . . . . . 1
*Quantities listed include those which may already be attached to antenna
NOTE: Cable, mast and mounting brackets are not included.
Assembly of UHF Portion
Rotate reflector element rods into place.
NOTE: When
rotating element rods, grasp close to pivot and relieve spring
pressure on pivot bracket detents.
Don’t apply excess pres-
sure to reflector element rods.
Included with Antenna
4
EN
Safety Instructions
Take the time to plan your installation procedure. Do all assembly
work on the antenna on the ground. Raise the completed antenna
after assembly.
Do NOT work on a wet,snowy or windy day or if a thunderstorm is
approaching.Do NOT use a metal ladder.
If the antenna assembly starts to fall, get away from it and let it fall.
Remember that the antenna mast and cable are all excellent conduc-
tors of electrical current.
Do NOT install the antenna by yourself. Be sure that there are two
other people available for help.
If any part of the antenna should come in contact with a power line .
. . DON'T TOUCH IT OR TRY TO REMOVE IT YOURSELF. Call your
local power company immediately.They will remove it.
Should an electrical accident occur . . . DON'T TOUCH THE PERSON
IN CONTACT WITH THE POWER LINE, or you too can become
electrocuted. Instead, use a DRY board, stick, or rope to push or pull
the victim away from the power lines and antenna. Once clear, check
the victim. If he has stopped breathing, immediately administer car-
diopulmonary resuscitation (CPR) and stay with him. Have someone
else call for medical help.
Install wire antennas high enough that they will not be "walked into"
by people.
Do not install antenna wire(s) over or under utility lines.
Assembly
IMPORTANT
READ
BEFORE
INSTALLATION
Note:
For final installation and
connection of your antenna, addi-
tional hardware may be required.
Before starting assembly, please
read through the instructions care-
fully to determine your specific
requirements.