Magnavox ZV427MG9 User manual, English (US) - Page 29
which your external tuner is, connected, then press - dvd recorder / vcr
 |
UPC - 053818570722
View all Magnavox ZV427MG9 manuals
Add to My Manuals
Save this manual to your list of manuals |
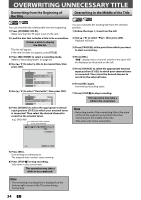
Page 29 highlights
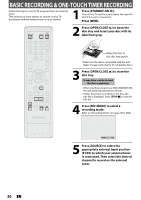
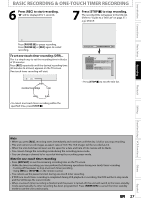
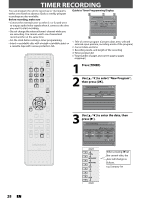
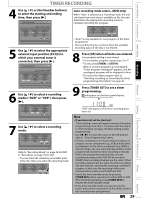
TIMER RECORDING Introduction Connections Basic Setup Recording Playback 4 Use [K / L] or [the Number buttons] to enter the starting and ending time, then press [B]. Timer Programming Date Date JAN/02 E1/E2 E1 TUE JAN/01 11:00AM Start End NewSPtraorgt ram 12 : 00AM REC To DVD E1/E2 End - - : - Mode SP SP 2 : 00 1/1 5 Use [K / L] to select the appropriate external input position (E1/E2) to which your external tuner is connected, then press [B]. Timer Programming Date Date JAN/02 E1/E2 E1 TUE JAN/01 11:00AM Start End NewSPtraorgt ram 12 : 00AM REC To DVD E1/E2 End 1 : 00AM Mode SP SP 1 : 00 Auto recording mode select...(DVD only) When "Auto" is selected as a recording mode, the unit calculates how much time is available on the disc and determines the appropriate recording mode to complete recording the program. Date JAN/02 E1/E2 E1 Start 12 : 00AM REC To DVD End 1 : 00AM Mode Auto Auto 0 : 00 • "Auto" is only available for one program in the timer program list. • The recording may be cut short when the available recording space of the disc is too limited. 8 Press [OK] when all items are entered. Your program setting is now stored. • To set another program, repeat steps 2 to 7. • To exit, press [TIMER] or [SETUP]. • When 2 or more programs are overlapped, "Timer program overlapped" appears, and the overlapped program will be displayed in blue. • To correct the timer program refer to "Checking, canceling, or correcting the timer programming information" on page 30. 1/1 6 Use [K / L] to select a recording media ("DVD" or "VCR"), then press [B]. Date Date JAN/02 E1/E2 E1 Start End NewSPtraorgt ram 12 : 00AM REC To E1/E2 End 1 : 00AM Mode DVD SP SP 1 : 00 1/1 7 Use [K / L] to select a recording mode. Date Date JAN/02 E1/E2 E1 Start End NewSPtraorgt ram 12 : 00AM REC To DVD E1/E2 End 1 : 00AM Mode SP SP 1 : 00 1/1 Refer to "Recording Mode" on page 24 for DVD or "Recording" on page 79 for VCR. • You can check the remaining recordable space of the disc when you select the recording mode. Date JAN/02 E1/E2 E1 Start 12 : 00AM REC To DVD End 1 : 00AM Mode SP SP 1 : 00 9 Press [TIMER SET] to set a timer programming. will appear on the front panel display. BS CS DR CD HDD DVD "VCR" will appear if VCR timer recording have been set. Note • If you have not set the clock yet: "Clock Setting" menu will appear instead of the timer programming list at step 1. Continue with the step 4 in "Clock Setting" on page 23 before setting a timer programming. • Use [s / B] to move the cursor to the left and the right in "Timer Programming" menu. • If a basic recording or one-touch timer recording is in progress on one component (e.g., VCR) and the timer recording set for the other component (e.g., DVD) is about to begin, the unit automatically switches to the programmed channel for timer recording 2 minutes before the programmed starting time, and the recording in progress (for VCR) will be canceled UNLESS their recording channels are the same. If their recording channels are the same, the timer recording will start without canceling the recording currently in progress. In this case, the recording of the same channel will be made on both DVD and VCR. • Cancel the timer-standby mode by pressing [TIMER SET] before operation for either DVD or VCR. When finished operating, press [TIMER SET] to resume the timer-standby mode. • In the timer-standby mode, you can turn on the power and use the component (VCR or DVD) which is not currently timer-programmed. EN 29 Editing Function Setup VCR Functions Others Español
-
 1
1 -
2
-
3
-
4
-
5
-
6
-
7
-
8
-
9
-
10
-
11
-
12
-
13
-
14
-
15
-
16
-
17
-
18
-
19
-
20
-
21
-
22
-
23
-
 24
24 -
 25
25 -
 26
26 -
 27
27 -
 28
28 -
 29
29 -
 30
30 -
 31
31 -
 32
32 -
 33
33 -
 34
34 -
35
-
36
-
37
-
38
-
39
-
40
-
41
-
42
-
43
-
44
-
45
-
46
-
47
-
48
-
49
-
50
-
51
-
52
-
53
-
54
-
55
-
56
-
57
-
58
-
59
-
60
-
61
-
62
-
63
-
64
-
65
-
66
-
67
-
68
-
69
-
70
-
71
-
72
-
73
-
74
-
75
-
76
-
77
-
78
-
79
-
80
-
81
-
82
-
83
-
84
-
85
-
86
-
87
-
88
-
89
-
90
-
91
-
92
 |
 |
