Makita 9924DB Owners Manual - Page 6
Functional, Description, Assembly - belts
 |
View all Makita 9924DB manuals
Add to My Manuals
Save this manual to your list of manuals |
Page 6 highlights
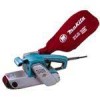
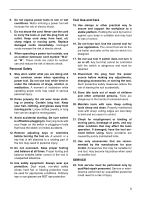
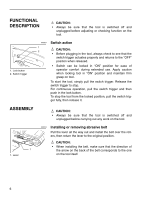
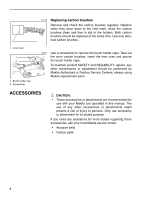
FUNCTIONAL DESCRIPTION CAUTION: • Always be sure that the tool is switched off and unplugged before adjusting or checking function on the tool. 1. Lock button 2. Switch trigger 003367 1 2 Switch action CAUTION: • Before plugging in the tool, always check to see that the switch trigger actuates properly and returns to the "OFF" position when released. • Switch can be locked in "ON" position for ease of operator comfort during extended use. Apply caution when locking tool in "ON" position and maintain firm grasp on tool. To start the tool, simply pull the switch trigger. Release the switch trigger to stop. For continuous operation, pull the switch trigger and then push in the lock button. To stop the tool from the locked position, pull the switch trigger fully, then release it. ASSEMBLY CAUTION: • Always be sure that the tool is switched off and unplugged before carrying out any work on the tool. 1. Lever 003374 Installing or removing abrasive belt Pull the lever all the way out and install the belt over the rollers, then return the lever to the original position. CAUTION: • When installing the belt, make sure that the direction of 1 the arrow on the back of the belt corresponds to the one on the tool itself. 6
-
 1
1 -
 2
2 -
 3
3 -
 4
4 -
 5
5 -
 6
6 -
 7
7 -
 8
8 -
 9
9 -
 10
10 -
 11
11 -
 12
12
 |
 |