Makita BGA452 Owners Manual - Page 5
Assembly - case
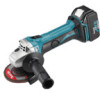 |
View all Makita BGA452 manuals
Add to My Manuals
Save this manual to your list of manuals |
Page 5 highlights
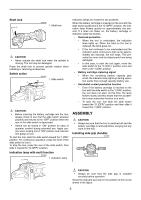
Shaft lock 1 007216 1. Shaft lock CAUTION: • Never actuate the shaft lock when the spindle is moving. The tool may be damaged. Press the shaft lock to prevent spindle rotation when installing or removing accessories. Switch action 007217 1. Slide switch 1 CAUTION: • Before inserting the battery cartridge into the tool, always check to see that the slide switch actuates properly and returns to the "OFF" position when the rear of the slide switch is depressed. • Switch can be locked in "ON" position for ease of operator comfort during extended use. Apply caution when locking tool in "ON" position and maintain firm grasp on tool. To start the tool, slide the slide switch toward the "I (ON)" position. For continuous operation, press the front of the slide switch to lock it. To stop the tool, press the rear of the slide switch, then slide it toward the "O (OFF)" position. Indication lamp with multi function 007224 1. Indication lamp 1 Indication lamps are located in two positions. When the battery cartridge is inserted on the tool with the slide switch positioned in the "O (OFF)" position, the indication lamp flickers quickly for approximately one second. If it does not flicker so, the battery cartridge or indication lamp has broken. - Overload protection - When the tool is overloaded, the indication lamp lights up. When the load on the tool is reduced, the lamp goes out. - If the tool continues to be overloaded and the indication lamp continues to light up for approximately two seconds, the tool stops. This prevents the motor and its related parts from being damaged. - In this case, to start the tool again, move the slide switch to the "O (OFF)" position once and then to the "I (ON)" position. - Battery cartridge replacing signal - When the remaining battery capacity gets small, the indicator lamp lights up during operation earlier than enough capacity battery use. - Accidental re-start preventive function - Even if the battery cartridge is inserted on the tool with the slide switch in the "I (ON)" position, the tool does not start. At this time, the lamp flickers slowly and this shows that the accidental re-start preventive function is at work. - To start the tool, first slide the slide switch toward the "O (OFF)" position and then slide it toward the "I (ON)" position. ASSEMBLY CAUTION: • Always be sure that the tool is switched off and the battery cartridge is removed before carrying out any work on the tool. Installing side grip (handle) 007225 CAUTION: • Always be sure that the side grip is installed securely before operation. Screw the side grip securely on the position of the tool as shown in the figure. 5
-
 1
1 -
 2
2 -
 3
3 -
 4
4 -
 5
5 -
 6
6 -
 7
7 -
 8
8 -
 9
9 -
 10
10 -
 11
11 -
12
-
13
-
14
-
15
-
16
-
17
-
18
-
19
-
20
-
21
-
22
-
23
-
24
-
25
-
26
-
27
-
28
-
29
-
30
-
31
-
32
-
33
-
34
-
35
-
36
 |
 |
