Makita CT233R SH02 Instruction Manual - Page 7
Indicating the remaining battery, capacity, Adjusting depth of cut, Bevel cutting, Sighting
 |
View all Makita CT233R manuals
Add to My Manuals
Save this manual to your list of manuals |
Page 7 highlights
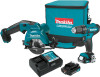
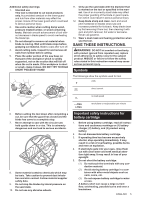
Indicating the remaining battery capacity Only for battery cartridges with "B" at the end of the model number move the base up or down. At the desired depth of cut, secure the base by tightening the clamping screw. For cleaner, safer cuts, set cut depth so that no more than one blade tooth projects below workpiece. Using proper cut depth helps to reduce potential for dangerous KICKBACKS which can cause personal injury. Bevel cutting 1 1 2 2 1. Indicator lamps 2. Check button Press the check button on the battery cartridge to indicate the remaining battery capacity. The indicator lamps light up for few seconds. Indicator lamps Remaining capacity Lighted Off 75% to 100% 1. Clamping screw 2. Bevel scale plate Loosen the clamping screw on the bevel scale plate on the front of the base. Set for the desired angle (0° - 45°) by tilting accordingly, then tighten the clamping screw securely. Sighting 50% to 75% 25% to 50% 0% to 25% B 1 A NOTE: Depending on the conditions of use and the ambient temperature, the indication may differ slightly from the actual capacity. Adjusting depth of cut 2 1 1. Cutting line For straight cuts, align the A position on the front of the base with your cutting line. For 45° bevel cuts, align the B position with it. 1. Clamping screw 2. Depth guide CAUTION: After adjusting the depth of cut, always tighten the clamping screw securely. Loosen the clamping screw on the depth guide and ENGLISH 7
-
 1
1 -
 2
2 -
 3
3 -
 4
4 -
 5
5 -
 6
6 -
 7
7 -
 8
8 -
 9
9 -
 10
10 -
 11
11 -
 12
12 -
13
-
14
-
15
-
16
-
17
-
18
-
19
-
20
-
21
-
22
-
23
-
24
-
25
-
26
-
27
-
28
-
29
-
30
-
31
-
32
-
33
-
34
-
35
-
36
 |
 |
