Makita DML811 DML811 Instruction Manual - Page 8
Operation, Maintenance, Optional Accessories - work light
 |
View all Makita DML811 manuals
Add to My Manuals
Save this manual to your list of manuals |
Page 8 highlights
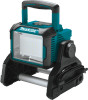
CAUTION: • Insert the female plug into the appliance first completely, then connect the male plug to an outlet. • Always close the socket cover firmly when the power cord is not plugged. NOTE: The AC power does not charge the battery inserted to the appliance. NOTE: Even operating in DC power, the appliance automatically changes to AC power when the power cord is plugged in. Organizing the power cord: Coil power cord on stand tightly, then clip end of the cord by using fastener attached. (Fig. 5) Turning on the light and brightness mode selection (Fig. 6) 1. Switch : Press the switch once, the light turns on (At the same brightness mode as the last setting). Press the switch again, the light turns off. 2. Brightness mode selection: Brightness sequence is : High mode / Mid mode / Low mode / High mode for each press when the light is on. Battery protection system (Fig. 7) The appliance is equipped with a battery protection system to extend battery life. When the battery becomes low, the LED lights go out except one LED as illustrated. Then approximately five to ten minutes later, the system automatically cuts off power. OPERATION CAUTION: • This light is intended for commercial use. Do not use the light for household purpose. • Always put the appliance on flat and stable place. Otherwise a falling accident may occur. Adjusting the angle of the light (Fig. 8) Loosen the knobs on the both side. Adjust the angle of the light (adjustment range is 240°). Then tighten the knobs again. CAUTION: Take care not to trap finger(s) when adjusting the angle of the light. Using with tripod (optional accessories) CAUTION: • Read carefully the instruction manuals of the accessories before using them with the light. You can put the light on the tripod to facilitate the operation. (Fig. 9) CAUTION: • Be careful not to drop the appliance when attaching the appliance on the tripod. • Place the tripod on a level and stable surface to prevent from falling. • Spread the legs of the tripod to the maximum. • Do not use the tripod if the wind is strong. • Make sure that the appliance is attached securely on the tripod. • Remove the appliance when carrying the tripod or when folding the legs of the tripod. • Be careful not to get your hand caught in the legs of the triopd when closing the tripod. 8 MAINTENANCE CAUTION: • Always be sure that the appliance is switched off, unplugged, and the battery cartridge is removed before attempting to perform inspection or maintenance. • Never use gasoline, benzine, thinner, alcohol or the like. Discoloration, deformation or cracks may result. Only maintenance work described in this instruction manual may be performed by the user. Any other work must be carried out by Makita authorized service centers. Cleaning CAUTION: • Never wash the appliance in water. From time to time wipe off the outside (appliance body) of the appliance using a cloth dampened in soapy water. OPTIONAL ACCESSORIES CAUTION: • These accessories or attachments are recommended for use with your Makita appliance specified in this manual. The use of any other accessories or attachments might present a risk of injury to persons. Only use accessory or attachment for its stated purpose. If you need any assistance for more details regarding these accessories, ask your local Makita service center. • Makita genuine battery and charger • Tripod [Part No:GM00002073] NOTE: • Some items in the list may be included in the appliance package as standard accessories. They may differ from country to country. MAKITA LIMITED ONE YEAR WARRANTY Warranty Policy Every Makita appliance is thoroughly inspected and tested before leaving the factory. It is warranted to be free of defects from workmanship and materials for the period of ONE YEAR from the date of original purchase. Should any trouble develop during this one year period, return the COMPLETE appliance, freight prepaid, to one of Makita's Factory or Authorized Service Centers. If inspection shows the trouble is caused by defective workmanship or material, Makita will repair (or at our option, replace) without charge. This Warranty does not apply where: • repairs have been made or attempted by others: • repairs are required because of normal wear and tear: • the appliance has been abused, misused or improperly maintained: • alterations have been made to the appliance. IN NO EVENT SHALL MAKITA BE LIABLE FOR ANY INDIRECT, INCIDENTAL OR CONSEQUENTIAL DAMAGES FROM THE SALE OR USE OF THE PRODUCT. THIS DISCLAIMER APPLIES BOTH DURING AND AFTER THE TERM OF THIS WARRANTY. MAKITA DISCLAIMS LIABILITY FOR ANY IMPLIED WARRANTIES, INCLUDING IMPLIED WARRANTIES OF "MERCHANTABILITY" AND "FITNESS FOR A SPECIFIC PURPOSE," AFTER THE ONE YEAR TERM OF THIS WARRANTY.
-
 1
1 -
2
-
 3
3 -
 4
4 -
 5
5 -
 6
6 -
 7
7 -
 8
8 -
 9
9 -
 10
10 -
 11
11 -
 12
12 -
 13
13 -
14
-
15
-
16
-
17
-
18
-
19
-
20
-
21
-
22
-
23
-
24
 |
 |
