Makita DPC8132 Owners Manual - Page 28
IMPORTANT, Replacing/cleaning the spark arrester screen, CAUTION
 |
View all Makita DPC8132 manuals
Add to My Manuals
Save this manual to your list of manuals |
Page 28 highlights
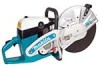
Press the cutting attachment (13) onto the drive arm in the side position. Guide the V-belt (14) over the V-belt pulley (15). NOTE: The illustration shows the V-belt for models DPC6340 - DPC7341. 13 15 14 Put the guard plate (16) on. Screw on nuts (17) and tighten by hand. To tighten the V-belt see "Tightening the V-belt / Checking Vbelt tension". Screw in and tighten the screw (detail X, only for DPC8132). Tighten the nuts (17) firmly with the combination wrench. Replace the grip (18) as shown. IMPORTANT: When you reposition the cutting attachment, the direction of rotation of the cutting wheel changes. If a rotation direction is marked on the cutting disc, make sure the disc turns in the right direction. 18 16 17 Replacing/cleaning the spark arrester screen Models without catalytic converter The spark arrester screen should be checked and cleaned regularly. 20 Models without catalytic converter Loosen the 2 screws (19) and remove the spark arrester screen (20). 19 Models with catalytic converter (DPC6440, 6441, 7340, 7341) Unscrew and remove screws (21). Remove the front housing section of the muffler (22). Unscrew and remove screw (23). Remove the deflector plate and spark arrester screen (24). Models with catalytic converter CAUTION: 21 22 Do not use sharp or pointed objects for screen cleaning. Damaged or misformed screen wires may result. Reassembly the spark arrester screen and tighten the screws. Information on the catalytic converter: The catalytic converter reduces the pollutant content of the exhaust. 23 24 28
-
 1
1 -
2
-
3
-
4
-
5
-
6
-
7
-
8
-
9
-
10
-
11
-
12
-
13
-
14
-
15
-
16
-
17
-
18
-
19
-
20
-
21
-
22
-
 23
23 -
 24
24 -
 25
25 -
 26
26 -
 27
27 -
 28
28 -
 29
29 -
 30
30 -
 31
31 -
 32
32 -
 33
33 -
34
-
35
-
36
-
37
-
38
-
39
-
40
-
41
-
42
-
43
-
44
-
45
-
46
-
47
-
48
-
49
-
50
-
51
-
52
-
53
-
54
-
55
-
56
-
57
-
58
-
59
-
60
-
61
-
62
-
63
-
64
-
65
-
66
-
67
-
68
 |
 |
