Makita HK0500 Owners Manual - Page 6
Functional, Description, Assembly
 |
View all Makita HK0500 manuals
Add to My Manuals
Save this manual to your list of manuals |
Page 6 highlights
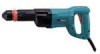
FUNCTIONAL DESCRIPTION CAUTION: • Always be sure that the tool is switched off and unplugged before adjusting or checking function on the tool. 1. Switch trigger 002885 Switch action CAUTION: 1 • Before plugging in the tool, always check to see that the switch trigger actuates properly and returns to the "OFF" position when released. To start the tool, simply pull the switch trigger. Release the switch trigger to stop. 1. Adjusting dial 002893 1 Speed change The blows per minute can be adjusted just by turning the adjusting dial. This can be done even while the tool is running. The dial is marked 1 (lowest speed) to 6 (full speed). Refer to the table below for the relationship between the number settings on the adjusting dial and the blows per minute. Number on adjusting dial 6 5 4 3 2 1 Blows per minute 3,500 3,200 2,900 2,600 2,300 2,000 ASSEMBLY CAUTION: • The speed adjusting dial can be turned only as far as 6 and back to 1. Do not force it past 6 or 1, or the speed adjusting function may no longer work. CAUTION: • Always be sure that the tool is switched off and unplugged before carrying out any work on the tool. 6
-
 1
1 -
 2
2 -
 3
3 -
 4
4 -
 5
5 -
 6
6 -
 7
7 -
 8
8 -
 9
9 -
 10
10 -
 11
11 -
 12
12
 |
 |
