Makita JN3200 Instruction Manual - Page 5
Maintenance - die
 |
View all Makita JN3200 manuals
Add to My Manuals
Save this manual to your list of manuals |
Page 5 highlights
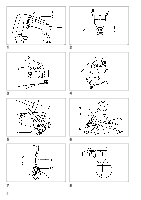
Punch replacement (Fig. 5, 6 & 7) Important: Always be sure that the tool is switched off and unplugged before replacing the punch. Fit the wrench provided onto the lock nut and tap the handle lightly with a hammer to loosen the lock nut. Take off the die holder and use a wrench to remove the screw. Then remove the punch. To install the punch, insert it into the punch holder with its cutting edge facing forward so that the pin in the punch holder fits into the groove in the punch. Install the screw and lock nut. Then tighten them securely. NOTE: When installing the screw and lock nut, be sure to tighten securely. If they become loose during operation, the tool may break down. Punch & die service life (Fig. 8 & 9) Replace or sharpen punch and die after cutting the lengths indicated in the accompanying table. Their life, of course, depends upon the thickness of materials cut and lubrication conditions. MAINTENANCE CAUTION: Always be sure that the tool is switched off and unplugged before carrying out any work on the tool. Replacement of carbon brushes (Fig. 10 & 11) Replace carbon brushes when they are worn down to the limit mark. Both identical carbon brushes should be replaced at the same time. To maintain product safety and reliability, repairs, maintenance or adjustment should be carried out by a Makita Authorized Service Center. Punch Die Replace after 150 m of 3.2 mm steel sheet Sharpen after 300 m of 3.2 mm steel sheet When cutting is poor even after replacing the punch, sharpen the die. Grind down the dull edge shown in Fig. 8 using a grinder. After rough-grinding the dull portion, finish with a dressing stone. Stock removal should be about 0.3 to 0.4 mm. When installing ground die, a clearance of 3.5 to 4.0 mm should be obtained by attaching one or two of the washer provided, as shown in Fig. 9. Failure to have the proper clearance will result in vibration during cutting. NOTE: The die can be sharpened two times. After two sharpenings, it should be replaced with new one. 5
-
 1
1 -
 2
2 -
 3
3 -
 4
4 -
 5
5 -
 6
6 -
 7
7 -
 8
8 -
 9
9 -
 10
10 -
 11
11 -
12
-
13
-
14
-
15
-
16
-
17
-
18
-
19
-
20
-
21
-
22
-
23
-
24
-
25
-
26
-
27
-
28
-
29
-
30
-
31
-
32
 |
 |