Makita LS1016LX Owners Manual - Page 23
Adjustment of the laser line position - ls1016l r
 |
View all Makita LS1016LX manuals
Add to My Manuals
Save this manual to your list of manuals |
Page 23 highlights
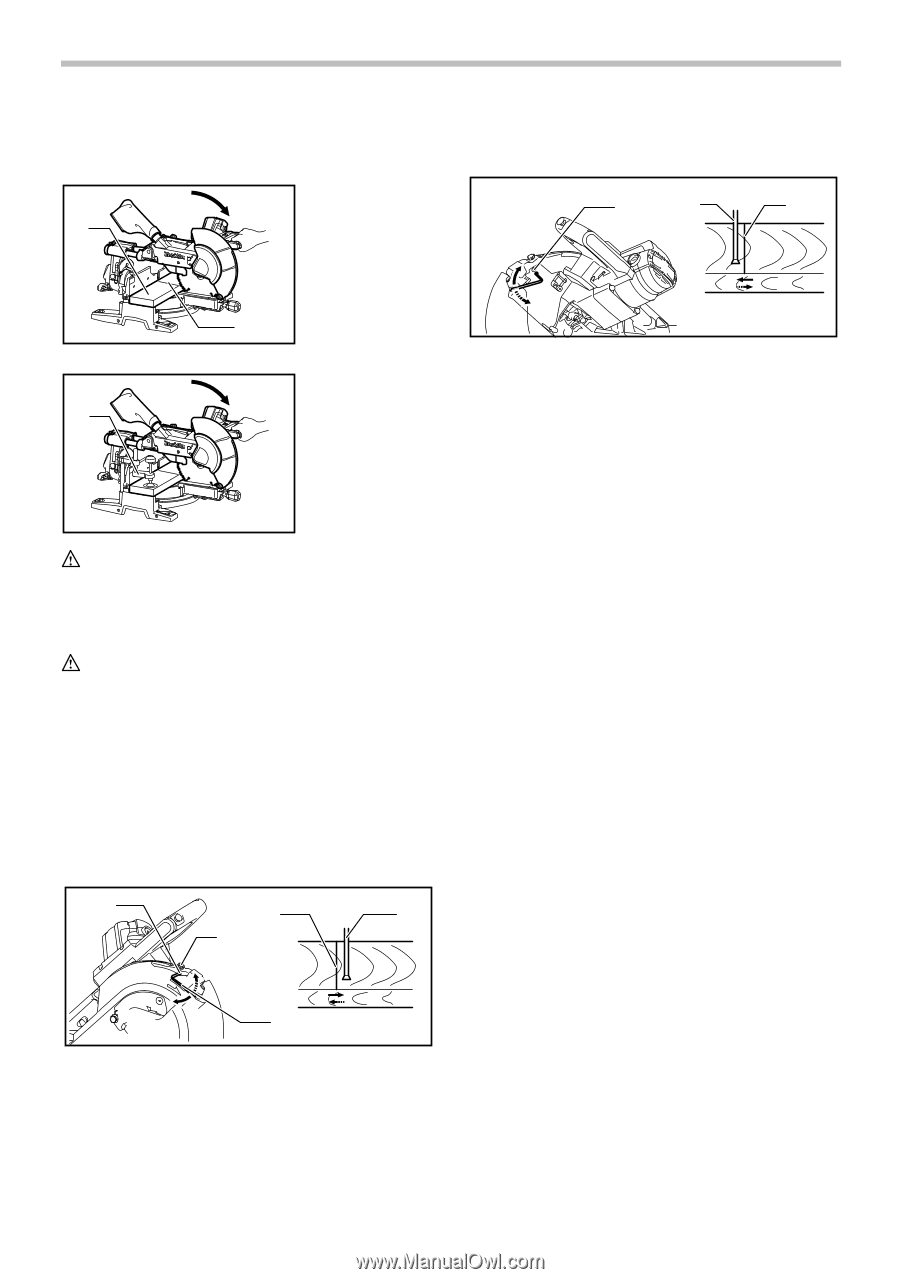
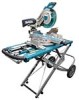
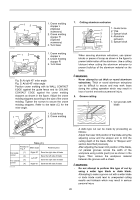
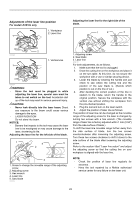
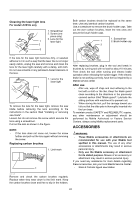
Adjustment of the laser line position For model LS1016L only 1. Workpiece 2. Laser line 1 Adjusting the laser line for the right side of the blade. 1 2 3 009526 1 2 1. Vertical vise 009527 WARNING: • Since the tool must be plugged in while adjusting the laser line, special care must be taken to not switch on the tool. Accidental start up of the tool may result in serious personal injury. CAUTION: • Never look directly into the laser beam. Direct eye exposure to the beam could cause serious damage to the eyes. • LASER RADIATION Do not stare into beam. NOTICE: • Beware that impacts to the tool may cause the laser line to be misaligned or may cause damage to the laser, shortening its life. Adjusting the laser line for the left side of the blade. 1 4 5 2 3 1. Screw to change the movable range of the adjusting screw 2. Adjusting screw 3. Hex wrench 4. Laser line 5. Saw blade 009514 1. Adjusting screw 2. Saw blade 3. Laser line 009515 For both adjustments, do as follows. 1. Make sure that the tool is unplugged. 2. Draw the cutting line on the workpiece and place it on the turn table. At this time, do not secure the workpiece with a vise or similar securing device. 3. Lower the blade by lowering the handle and just check to see where the cutting line and the position of the saw blade is. (Decide which position to cut on the line of cut.) 4. After deciding the correct position of the line in relation to the blade, return the handle to the original position. Secure the workpiece with the vertical vise without shifting the workpiece from the pre-checked position. 5. Plug the tool and turn on the laser switch. 6. Adjust the position of laser line as follows. The position of laser line can be changed as the movable range of the adjusting screw for the laser is changed by turning two screws with a hex wrench. (The movable range of laser line is factory adjusted within 1 mm (0.04") from the side surface of blade.) To shift the laser line movable range further away from the side surface of blade, turn the two screws counterclockwise after loosening the adjusting screw. Turn these two screws clockwise to shift it closer to the side surface of the blade after loosening the adjusting screw. Refer to the section titled "Laser line action" and adjust the adjusting screw so that the cutting line on your workpiece is aligned with the laser line. NOTE: • Check the position of laser line regularly for accuracy . • Have the tool repaired by a Makita authorized service center for any failure on the laser unit. 23
-
 1
1 -
2
-
3
-
4
-
5
-
6
-
7
-
8
-
9
-
10
-
11
-
12
-
13
-
14
-
15
-
16
-
17
-
 18
18 -
 19
19 -
 20
20 -
 21
21 -
 22
22 -
 23
23 -
 24
24 -
 25
25 -
 26
26 -
 27
27 -
 28
28 -
29
-
30
-
31
-
32
-
33
-
34
-
35
-
36
-
37
-
38
-
39
-
40
-
41
-
42
-
43
-
44
-
45
-
46
-
47
-
48
-
49
-
50
-
51
-
52
-
53
-
54
-
55
-
56
-
57
-
58
-
59
-
60
-
61
-
62
-
63
-
64
-
65
-
66
-
67
-
68
-
69
-
70
-
71
-
72
-
73
-
74
-
75
-
76
 |
 |