Makita LXDT01 Owners Manual - Page 8
Maintenance
 |
View all Makita LXDT01 manuals
Add to My Manuals
Save this manual to your list of manuals |
Page 8 highlights
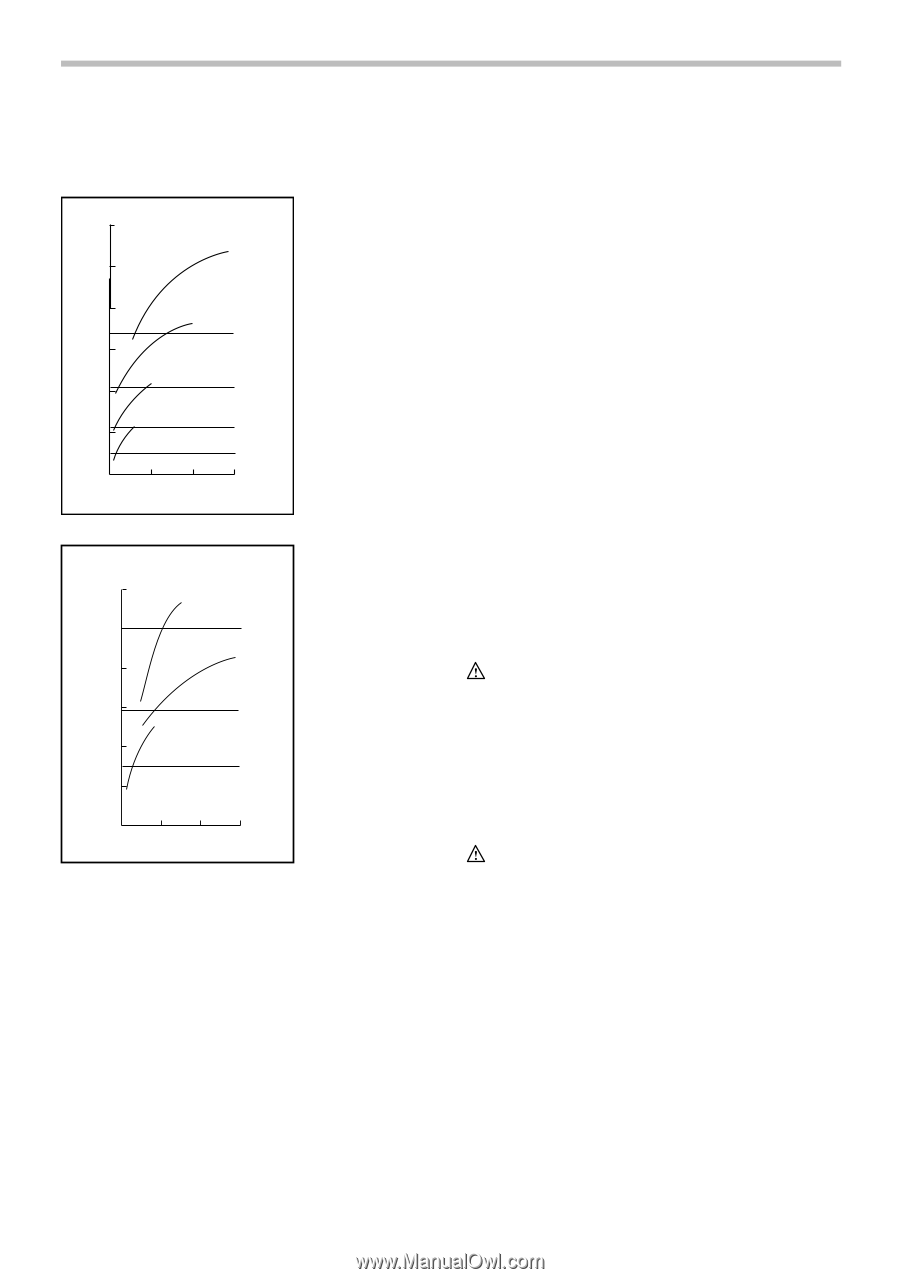
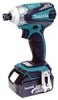
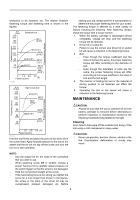
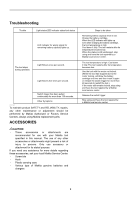
workpiece to be fastened, etc. The relation between fastening torque and fastening time is shown in the figures. Fastening torque Proper fastening torque N.m (ft.lbs) 120 (87) 100 (72) Standard bolt M14 (9/16") 80 (58) M12 (1/2") 60 (M14) (43) (9/16") 40 (29) M10 (3/8") (M12) (1/2") 20 M8 (5/16") (14) (M10) (3/8") (M8) (5/16") 0 1.0 2.0 Fastening time 009220 3.0 (S) Fastening torque Proper fastening torque N.m (ft.lbs) 120 (87) 100 (72) 80 (58) 60 (43) 40 (29) 20 (14) High tensile bolt M12(1/2") M10 (3/8") (M12) (1/2") M8 (5/16") (M10) (3/8") (M8) (5/16") 0 1.0 2.0 3.0 (S) Fastening time 009221 Hold the tool firmly and place the point of the driver bit in the screw head. Apply forward pressure to the tool to the extent that the bit will not slip off the screw and turn the tool on to start operation. starting your job, always perform a test operation to determine the proper fastening time for your screw. The fastening torque is affected by a wide variety of factors including the following. After fastening, always check the torque with a torque wrench. 1. When the battery cartridge is discharged almost completely, voltage will drop and the fastening torque will be reduced. 2. Driver bit or socket bit Failure to use the correct size driver bit or socket bit will cause a reduction in the fastening torque. 3. Bolt • Even though the torque coefficient and the class of bolt are the same, the proper fastening torque will differ according to the diameter of bolt. • Even though the diameters of bolts are the same, the proper fastening torque will differ according to the torque coefficient, the class of bolt and the bolt length. 4. The manner of holding the tool or the material of driving position to be fastened will affect the torque. 5. Operating the tool at low speed will cause a reduction in the fastening torque. MAINTENANCE CAUTION: • Always be sure that the tool is switched off and the battery cartridge is removed before attempting to perform inspection or maintenance except for the following troubleshooting related to the light. Cleaning From time to time wipe off the outside (tool body) of the tool using a cloth dampened in soapy water. CAUTION: • Never use gasoline, benzine, thinner, alcohol or the like. Discoloration, deformation or cracks may result. NOTE: • Use the proper bit for the head of the screw/bolt that you wish to use. • When fastening screw M8 or smaller, choose a proper hammer force carefully adjust pressure on the switch trigger so that the screw is not damaged. • Hold the tool pointed straight at the screw. • If the hammering force is too strong you tighten the screw for a time longer than shown in the figures, the screw or the point of the driver bit may be overstressed, stripped, damaged, etc. Before 8
-
 1
1 -
2
-
 3
3 -
 4
4 -
 5
5 -
 6
6 -
 7
7 -
 8
8 -
 9
9 -
 10
10 -
 11
11 -
 12
12 -
 13
13 -
14
-
15
-
16
-
17
-
18
-
19
-
20
-
21
-
22
-
23
-
24
-
25
-
26
-
27
-
28
-
29
-
30
-
31
-
32
 |
 |