Marantz CD5400 CD5400 CD Player User Guide - Page 26
Peak search searching for the, loudest passage, Editing recording a disc on a tape
 |
View all Marantz CD5400 manuals
Add to My Manuals
Save this manual to your list of manuals |
Page 26 highlights
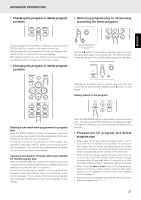
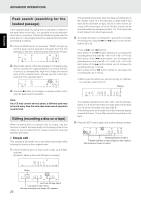
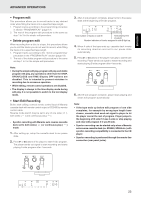
ADVANCED OPERATIONS 5 ENGLISH Peak search (searching for the loudest passage) If the cassette deck recording level is adjusted in relation to the peak level on the disc, it is possible to avoid distortion and noise in recording. This facility allows the peak over the entire disc or in the programmed to be detected tracks before proceeding to editing. 1. Press the PEAK button on the player. "PEAK" will light up and the peak search operation will begin from the first passage on the disc. Searching may need a few minutes. TTL TRK PEAK TIME TEXT 1 2 3 4 5 6 7 8 9 10 11 12 13 14 15 16 17 18 19 20 2. When peak search of the last passage is completed, play will be repeated for approximately 6 seconds with the volume at a comparatively high level. Adjust the record level of the cassette deck. (Please see the instruction manual for the cassette deck.) TTL TRK 555 PEAK TIME TEXT 1 2 3 4 5 6 7 8 9 10 11 12 13 14 15 16 17 18 19 20 3. Press the 7 button on the player or remote control unit to stop the peak search operation. Note: As a CD may contain several peaks, a different peak may be found every time the auto peak level search operation is performed. Editing (recording a disc on a tape) When recording from a compact disc to a tape, use this function to match the tape length to the playing time of the tracks to be recorded and to create 4-second intervals between the tracks. • Simple edit This operation fits tracks into a specified tape length while keeping the tracks in their original order. 1. Press the EDIT button in stop mode to light up the EDIT indicator. (Example: When a disc with 28 tracks is loaded) EDIT TEXT 1 2 3 4 5 6 7 8 9 10 11 12 13 14 15 16 17 18 19 20 Blinks. 555 EDIT 56 13 14 Last track on tape side B Last track on tape side A The tape recording time display (90) appears. 22 5 5 55 55 555 5 5 555 55 55 5 This example shows that, when the tape recording time is 90 minutes, track 15 is the last track on tape side A and track 28 the last track on tape side B. In other words, by using a 90-minute tape, all of the 28 disc tracks can be accommodated by assigning tracks 1 to 15 on tape side A and tracks 16 to 28 on tape side B. 2. To change the tape recording time, specify the new tape recording time using the ¢ or 4 button or the numeric buttons (0 to 9). • Use of ¢ and 4 buttons Each press of the ¢ button allows you to change the recording time in the order 90 → 46 → 54 → 60 → 74 → 90. Each press of the 4 button allows you to change the recording time in the order 90 → 74 → 60 → 54 → 46 → 90. Each press of the ¡ button allows you to increase the recording time by 1 minute. Each press of the 1 button allows to decrease the recording time by 1 minute. • When numeric buttons are used to specify a C-46 tape, for example, press 4 then 6. Flashes. EDIT TEXT 1 2 3 4 5 6 7 8 9 10 11 12 13 14 15 16 17 18 19 20 This display example shows that, with a 46-minute tape, tracks 1 to 8 will be recorded onto tape side A and tracks 9 to 16 will be recorded onto tape side B. The blinking arrow on the right end of the character display shows that tracks 17 and after cannot be recorded on the tape. 3. Press the EDIT button again and set the editing contents. 5 TTL TRK A - 5 EDIT TTL TIME TEXT 1 2 3 4 5 6 7 8 9 10 11 12 13 14 15 Total playing time of side A Number indicators of tracks assigned to side A light up. Total number of tracks on side A
-
 1
1 -
2
-
3
-
4
-
5
-
6
-
7
-
8
-
9
-
10
-
11
-
12
-
13
-
14
-
15
-
16
-
17
-
18
-
19
-
20
-
 21
21 -
 22
22 -
 23
23 -
 24
24 -
 25
25 -
 26
26 -
 27
27 -
 28
28 -
 29
29 -
 30
30 -
 31
31 -
32
-
33
 |
 |