Marantz SR6013 Owners Manual English - Page 223
WPS Router, Manual
 |
View all Marantz SR6013 manuals
Add to My Manuals
Save this manual to your list of manuals |
Page 223 highlights
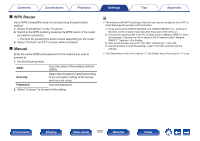
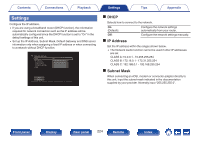
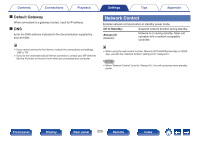
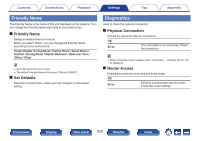
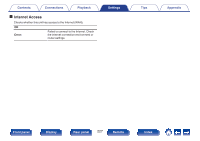
Contents Connections Playback o WPS Router Use a WPS-compatible router to connect using the push button method. 1. Select "Push Button" on the TV screen. 2. Switch to the WPS mode by pressing the WPS button of the router you wish to connect to. 0 The time for pressing the button varies depending on the router. 3. Select "Connect" on the TV screen within 2 minutes. o Manual Enter the name (SSID) and password of the network you wish to connect to. 1. Set the following items. SSID: Input the name of the wireless network (SSID). Security: Select the encryption method according to the encryption setting of the access point you are using. Password: Input the password. 2. Select "Connect" at the end of the setting. Settings Tips Appendix 0 The wireless LAN (Wi-Fi) settings of this unit can also be configured from a PC or tablet that supports wireless LAN connection. 1. Press and hold the ZONE2 SOURCE and TUNER PRESET CH + buttons on the main unit for at least 3 seconds when the power of the unit is on. 2. Connect the wireless LAN of the PC or tablet used to "Marantz SR6013" when the message "Connect your Wi-Fi device to Wi-Fi network called "Marantz SR6013"." appears in the display. 3. Start up the browser and enter "192.168.1.16/Settings/" in the URL. 4. Use the browser to enter the settings, select "Connect" and then exit the settings. 0 The Default key of this unit is fixed at "1". Set Default key of the router to "1" to use. Front panel Display Rear panel 223 Remote Index
-
 1
1 -
2
-
3
-
4
-
5
-
6
-
7
-
8
-
9
-
10
-
11
-
12
-
13
-
14
-
15
-
16
-
17
-
18
-
19
-
20
-
21
-
22
-
23
-
24
-
25
-
26
-
27
-
28
-
29
-
30
-
31
-
32
-
33
-
34
-
35
-
36
-
37
-
38
-
39
-
40
-
41
-
42
-
43
-
44
-
45
-
46
-
47
-
48
-
49
-
50
-
51
-
52
-
53
-
54
-
55
-
56
-
57
-
58
-
59
-
60
-
61
-
62
-
63
-
64
-
65
-
66
-
67
-
68
-
69
-
70
-
71
-
72
-
73
-
74
-
75
-
76
-
77
-
78
-
79
-
80
-
81
-
82
-
83
-
84
-
85
-
86
-
87
-
88
-
89
-
90
-
91
-
92
-
93
-
94
-
95
-
96
-
97
-
98
-
99
-
100
-
101
-
102
-
103
-
104
-
105
-
106
-
107
-
108
-
109
-
110
-
111
-
112
-
113
-
114
-
115
-
116
-
117
-
118
-
119
-
120
-
121
-
122
-
123
-
124
-
125
-
126
-
127
-
128
-
129
-
130
-
131
-
132
-
133
-
134
-
135
-
136
-
137
-
138
-
139
-
140
-
141
-
142
-
143
-
144
-
145
-
146
-
147
-
148
-
149
-
150
-
151
-
152
-
153
-
154
-
155
-
156
-
157
-
158
-
159
-
160
-
161
-
162
-
163
-
164
-
165
-
166
-
167
-
168
-
169
-
170
-
171
-
172
-
173
-
174
-
175
-
176
-
177
-
178
-
179
-
180
-
181
-
182
-
183
-
184
-
185
-
186
-
187
-
188
-
189
-
190
-
191
-
192
-
193
-
194
-
195
-
196
-
197
-
198
-
199
-
200
-
201
-
202
-
203
-
204
-
205
-
206
-
207
-
208
-
209
-
210
-
211
-
212
-
213
-
214
-
215
-
216
-
217
-
 218
218 -
 219
219 -
 220
220 -
 221
221 -
 222
222 -
 223
223 -
 224
224 -
 225
225 -
 226
226 -
 227
227 -
 228
228 -
229
-
230
-
231
-
232
-
233
-
234
-
235
-
236
-
237
-
238
-
239
-
240
-
241
-
242
-
243
-
244
-
245
-
246
-
247
-
248
-
249
-
250
-
251
-
252
-
253
-
254
-
255
-
256
-
257
-
258
-
259
-
260
-
261
-
262
-
263
-
264
-
265
-
266
-
267
-
268
-
269
-
270
-
271
-
272
-
273
-
274
-
275
-
276
-
277
-
278
-
279
-
280
-
281
-
282
-
283
-
284
-
285
-
286
-
287
-
288
-
289
-
290
-
291
-
292
-
293
-
294
-
295
-
296
-
297
-
298
-
299
-
300
-
301
-
302
-
303
-
304
-
305
-
306
-
307
-
308
-
309
-
310
-
311
-
312
-
313
-
314
-
315
-
316
-
317
-
318
 |
 |