Marantz SR7500 SR7500 User Manual - Page 13
Remote Control Range, Loading Batteries, Battery Replacement Interval, Setting The Time - reset
 |
View all Marantz SR7500 manuals
Add to My Manuals
Save this manual to your list of manuals |
Page 13 highlights
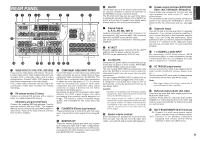
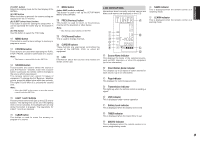
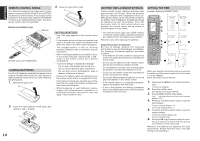
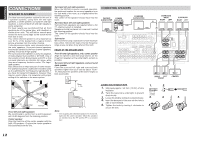
ENGLISH REMOTE CONTROL RANGE The distance between the transmitter of the remote control and the IR SENSOR of the SR7500 should be less than 5 meters. If the remote control is pointed in a direction other than the IR SENSOR or if there is an obstacle between them, use of the remote control may not be possible. Remote-controllable range SR7500 Approx. 5 m 60° INPUT AV SELECTOR SURROUND RECEIVER SR7500 STANDBY POWER ON/OFF PHONES DISP SLEEP MULTI AUTO AUTO SURR DTIRUENCETD ST DISCS6P.1KR A B MT V-OFF X 6.1 PEAK NIGHT ATT DAINGAITLAOLG AAC PCM DSLUIGRIRTAOLUND C SL LFE R S SR ENTER DOWN VOLUME UP DIGITAL S-VIDEO AUX 1 INPUT VIDEO L AUDIO R CH CLEAR OK PREV 7 4 DISP 0 1 7.1CH TESTMENU 2 CH.SEL GUIDE 5 ATT 8 OSD 3 6 SPK-AB SURREXIT 9 SLEEP MUTE TV TUNER TAPE 1 AUX1 Learning LIGHT RemRoCte14C0o0ntroller DVD CD VCR CD-R AUX2 MD AMP 2 DSS MEMO VOL OFF ONP/OOFFWER SOURCE ON M D1 D2 D3 D4 D5 Remote control unit (RC8500SR) LOADING BATTERIES The life of the batteries used with the remote control is about 4 months with normal use. Also be sure to replace batteries earlier when you notice that they are getting weak. 1. Remove the back cover. 2. Insert the new batteries (AAA type) with correct and polarity. 10 3. Close the cover until it clicks. CAUTIONS ON BATTERIES • Use "AAA" type batteries in this remote control unit. • If the remote control unit does not operate from close to the main unit, replace the batteries with new ones, even if less then a year has passed. • The included battery is only for verifying operation. Replace it with a new battery as soon as possible. • When inserting the batteries, be careful to do so in the proper direction, following the + and marks in the remote control unit's battery compartment. • To prevent damage or battery fluid leakage: - Do not use a new battery with an old one. - Do not use two different types of batteries. - Do not short-circuit, disassemble, heat or dispose of batteries in flames. • Remove the batteries when not planning to use the remote control unit for a long period of time. • If the batteries should leak, carefully wipe off the fluid from the inside of the battery compartment, then insert new batteries. • When disposing of used batteries, please comply with governmental regulations or environmental public instruction's rules that apply in your country or area. BATTERY REPLACEMENT INTERVAL Under normal usage, alkaline batteries last approximately four months. When the batteries wear out, a battery mark is displayed on the LCD. Although the remote control can still be used when the battery mark is displayed, the batteries should be replaced as soon as possible. The LCD eventually starts to flash when buttons are pressed, the remote control will be unable to transmit signals or learn codes. • This remote control uses non-volatile memory so that the learned codes and macro programs are retained even if the batteries are removed. Reset the clock after replacing the batteries. Safety Precautions for Batteries Be sure to always observe the following precautions to prevent fluid leakage, overheating, fire, breakage, accidental ingestion, and other accidents. • If the batteries are left unused for a long period of time, the battery fluid may leak or the batteries may corrode. • Do not use the batteries in the remote control with the plus and minus polarity reversed. • Do not attempt to recharge, heat, or disassemble the batteries. Do not put the batteries in a fire. • Do not use the remote control with old batteries or worn-out batteries inserted. • Do not use different types of batteries or mix old and new batteries in the remote control. • If the remote control is not operating properly, replace the batteries with new ones. • If any of the batteries are leaking, completely wipe up all leaked battery fluid, and then replace the batteries with new ones. SETTING THE TIME Example: Setting to 6:20PM (18:20) 1 2 POWER OFF ON/OFF SOURCE ON M D1 D2 D3 D4 D5 3. 3. 2. CH VOL USE PAGE 1 3 USE PAGE 1 2 4 OK PREV MENU TEST 1 7.1CH 4 DISP 7 CLEAR LIP.SYNC GUIDE CH.SEL 2 ATT 5 OSD 8 THX 0 MUTE EXIT SURR 3 SPK-AB 6 SLEEP 9 MEMO 6. 4. 5. LEARN 5 LEARN 6 TV DVD VCR DSS TUNER CD CD-R MD TAPE 1 AUX1 AUX2 LIGHT RC8500SR Learning Remote Controller AMP 2 LEARN USE PAGE 1 2 When you bought this remote control and insert the batteries to the remote control at first, the steps 1 to 3 are skipped. Starts from step 4 to set the time. 1. Hold down the M button for three seconds or more. The menu is displayed. 2. Press the > button once. This displays second page (SETUP). 3. Press the D4 (CLOCK) direct button. The " " indicator blinks and the clock indicator displays "0:00". 4. Press the 1 and 8 numeric button to set the hour indicator. The hour indicator displays "18". The minute indicator blinks "_". 5. Press the 2 and 0 numeric button to set the minute indicator. The minute indicator displays "20". The hour indicator blinks. 6. Press the OK cursor button to start the clock. The clock starts from 0 second at the time that was set and return to normal (USE) mode. Whenever the batteries are replaced, the clock shows 00:00. Please reset the clock. (The time setting is not backed up.)
-
 1
1 -
2
-
3
-
4
-
5
-
6
-
7
-
 8
8 -
 9
9 -
 10
10 -
 11
11 -
 12
12 -
 13
13 -
 14
14 -
 15
15 -
 16
16 -
 17
17 -
 18
18 -
19
-
20
-
21
-
22
-
23
-
24
-
25
-
26
-
27
-
28
-
29
-
30
-
31
-
32
-
33
-
34
-
35
-
36
-
37
-
38
-
39
-
40
-
41
-
42
-
43
-
44
-
45
-
46
-
47
-
48
-
49
-
50
-
51
-
52
-
53
-
54
-
55
-
56
 |
 |
