Maytag MBL2262KES Use and Care Manual - Page 6
Pullout Freezer Drawer
 |
View all Maytag MBL2262KES manuals
Add to My Manuals
Save this manual to your list of manuals |
Page 6 highlights
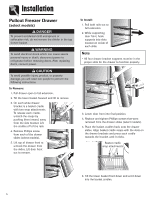
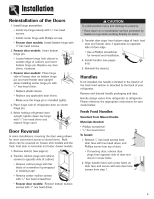
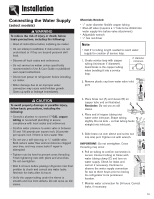
Installation Pullout Freezer Drawer (select models) DANGER To prevent accidental child entrapment or suffocation risk, do not remove the divider in the top freezer basket. WARNING To avoid electrical shock which can cause severe personal injury or death, disconnect power to refrigerator before removing doors. After replacing doors, connect power. CAUTION To avoid possible injury, product, or property damage, you will need two people to perform the following instructions. To Remove: 1. Pull drawer open to full extension. 2. Tilt the lower basket forward and lift to remove. 3. On each white drawer bracket is a basket cradle with two snap attachments. To release each cradle, unlatch the snaps by pushing them inward, away from the side bracket. Lift the cradles off of the rails. 4. Remove Phillips screw from each of the drawer slides (select models). 5. Lift top of drawer front to unhook the drawer from the slides. Lift door front out to remove. To Install: 1. Pull both rails out to full extension. 2. While supporting door front, hook supports into slots located on inside of each slide. Note • All four drawer bracket supports must be in the proper slots for the drawer to function properly. 3. Lower door front into final position. 4. Replace and tighten Phillips screws that were removed from the drawer slides (select models). 5. Place the basket cradles back onto the drawer slides. Align basket cradle snaps with the slots on the drawer brackets and press each cradle towards the bracket until it clicks. Basket cradle snap attachments 6. Tilt the lower basket front down and set it down into the basket cradles. 5
-
 1
1 -
 2
2 -
 3
3 -
 4
4 -
 5
5 -
 6
6 -
 7
7 -
 8
8 -
 9
9 -
 10
10 -
 11
11 -
 12
12 -
13
-
14
-
15
-
16
-
17
-
18
-
19
-
20
-
21
-
22
-
23
-
24
-
25
-
26
-
27
-
28
-
29
-
30
-
31
-
32
-
33
-
34
-
35
-
36
-
37
-
38
-
39
-
40
-
41
-
42
-
43
-
44
-
45
-
46
-
47
-
48
-
49
-
50
-
51
-
52
-
53
-
54
-
55
-
56
-
57
-
58
-
59
-
60
-
61
-
62
-
63
-
64
-
65
-
66
-
67
-
68
-
69
-
70
-
71
-
72
-
73
-
74
-
75
-
76
-
77
-
78
-
79
-
80
-
81
-
82
-
83
-
84
-
85
-
86
-
87
-
88
-
89
-
90
-
91
-
92
-
93
-
94
-
95
-
96
-
97
-
98
-
99
-
100
-
101
-
102
-
103
-
104
 |
 |