Maytag MDB9979S Owners Manual - Page 13
Installation Instructions
 |
View all Maytag MDB9979S manuals
Add to My Manuals
Save this manual to your list of manuals |
Page 13 highlights
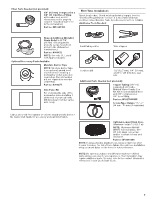
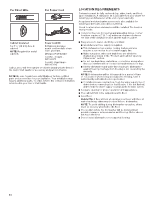
INSTALLATION INSTRUCTIONS WARNING Electrical Shock Hazard Disconnect electrical power at the fuse box or circuit breaker box before installing dishwasher. Failure to do so can result in death or electrical shock. Drill a 11/2" (3.8 cm) drain hose hole in the side or rear of cabinet, depending on location of drain hose routing and drain hose connection location. Drill a 1/2" (1.27 cm) water supply hose hole in the side or rear of cabinet, depending on location of water supply routing and connection location Drill a 11/2" (3.8 cm) electrical conduit hole in the right-hand side or rear of cabinet. 1. Sand holes smooth 1. Video Installation Video of installation steps can be found online at whirlpool. com in the "Service & Support" section "How To's & FAQ. The video can be found at http://www.kaltura.com/tiny/ro00v Wood Cabinet Metal Cabinet 2. Disconnect power Disconnect electrical power at the fuse box or circuit breaker box before installing dishwasher. 3. Shut off water supply Shut off the water supply to the dishwasher. Wood cabinet: Sand the hole until smooth. Metal cabinet: Cover edges of hole with grommet included with power cord kit. Helpful Tip: Wiring the dishwasher will be easier if you route the cable into the cabinet opening from the right-hand side. INSTALL OPTIONAL MOISTURE BARRIER RECOMMENDED FOR WOOD COUNTERTOPS Moisture barrier/wood shims PREPARE CABINET OPENING- NEW UTILITIES 4. Drill hole locations-new construction 11/2" (3.8 cm) Optional location Preferred location 1/2" (1.27 cm) The power-supply receptacle for the appliance shall be installed in a cabinet or on a wall adjacent to the undercounter space in which the appliance is to be installed. NOTE: Refer to the "Product and Cabinet Opening Dimensions" section for the correct hole placement and dimensions of the shaded area. Install wood shims Moisture barrier Make sure the area under the cabinet is clean and dry for installation of the moisture barrier. Remove the backing of the moisture barrier, and apply to underside of the countertop along the front edge of the counter. NOTE: The use of this moisture barrier is recommended but not required. NOTE: Install wood shims if side anchoring and the gap between the sides of the cabinet and sides of the dishwasher are greater than 1/2" (1.27 cm) on each side or are greater than the length of the side anchor screws. 13
-
 1
1 -
2
-
3
-
4
-
5
-
6
-
7
-
 8
8 -
 9
9 -
 10
10 -
 11
11 -
 12
12 -
 13
13 -
 14
14 -
 15
15 -
 16
16 -
 17
17 -
 18
18 -
19
-
20
-
21
-
22
-
23
-
24
-
25
-
26
-
27
-
28
-
29
-
30
-
31
-
32
-
33
-
34
-
35
-
36
-
37
-
38
-
39
-
40
-
41
-
42
-
43
-
44
-
45
-
46
-
47
-
48
-
49
-
50
-
51
-
52
-
53
-
54
-
55
-
56
-
57
-
58
-
59
-
60
-
61
-
62
-
63
-
64
-
65
-
66
-
67
-
68
-
69
-
70
-
71
-
72
-
73
-
74
-
75
-
76
-
77
-
78
-
79
-
80
-
81
-
82
-
83
-
84
-
85
-
86
-
87
-
88
 |
 |