Maytag MDC4650AWB Installation Instructions - Page 1
Maytag MDC4650AWB - Jet Clean II 24" Portable Dishwasher Manual
 |
UPC - 719881175010
View all Maytag MDC4650AWB manuals
Add to My Manuals
Save this manual to your list of manuals |
Page 1 highlights
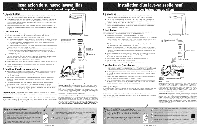
Shippin Base Removal Open door by lifting latch located under handle (center top of control panel), Remove accessory package and packing materials, Carefully lay dishwasher on its back resting on thickness of corner post, Two other corner posts should be placed under the lower edge of the cabinet to raise the shipping base off the floor to facilitate removal of the shipping base, Remove shipping base and discard, Remove casters from accessory bag, Press casters into holes of frame until securty locked, place Dishwasher upright, Installation The dishwasher accessory package contains a faucet adapter, gasket, and aerator adapter for the faucet coupler,[See figure B,) Q Unscrew and remove existing aerator or strainer from sink faucet, If faucet has proper external threads, it will not be necessary to use the adapter ring [see boxed parts], Carefully remove the cardboard cap from the aerator assembly, contents are under pressure due to internal spring, Screw aerator assembly onto faucet and tighten securely, If faucet has proper internal threads, install the gasket and adapter ring, Tighten securely and install aerator assembly, If no threads are provided, or if threads do not match the faucet for the adapting ring or aerator,suitable adapters may be obtained by referring to a parts catalog or from a plumber, Adapters are available that will fit almost all types of faucets, Move dishwasher into position, remove coupler from receptacle and press down on thumb release, Lift coupler up onto faucet adapter and remove pressure from the thumb release to hold coupler firmly in place, [See Figure C,) Open hot water faucet fully, Water should not leak from any of the fittings, Plug power cord into electrical outlet, (See Electrical Wiring and Ground Instructions.) Figure A J Aindaalpl teinr stanlolattiounssed [_ ] Aerator Assembly Figure B Checking installation Check Dishwasher as follows for proper operation and leaks, Set timer dial to "Light/China Wash ","Short ",or "Rinse & Hold "selection, Close door until it latches, This will staff the dishwasher operation, For microprocessor models: Close door until it latches, Select "Rinse Only," then press START,This will start the dishwasher operation, Allow dishwasher to fill, wash, and drain, Be sure dishwasher is operating properly, Check operation of the dishwasher according to the user's guide, Turn faucet off and relieve pressure on hose by depressing relief button on the side of faucet coupler, Depress thumb release lever and remove coupler,[See Figure C,) Electrical Wiring Convertible dishwashers are designed for operation on 120V-60Hz approved elec-trical service, protected by a 15 amp fuse or comparable circuit breaker. _, Warning" Hose that attaches to a sink spray nozzle can burst if it is installed on the same water line as the dishwasher. If the sink has a spray nozzle attachment, it is recommended that the hose be removed and the hole plugged. Pressure r_e_eose Coupler Connection Figure C Grounding Instructions Warning: This appliance must be grounded. In _ twhiell erveednut ceof thae mraislfkunoctfionelectriocr bsrheoackdkowbny, progvrioduinndging a path of least resistance for electric current. This appliance is equipped with a cord having an equipment-ground- ing conductor and a grounding plug. The plug must be plugged into an appropriate outlet that is installed and grounded in accor- dance with all local codes and ordinances. ,_ Warning: Improper connection of the equipment- grounding conductor can result in a risk of electric shock. Check with a qualified electrician or service representative if you are in doubt whether the appliance is properly grounded. Do not modify the plug provided with the appliance; if it will not fit the outlet, have a proper outlet installed by a qualified electrician. DO NOT CUT OR REMOVE THE THIRD GROUNDING PRONG FROM THE POWER CORD PLUG. Printed in USA 6 920048 B
-
 1
1 -
 2
2
 |
 |
