Maytag MEC5430BDW Installation Instructions - Page 3
Notice To Installer, CAUTION, Preparation Of Countertop, Installation Of Appliance
 |
View all Maytag MEC5430BDW manuals
Add to My Manuals
Save this manual to your list of manuals |
Page 3 highlights
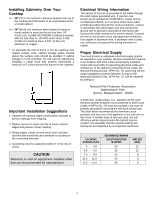
Notice To Installer Follow accompanying instruction carefully. CAUTION Never use a metal blade to pry knob off. If knob cannot be easily removed, tuck folds of a dishtowel under knob skirt and pull upward with steady, even pressure. Preparation Of Countertop The cutout in the countertop into which the appliance is to be installed should be prepared according to the cutout dimensions given on page 1 of these instructions. CAUTION Cutout dimensions are critical. Dimensions must be measured and cut accurately to within + 1/16² (.16 cm) to insure proper fit. Installation Of Appliance 1. Remove the cooktop from the carton and place it upside down over two soft pads making sure control knobs do not interfere with any surface. 2. Provide cutout in countertop as required per page 1. 3. Place unit in the cutout. 4. Make electrical wire connection to unit. Consult local codes for proper power hook-up. 5. Test to insure control knobs operate all elements properly. 3
-
 1
1 -
 2
2 -
 3
3 -
 4
4 -
 5
5 -
 6
6 -
 7
7 -
 8
8 -
 9
9
 |
 |
