Maytag MED6230RH Owners Manual 1 - Page 23
Remove the door assembly
 |
View all Maytag MED6230RH manuals
Add to My Manuals
Save this manual to your list of manuals |
Page 23 highlights
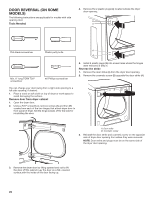
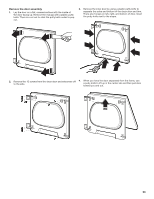
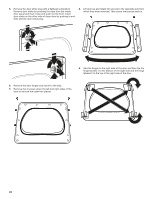
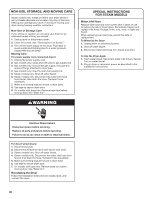
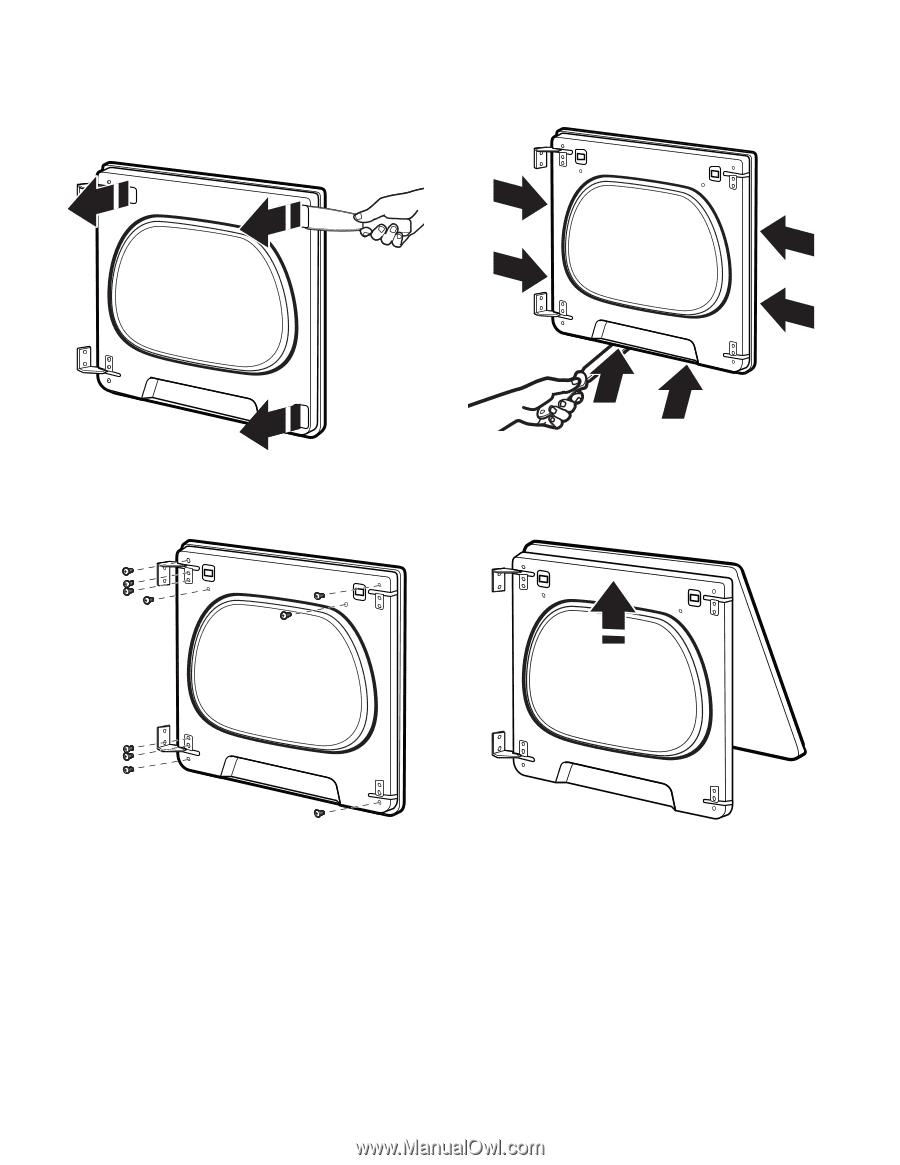
Remove the door assembly 1. Lay the door on a flat, covered surface with the inside of the door facing up. Remove the 3 plugs with a plastic putty knife. There is a cut out to stick the putty knife under to pop out. 3. Remove the inner door by using a plastic putty knife to separate the sides and bottom of the dryer door and trim. There are 2 snaps on left, right, and bottom of door. Insert the putty knife next to the snaps. 2. Remove the 10 screws from the dryer door and setscrews off to the side. 4. When you have the door separated from the frame, use a putty knife to lift up in the center tab and then pull door toward you and out. 23
-
 1
1 -
2
-
3
-
4
-
5
-
6
-
7
-
8
-
9
-
10
-
11
-
12
-
13
-
14
-
15
-
16
-
17
-
 18
18 -
 19
19 -
 20
20 -
 21
21 -
 22
22 -
 23
23 -
 24
24 -
 25
25 -
 26
26 -
 27
27 -
 28
28 -
29
-
30
-
31
-
32
-
33
-
34
-
35
-
36
-
37
-
38
-
39
-
40
-
41
-
42
-
43
-
44
-
45
-
46
-
47
-
48
-
49
-
50
-
51
-
52
-
53
-
54
-
55
-
56
-
57
-
58
-
59
-
60
-
61
-
62
-
63
-
64
-
65
-
66
-
67
-
68
-
69
-
70
-
71
-
72
-
73
-
74
-
75
-
76
-
77
-
78
-
79
-
80
-
81
-
82
-
83
-
84
-
85
-
86
-
87
-
88
 |
 |
23
Remove the door assembly
1.
Lay the door on a flat, covered surface with the inside of
the door facing up. Remove the 3 plugs with a plastic putty
knife. There is a cut out to stick the putty knife under to pop
out.
2.
Remove the 10 screws from the dryer door and setscrews off
to the side.
3.
Remove the inner door by using a plastic putty knife to
separate the sides and bottom of the dryer door and trim.
There are 2 snaps on left, right, and bottom of door. Insert
the putty knife next to the snaps.
4.
When you have the door separated from the frame, use
a putty knife to lift up in the center tab and then pull door
toward you and out.