Maytag MEDE500WR Installation Instructions - Page 15
Level Dryer, Complete Installation, Troubleshooting - lowes
 |
UPC - 883049186689
View all Maytag MEDE500WR manuals
Add to My Manuals
Save this manual to your list of manuals |
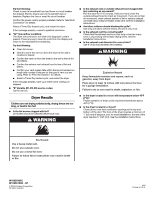
Page 15 highlights
LEVEL DRYER Check the levelness of the dryer. Check levelness first side to side, then front to back. If the dryer is not level, prop up the dryer using a wood block. Use a wrench to adjust the legs up or down and check again for levelness. COMPLETE INSTALLATION 1. Check that all parts are now installed. If there is an extra part, go back through the steps to see which step was skipped. 2. Check that you have all of your tools. 3. Dispose of/recycle all packaging materials. 4. Check the dryer's final location. Be sure the vent is not crushed or kinked. 5. Check that the dryer is level. See "Level Dryer." 6. Remove the blue film on the console and any tape remaining on the dryer. 7. Wipe the dryer drum interior thoroughly with a damp cloth to remove any dust. 8. Read "Dryer Use." 9. For power supply cord installation, plug into a grounded outlet. For direct wire installation, turn on power. Steam Models Only: 10. Be sure the water faucets are on. 11. Check for leaks around "Y" connector, faucet, and hoses. 12. If you live in a hard water area, use of a water softener is recommended to control the buildup of scale through the water system in the dryer. Over time, the buildup of lime scale may clog different parts of the water system, which will reduce product performance. Excessive scale buildup may lead to the need for certain part replacement or repair. All Models: 13. Select a Timed Dry heated cycle, and start the dryer. Do not select the Air Only Temperature setting. If the dryer will not start, check the following: ■ Controls are set in a running or "On" position. ■ Start button has been pushed firmly. ■ Dryer is plugged into a grounded 3 prong outlet and/or electrical supply is connected. ■ Household fuse is intact and tight, or circuit breaker has not tripped. ■ Dryer door is closed. This dryer automatically runs an installation diagnostic routine at the start of its first cycle. If you receive an L2 code, there may be a problem with your home power supply keeping the dryer's heater from turning on. See "Troubleshooting." 14. When the dryer has been running for 5 minutes, open the dryer door and feel for heat. If you feel heat, cancel cycle and close the door. If you do not feel heat, turn off the dryer and check the following: ■ There may be 2 household fuses or circuit breakers for the dryer. Check that both fuses are intact and tight, or that both circuit breakers have not tripped. If there is still no heat, contact a qualified technician. NOTE: You may notice an odor when the dryer is first heated. This odor is common when the heating element is first used. The odor will go away. TROUBLESHOOTING First try the solutions suggested here and possibly avoid the cost of a service call... Dryer Operation Dryer will not run ■ Has a household fuse blown, or has a circuit breaker tripped? There may be 2 household fuses or circuit breakers for the dryer. Check that both fuses are intact and tight, or that both circuit breakers have not tripped. Replace the fuse or reset the circuit breaker. If the problem continues, call an electrician. ■ Is the correct power supply available? Electric dryers require 240-volt power supply. Check with a qualified electrician. ■ Was a regular fuse used? Use a time-delay fuse. No heat ■ Has a household fuse blown, or has a circuit breaker tripped? The drum may be turning, but you may not have heat. Electric dryers use 2 household fuses or circuit breakers. Replace the fuse or reset the circuit breaker. If the problem continues, call an electrician. Dryer displaying code message ■ "PF" (power failure), check the following: Was the drying cycle interrupted by a power failure? Press and hold START to restart the dryer. ■ "L2" Diagnostic Code (low or no line voltage condition): The drum will turn, but there may be a problem with your home power supply keeping the dryer's heater from turning on. The dryer will continue to run when this diagnostic code is present. Press any key to clear the code from the display and return to the estimated time remaining. 15
-
 1
1 -
2
-
3
-
4
-
5
-
6
-
7
-
8
-
9
-
 10
10 -
 11
11 -
 12
12 -
 13
13 -
 14
14 -
 15
15 -
 16
16
 |
 |
