Maytag MER8875W User Instructions - Page 7
To use SINGLE and BRIDGE area A+B
 |
UPC - 883049186870
View all Maytag MER8875W manuals
Add to My Manuals
Save this manual to your list of manuals |
Page 7 highlights
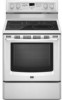
Bridge Element Use the bridge area to create an oblong heated area to cook with large cookware. A. Left front single element B. Left center bridge element C. Left rear single element o high oo moo high high Left Front Control mo oOo Left Rear Control To use SINGLE (A}: 1. Push in and turn left front control knob clockwise from the Off position to the SINGLE zone anywhere between LOW and HIGH. 2. Turn control knob to Off when finished. To use SINGLE (C): 1. Push in and turn left rear control knob counterclockwise from the Off position to anywhere between LOW and HIGH. 2. Turn control knob to Off when finished. To use SINGLE and BRIDGE area (A+B): 1. Push in and turn left front control knob counterclockwise from the Off position to the BRIDGE zone anywhere between LOW and HIGH. 2. Turn both control knobs to Off when finished. To use both SINGLE elements and BRIDGE (A+B+C): 1. Push in and turn left front control knob counterclockwise from the Off position to the BRIDGE zone anywhere between LOW and HIGH. 2. Push in and turn left rear control knob counterclockwise from the Off position to anywhere between LOW and HIGH. 3. Turn both control knobs to Off when finished. To use both SINGLE elements (A+C): 1. Push in and turn left front control knob clockwise from the Off position to the SINGLE zone anywhere between LOW and HIGH. 2. Push in and turn left rear control knob counterclockwise from the Off position to anywhere between LOW and HIGH. 3. Turn control knob to Off when finished. OVEN USE Odors and smoke are normal when the oven is used the first few times, or when it is heavily soiled. IMPORTANT: The health of some birds is extremely sensitive to the fumes given off. Exposure to the fumes may result in death to certain birds. Always move birds to another closed and wellventilated room. Control Display The display will flash when powered up or after a power loss. Press CANCEL to clear. When oven is not in use, the time of day is displayed. Indicator lights show functions that are in use. Tones Tones are audible signals, indicating the following: One tone • Valid pad press • Oven is preheated (long tone) • Function has been entered • Reminder (on some models), repeating each minute after the end-of-cycle tones Three tones • Invalid pad press Four tones • End of cycle To Change Tone Settings: Tone Pitch Sets the pitch of the tone to either high or low. Press and hold BROIL for 5 seconds. "TONE PITCH HIGH" or "TONE PITCH LOW" will appear in the display. Press and hold BROIL again to change setting. To exit, press CANCEL. Key Press Tones Activates or turns off the tones when a keypad is pressed. Press and hold KEEP WARM for 5 seconds. "KEY PRESS TONES ON" or "KEY PRESS TONES OFF" will appear in the display. Press and hold KEEP WARM again to change setting. To exit, press CANCEL. End of Cycle Tone Activates or turns off the tones that sound at the end of a cycle. Press and hold CONVECT BAKE for 5 seconds. "CYCLE END TONE ON" or "CYCLE END TONE OFF" will appear in the display. Press and hold CONVECT BAKE again to change setting. To exit, press CANCEL. Reminder Tones Disable Turns off the short tones that sound 1 minute after the end of cycle tones. Press and hold BAKE for 5 seconds. "REMINDER TONES ON" or "REMINDER TONES OFF" will appear in the display. Press and hold BAKE again to change setting. To exit, press CANCEL. Audible Tones Disable Turns off all tones, including the end of cycle tone and key press tones. Reminder tones are still active when all tones are disabled. Press and hold CLOCK for 5 seconds. "ALL SOUNDS ON" or "ALL SOUNDS OFF" will appear in the display. Press and hold CLOCK again to change setting. To exit, press CANCEL.
-
 1
1 -
 2
2 -
 3
3 -
 4
4 -
 5
5 -
 6
6 -
 7
7 -
 8
8 -
 9
9 -
 10
10 -
 11
11 -
 12
12 -
13
-
14
-
15
-
16
 |
 |
