Maytag MEW7527AB Use & Care Guide - Page 14
General Cleaning, Oven Light, Oven Door
 |
View all Maytag MEW7527AB manuals
Add to My Manuals
Save this manual to your list of manuals |
Page 14 highlights
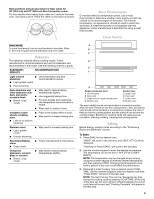
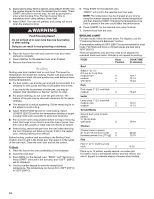
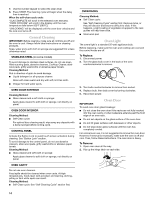
7. Use the number keypad to select the clean level. 8. Press START. The cleaning cycle will begin when the delay time is reached. When the self-clean cycle ends: "CLN COMPLETE will scroll in the selected oven text area. "OVEN COOLING" will scroll in the display until the oven temperature falls below 500°F (260°C). "UNLOCKING" will be displayed until the oven door unlocks and the lock icon turns off. General Cleaning IMPORTANT: Before cleaning, make sure all controls are off and the oven is cool. Always follow label instructions on cleaning products. Soap, water and a soft cloth or sponge are suggested first unless otherwise noted. STAINLESS STEEL (on some models) To avoid damage to stainless steel surfaces, do not use soapfilled scouring pads, abrasive cleaners, Cooktop Cleaner, steelwool pads, gritty washcloths or abrasive paper towels. Cleaning Method: Rub in direction of grain to avoid damage. ■ Liquid detergent or all-purpose cleaner: Rinse with clean water and dry with soft, lint-free cloth. ■ Vinegar for hard water spots. OVEN DOOR EXTERIOR Cleaning Method: ■ Glass cleaner and a soft cloth or sponge: Apply glass cleaner to soft cloth or sponge, not directly on panel. OVEN DOOR INTERIOR Cleaning Method: ■ Self-Clean cycle: For optimal door cleaning result, wipe away any deposits with a damp sponge before running cycle. CONTROL PANEL Activate the Button Lock to avoid touch screen activation during cleaning. See "Button Lock" section. To avoid damage to the control panel, do not use abrasive cleaners, steel-wool pads, gritty washcloths or abrasive paper towels. Cleaning Method: ■ Glass cleaner and soft cloth or sponge: Apply glass cleaner to soft cloth or sponge, not directly on panel. OVEN CAVITY Do not use oven cleaners. Food spills should be cleaned when oven cools. At high temperatures, foods react with porcelain and staining, etching, pitting or faint white spots can result. Cleaning Method: ■ Self-Clean cycle: See "Self-Cleaning Cycle" section first. OVEN RACKS Cleaning Method: ■ Self-Clean cycle: See "Self-Cleaning Cycle" section first. Remove racks, or they will discolor and become difficult to slide. If this happens, a light coating of vegetable oil applied to the rack guides will help them slide. ■ Steel-wool pad Oven Light The ovens light is a standard 25-watt appliance bulb. Before replacing, make sure the oven and cooktop are cool and the control knobs are off. To Replace: 1. Disconnect power. 2. Turn the glass bulb cover in the back of the oven counterclockwise to remove. 3. Turn bulb counterclockwise to remove from socket. 4. Replace bulb, then bulb cover by turning clockwise. 5. Reconnect power. Oven Door IMPORTANT: To avoid oven door glass breakage: ■ Do not close the oven door if the racks are not fully inserted into the oven cavity or when bakeware extends past the front edge of an oven rack. ■ Do not set objects on the glass surface of the oven door. ■ Do not hit glass surfaces with bakeware or other objects. ■ Do not wipe down glass surfaces until the oven has completely cooled. For normal oven use, it is not suggested to remove the oven door. However, if removal is necessary, make sure the oven is off and cool. Then, follow these instructions. The oven door is heavy. To Remove: 1. Open oven door all the way. 2. Flip up the hinge latch on each side. 14
-
 1
1 -
2
-
3
-
4
-
5
-
6
-
7
-
8
-
 9
9 -
 10
10 -
 11
11 -
 12
12 -
 13
13 -
 14
14 -
 15
15 -
 16
16 -
 17
17 -
 18
18 -
 19
19 -
20
-
21
-
22
-
23
-
24
-
25
-
26
-
27
-
28
-
29
-
30
-
31
-
32
-
33
-
34
-
35
-
36
-
37
-
38
-
39
-
40
 |
 |