Maytag MEW7530WDS Installation Instructions - Page 5
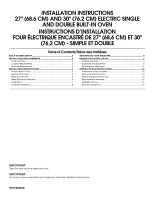
Installation Instructions - 30
 |
UPC - 883049189208
View all Maytag MEW7530WDS manuals
Add to My Manuals
Save this manual to your list of manuals |
Page 5 highlights
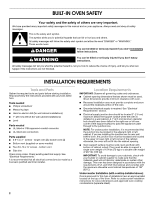
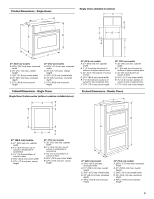
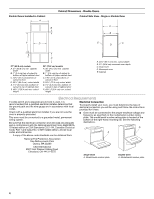
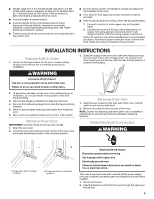
■ Models rated from 7.3 to 9.6 kW at 240 volts (5.5 to 7.2 kW at 208 volts) require a separate 40-amp circuit. Models rated at 7.2 kW and below at 240 volts (5.4 kW and below at 208 volts) require a separate 30-amp circuit. ■ A circuit breaker is recommended. ■ Connect directly to the circuit breaker box (or fused disconnect) through flexible, armored or nonmetallic sheathed, copper cable (with grounding wire). See "Make Electrical Connection" section. ■ Flexible conduit from the oven should be connected directly to the junction box. ■ Do not cut the conduit. The length of conduit provided is for serviceability of the oven. ■ A UL listed or CSA approved conduit connector must be provided. ■ If the house has aluminum wiring, follow the procedure below: 1. Connect a section of solid copper wire to the pigtail leads. 2. Connect the aluminum wiring to the added section of copper wire using special connectors and/or tools designed and UL listed for joining copper to aluminum. Follow the electrical connector manufacturer's recommended procedure. Aluminum/copper connection must conform with local codes and industry accepted wiring practices. INSTALLATION INSTRUCTIONS Prepare Built-In Oven 1. Decide on the final location for the oven. Locate existing wiring to avoid drilling into or severing wiring during installation. 3. Grasp the edges of the oven door with both hands and close the oven door until it will no longer close. Lift and pull oven door toward you and remove. Set the oven door(s) aside on a covered work surface. WARNING Excessive Weight Hazard Use two or more people to move and install oven. Failure to do so can result in back or other injury. 2. To avoid floor damage, set the oven onto cardboard prior to installation. Do not use handle or any portion of the front frame for lifting. 3. Remove the shipping materials and tape from the oven. 4. Remove the hardware package from inside the bag containing literature. 5. Remove and set aside racks and other parts from inside the oven. 6. Move oven and cardboard close to the oven's final location. Remove Oven Door IMPORTANT: Use both hands to remove oven door(s). 1. Open the oven door. 2. Locate the oven door latches in both corners of the oven door, and rotate the latches forward to the unlocked position. Remove Oven Trim 1. Side trims are located on the right side of the oven. Cut the cable tie and remove side trims. 2. Remove the cable tie from the side of the oven. NOTE: Screws for attaching side trims (after oven is installed in cabinet) are in a screw bag inside the package containing literature. Make Electrical Connection WARNING A B A. Oven door latch in locked position B. Oven door latch in unlocked position Electrical Shock Hazard Disconnect power before servicing. Use 8 gauge solid copper wire. Electrically ground oven. Failure to follow these instructions can result in death, fire, or electrical shock. This oven is manufactured with a neutral (white) power supply wire and a cabinet-connected green (or bare) ground wire twisted together. 1. Disconnect power. 2. Feed the flexible conduit from the oven through the opening in the cabinet. 5
-
 1
1 -
 2
2 -
 3
3 -
 4
4 -
 5
5 -
 6
6 -
 7
7 -
 8
8 -
 9
9 -
 10
10 -
 11
11 -
12
-
13
-
14
-
15
-
16
 |
 |
