Maytag MEW9530AS Use & Care Guide - Page 17
Convect Broil, Auto Convection Conversion
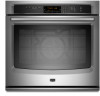 |
View all Maytag MEW9530AS manuals
Add to My Manuals
Save this manual to your list of manuals |
Page 17 highlights
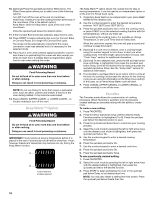
6. (Optional) If a cook time is desired, enter a cooking length using the number keypad to set a timer to alert you when cooking ends. The time length cannot exceed 12 hours. See "Cook Timer" section for additional information. When the cook time expires, the oven will behave as chosen in the When Done option. 7. (Optional) To set a delayed start, press the left and right arrow keys until Delay is highlighted, then press the quickset pad below Delay. Scroll to the desired time for delay and press the quickset pad below DELAY. See the "Delay Start" section for additional information. 8. (Optional) Press the quickset pad below When Done. The When Done option allows you to select one of the following options: Turn Off: Play a sound and turn off the oven at the end of the countdown. Hold Temp: Play a sound every minute and continue to run the cooking function at the end of the countdown. (This is the default option.) Keep Warm: Play a sound and start the Keep Warm cycle at the end of the countdown. Press the quickset pad below the desired option. WARNING Food Poisoning Hazard Do not let food sit in oven more than one hour before or after cooking. Doing so can result in food poisoning or sickness. 9. Press START to begin the cooking cycle. 10. Press CANCEL (UPPER CANCEL or LOWER CANCEL, on double models) to turn off the oven. Convect Broil (on some models) A B A. Broil element B. Convection fan During convection broiling, the broil element will heat the oven then maintain oven temperature, while the fan circulates the hot air. The oven door must be closed for the broil element and convect fan to operate. The temperature is preset at 550°F (288°C), but can be changed to a different temperature. Cooking times will vary depending on the rack position and temperature and may need to be adjusted. The fan turns off immediately when door is opened and turns on again immediately when door is closed. The broil element will turn off approximately 30 seconds after the door is opened. They will turn on again approximately 30 seconds after the door is closed. On double oven models, Convect Broil is available only in the upper oven. To Use Convect Broil: Before using Convect Broil, see the "Broil" section for general broiling guidelines. Position food on the broiler pan grid and place it in the center of the oven rack with the longest side parallel to the door. It is not necessary to wait for the oven to preheat before putting in food unless recommended in the recipe. Close the door. 1. Press CONVECT then press the quickset pad below Convect Broil. 2. A prompt for recipe conversion will appear in the display. Press the quickset pad below Yes or No. 3. From the Temperature screen, use the number keypad to enter a desired cooking temperature. The temperature must be between 450°F (232°C) and 550°F (288°C) or an invalid key alert occurs and the default temperature appears on screen. 4. Press the quickset button below OK and then press START OR Press START. 5. Press CANCEL (UPPER CANCEL or LOWER CANCEL, on double models) to turn off the oven. Auto Convection Conversion Convection temperature and/or times can differ from those of standard cooking. When necessary, the oven automatically reduces standard recipe temperature and/or times. 1. Press CONVECT. 2. Select a recipe conversion mode (Convect Bake, Convect Roast or Convect Broil) by pressing the quickset pad below the desired mode. 3. Press the quickset pad below Yes to use the recipe conversion mode, or No to skip the recipe conversion mode. NOTE: It is also possible to skip this screen using the Settings Menu. See "Setup Menu" section. 4. Press the quickset pad below Yes. 5. From the Temperature screen, use the number keypad to enter a desired cooking temperature. The temperature must be between 170°F (77°C) and 550°F (288°C) or an invalid key alert occurs and the default temperature appears on the screen. 6. The recipe will be automatically converted if necessary. 7. Press the quickset pad below Ok to enter the time screen. Use the number keypads to enter the desired time then press the quickset pad below Ok. OR Press the quickset pad below Skip Timer to continue without entering a cook time. Temperature and time (if selected) will be displayed. Necessary conversions will be shown after Start is pressed. Once entering the cooking menu, it is possible to set Cook Timer, Delay Start and, if time is set, the When Done option. 8. (Optional) If a cook time is desired, enter a cooking length using the number keypad to set a timer to alert you when cooking ends. The time length cannot exceed 12 hours. See "Cook Timer" section for additional information. When the cook time expires, the oven will behave as chosen in the When Done option. 9. (Optional) To set a delayed start, press the left and right arrow keys until Delay is highlighted, then press the quickset pad below Delay. Scroll to the desired time for delay and press the quickset pad below Delay. See the "Delay Start" section for additional information. 17
-
 1
1 -
2
-
3
-
4
-
5
-
6
-
7
-
8
-
9
-
10
-
11
-
 12
12 -
 13
13 -
 14
14 -
 15
15 -
 16
16 -
 17
17 -
 18
18 -
 19
19 -
 20
20 -
 21
21 -
 22
22 -
23
-
24
-
25
-
26
-
27
-
28
-
29
-
30
-
31
-
32
-
33
-
34
-
35
-
36
-
37
-
38
-
39
-
40
-
41
-
42
-
43
-
44
-
45
-
46
-
47
-
48
-
49
-
50
-
51
-
52
-
53
-
54
-
55
-
56
 |
 |
