Maytag MFI2569VEW User Instructions - Page 6
Donottighten - model
 |
UPC - 883049135250
View all Maytag MFI2569VEW manuals
Add to My Manuals
Save this manual to your list of manuals |
Page 6 highlights
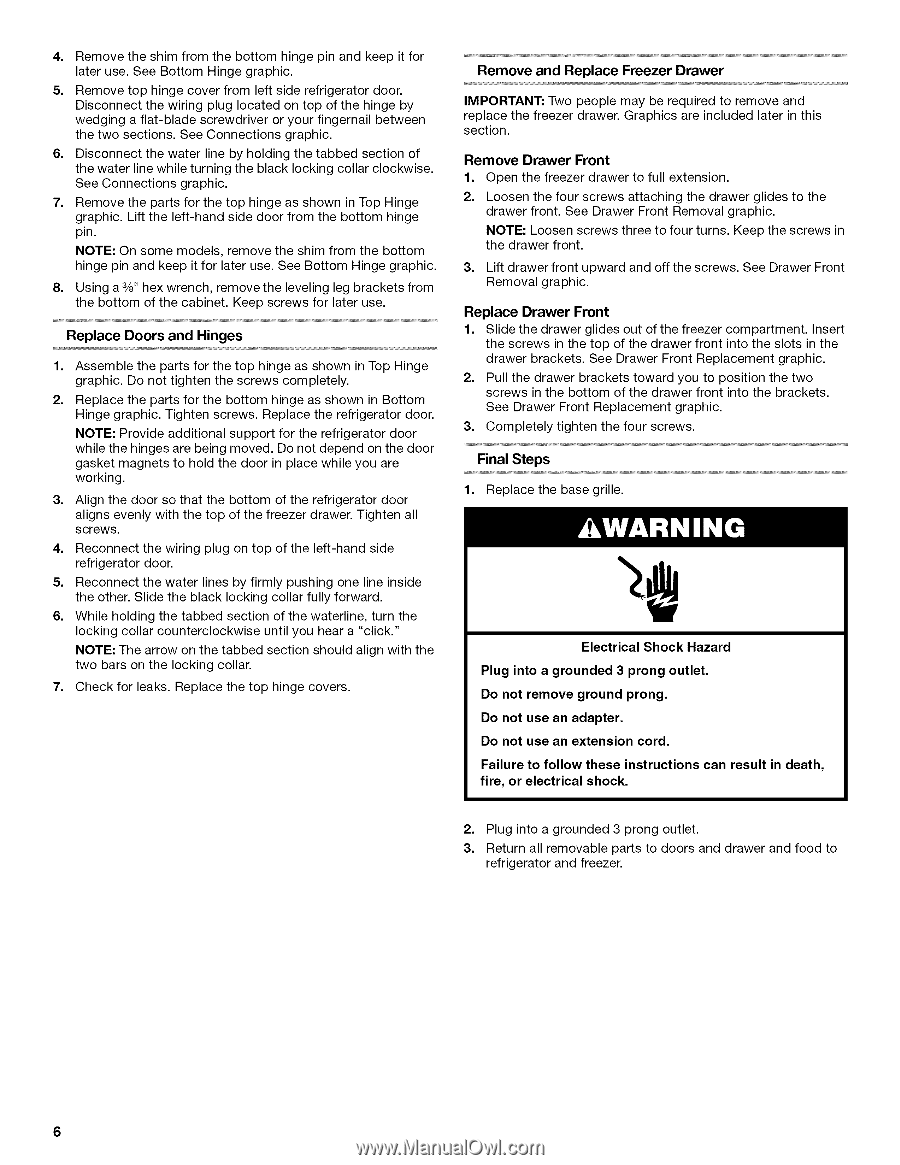
4. Removteheshimfromthebottomhingepinandkeepitfor lateruseS. eeBottomHingegraphic. Remove and Replace Freezer Drawer 5. Removteophingecovefrromleftsiderefrigeratdooror. Disconnetchtewiringpluglocateodntopofthehingeby wedginagflat-bladsecrewdrivoerryourfingernabiletween thetwosectionsS.eeConnectiognrsaphic. IMPORTANT: Two people may be required to remove and replace the freezer drawer. Graphics are included later in this section. 6. Disconnetchtewatelrinebyholdintghetabbedsectioonf thewatelrinewhileturnintgheblacklockingcollacr lockwise. Remove Drawer Front SeeConnectiognrsaphic. 1. Open the freezer drawer to full extension. 7. RemovtehepartsforthetophingeasshowninTopHinge graphicL.ifttheleft-hansdidedoorfromthebottomhinge 2. Loosen the four screws attaching the drawer glides to the drawer front. See Drawer Front Removal graphic. pin. NOTE: Loosen screws three to four turns. Keep the screws in NOTEO: nsomemodelsre, movteheshimfromthebottom the drawer front. hingepinandkeepitforlateruseS. eeBottomHingegraphic. 3. Lift drawer front upward and off the screws. See Drawer Front 8. Usinga3/8h"exwrenchre, movtehelevelinlgegbrackeftrsom Removal graphic. thebottomofthecabineKt. eepscrewfsorlateruse. Replace Drawer Front ReplaceDoorsandHinges 1. Slide the drawer glides out of the freezer compartment. Insert the screws in the top of the drawer front into the slots in the 1. AssembtlheepartsforthetophingeasshowninTopHinge graphicD. onottightenthescrewcsompletely. 2. ReplactehepartsforthebottomhingeasshowninBottom HingegraphicT.ightesncrewsR. eplacteherefrigeratdoor or. NOTEP: rovidaedditionsaul pporfot rtherefrigeratdooror whilethehingeasrebeingmovedD. onotdepenodnthedoor gaskemt agnetsoholdthedoorinplacewhileyouare working. 3. Alignthedoorsothatthebottomoftherefrigeratdoor or ascligrenwsesv.enlwy iththetopofthefreezedrraweTr.ighteanll drawer brackets. See Drawer Front Replacement graphic. 2. Pull the drawer brackets toward you to position the two screws in the bottom of the drawer front into the brackets. See Drawer Front Replacement graphic. 3. Completely tighten the four screws. Final Steps 1. Replace the base grille. 4. Reconnetchtewiringplugontopoftheleft-hansdide refrigeratdoor or. 5. Reconnetchtewatelrinesbyfirmlypushinognelineinside theotherS. lidetheblacklockingcollafrullyforward. 6. Whileholdintghetabbedsectionofthewaterlinteu,rnthe lockingcollarcounterclockwuinsetiyl ouheaar "click." NOTET:hearrowonthetabbedsectiosnhouldalignwiththe twobarsonthelockingcollar. 7. ChecfkorleaksR. eplactheetophingecovers. Electrical Shock Hazard Plug into a grounded 3 prong outlet. Do not remove ground prong. Do not use an adapter. Do not use an extension cord. Failure to follow these instructions can result in death, fire, or electrical shock. 2. Plug into a grounded 3 prong outlet. 3. Return all removable parts to doors and drawer and food to refrigerator and freezer. 6
-
 1
1 -
 2
2 -
 3
3 -
 4
4 -
 5
5 -
 6
6 -
 7
7 -
 8
8 -
 9
9 -
 10
10 -
 11
11 -
 12
12 -
13
-
14
-
15
-
16
-
17
-
18
-
19
-
20
-
21
-
22
-
23
-
24
-
25
-
26
-
27
-
28
-
29
-
30
-
31
-
32
-
33
-
34
-
35
-
36
 |
 |