Maytag MGDC400VW Installation Instructions
Maytag MGDC400VW - Centennial 29" Gas Dryer Manual
 |
UPC - 883049145396
View all Maytag MGDC400VW manuals
Add to My Manuals
Save this manual to your list of manuals |
Maytag MGDC400VW manual content summary:
- Maytag MGDC400VW | Installation Instructions - Page 1
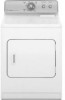
Dryer Installation Instructions 29" and 27" Wide Models Gas (U.S.A. and Canada) & Electric (Canada Only) Instructions D'installation de la sÉcheuse Modèles de 29" et de 27" de largeur À gaz (É.-U. et Canada) et Électrique (Canada uniquement) Para obtener acceso al manual de uso y cuidado en español - Maytag MGDC400VW | Installation Instructions - Page 2
Gas and Propane Installation Code, CSA B149.1. The dryer must be electrically grounded in accordance with local codes, or in the absence of local codes, with the National Electrical Code, ANSI/NFPA 70 or Canadian Electrical Code, CSA C22.1. WARnIng: For your safety, the information in this manual - Maytag MGDC400VW | Installation Instructions - Page 3
plumber, or gasfitter qualified or licensed by the State of Massachusetts. � If using a ball valve, it shall be a T-handle type. � A flexible gas connector, when used, must not exceed 3 feet. IMPORTANT SAFETY INSTRUCTIONS When discarding or storing your old clothes dryer, remove the door. SAVE THESE - Maytag MGDC400VW | Installation Instructions - Page 4
supply and venting, and read "Electrical Requirements" and "Venting Requirements" before purchasing parts. Mobile home installations require metal exhaust system hardware. For further information, please reference the "Assistance or Service" section of the "Dryer User Instructions." You will need - Maytag MGDC400VW | Installation Instructions - Page 5
Title 24, HUD Part 280) or the Canadian Manufactured Home Standard CAN/CSA-Z240 MH. Mobile home installations require: ■■ Metal exhaust system hardware, available for purchase. For further information, please reference the "Assistance or Service" section of the "Dryer User Instructions." ■■ Special - Maytag MGDC400VW | Installation Instructions - Page 6
and cardboard. For mobile home use Gas dryers must be securely fastened to the floor. 3. Examine the leveling legs. Find the diamond marking. Mobile home installations require a Mobile Home Installation Hold-down Kit. For ordering information please reference the "Dryer User Instructions." 6 - Maytag MGDC400VW | Installation Instructions - Page 7
agree with the type of gas available, please reference the "Assistance or Service" section of the "Dryer User Instructions." LP gas conversion: Conversion must be made by a qualified technician. No attempt shall be made to convert the dryer from the gas specified on the model/serial rating plate for - Maytag MGDC400VW | Installation Instructions - Page 8
be purchased by calling the toll-free number. For further information, please reference the "Assistance or Service" section of the "Dryer User Instructions." Rigid metal vent: ■■ For best drying performance, rigid metal vents are recommended. ■■ Rigid metal vent is recommended to avoid crushing and - Maytag MGDC400VW | Installation Instructions - Page 9
models only) Optional exhaust installations: 27" Wide Models can be converted to exhaust out the right side, left side, or through the bottom. Each kit includes step-bystep instructions. For further information, please reference the "Assistance or Service" section of the "Dryer User Instructions - Maytag MGDC400VW | Installation Instructions - Page 10
Service" section of the "Dryer User Instructions." ■■ Over-the-Top Installation: Part Number 4396028 ■■ Periscope Installation (For use with dryer vent to wall vent mismatch): Part Side and bottom exhaust installations for 27" wide models have a 90º turn inside the dryer. To determine maximum - Maytag MGDC400VW | Installation Instructions - Page 11
cloth to remove any dust. 9. Read "Dryer Use" in the "Dryer User Instructions". 10. Set the dryer on a full heat cycle (not an air cycle) for 20 minutes and start the dryer. If the dryer will not start, check the following: ■■ Dryer is plugged into a grounded 3 prong outlet. ■■ Electrical supply - Maytag MGDC400VW | Installation Instructions - Page 12
Models A Reversible Large Side Swing Door B C E A F B D D C 1. Place towel (A) on top of dryer to avoid damaging the surface. 2. Open dryer top screws in cabinet are in large part of hinge slot. Pull door forward off screws. Set door on top of dryer. Remove top screws from cabinet. 4. - Maytag MGDC400VW | Installation Instructions - Page 13
slot to adjust alignment. 27" Wide Models Reversible Side-Swing Door Appearance may vary A 7. Attach door hinges to dryer door so that the larger hole is in cabinet are in large part of hinge slot. Pull door forward off screws. Set door (handle side up) on top of dryer. Remove top screws from - Maytag MGDC400VW | Installation Instructions - Page 14
risque de blessure et ce qui peut se produire en cas de non-respect des instructions. IMPORTANT : L'installation du gaz doit se conformer aux codes locaux, ou en l'absence de codes locaux, au National Fuel Gas Code, ANSI Z223.1/NFPA 54. La sécheuse doit être électriquement reliée à la terre conform - Maytag MGDC400VW | Installation Instructions - Page 15
la sécheuse est utilisée près d'eux. � Avant d'enlever la sécheuse du service ou la jeter, enlever la porte du compartiment de séchage. � Ne pas mettre d'une recommandation spécifique dans le guide d'utlilisation et d'entretien, ou publiée dans les instructions de réparation par l'utilisateur que - Maytag MGDC400VW | Installation Instructions - Page 16
Dans l'État du Massachusetts, les instructions d'installation suivantes sont applicables : ■ Les travaux d'installation et réparation doivent être exécutés par un plombier ou tuyauteur qualifié ou licencié, ou par le personnel qualifié d'une entreprise licenciée par l'État du - Maytag MGDC400VW | Installation Instructions - Page 17
installations en résidence mobile, le circuit d'évacuation nécessite des matériaux métalliques. Pour plus d'informations, consulter la section "Assistance ou service" dans "Instructions écifications électriques". ■■ Un plancher robuste capable de supporter le poids de la sécheuse (sécheuse et charge) - Maytag MGDC400VW | Installation Instructions - Page 18
les plinthes. ■■ Un espace supplémentaire 1" (25 mm) doit être envisagé de tous les côtés de la sécheuse afin de réduire le transfert de bruit. ■■ Pour installation dans un placard avec porte, on doit prévoir des ouvertures minimums d'entrée d'air en haut et en bas de la porte. Les portes à claire - Maytag MGDC400VW | Installation Instructions - Page 19
du Canadian Manufactured Home Standard CAN/CSA-Z240 MH. Autres critères à respecter pour une installation en résidence mobile : ■■ Un matériel d'évacuation métallique, disponible à l'achat. Pour plus d'informations, consulter la section "Assistance ou service" dans "Instructions d'utilisation de la - Maytag MGDC400VW | Installation Instructions - Page 20
ou plus de personnes pour déplacer et installer la sécheuse. Le non-respect de cette instruction peut causer une blessure au dos ou garde des "Instructions d'utilisation de la sécheuse". Conversion pour l'alimentation au propane : Un technicien qualifié doit effectuer la conversion. Ne pas - Maytag MGDC400VW | Installation Instructions - Page 21
d'arrêt. Aux États-Unis : Un robinet d'arrêt individuel manuel doit être installé à six (6) pi (1,8 m) maximum de la sécheuse, conformément au Code raccord neuf en acier inoxydable souple (conception homologuée par l'American Gas Association ou par CSA International) pour raccorder la sécheuse à - Maytag MGDC400VW | Installation Instructions - Page 22
de réduire la capacité d'évacuation et le rendement. ■■ Ne pas installer le conduit métallique flexible dans les cavités fermées des murs, éro sans frais. Pour plus d'informations, consulter la section "Assistance ou service" dans "Instructions d'utilisation de la sécheuse". 22 4" (102 mm) 4" (102 - Maytag MGDC400VW | Installation Instructions - Page 23
de périscope REMARQUE : On peut acheter les trousses suivantes pour les installations où le dégagement est réduit. Veuillez consulter la section "Assistance ou service" dans les "Instructions d'utilisation de la sécheuse". ■■ Installation au-dessus de la sécheuse : Pièce numéro 4396028 23 - Maytag MGDC400VW | Installation Instructions - Page 24
44 pi (13,4 m) 38 pi (11,6 m) rigide 3 Métallique 35 pi (10,7 m) 29 pi (8,8 m) rigide 4 Métallique 27 pi (8,2 m) 21 pi (6,4 m) rigide REMARQUE : Les installations avec évacuation par le côté ou par le bas pour les modèles de 27" de largeur comportent un changement de direction à 90º à l'int - Maytag MGDC400VW | Installation Instructions - Page 25
de mettre à nouveau de niveau la sécheuse une fois qu'on l'installe à son emplacement définitif. Raccordement au gaz 1. Retirer le capuchon rouge de poussière. 9. Lire la section "Utilisation de la sécheuse" dans "Instructions d'utilisation de la sécheuse". 10. Régler la sécheuse pour un programme - Maytag MGDC400VW | Installation Instructions - Page 26
■■ Si le robinet d'arrêt de la canalisation de gaz est ouvert, contacter un technicien qualifié. REMARQUE : Il est possible que la sécheuse dégage une odeur lors du chauffage initial. Cette odeur est normale lorsque l'élément chauffant est utilisé pour la première fois. L'odeur disparaîtra. - Maytag MGDC400VW | Installation Instructions - Page 27
8. Enlever la gâche de la porte (E) de la caisse. Utiliser un petit tournevis à lame plate pour ôter soigneusement 4 bouchons d'obturation (F) du côté gauche de la caisse. Insérer les bouchons dans les trous de charnière du côté droit de la caisse. 9. Insérer les vis dans les trous inférieurs du - Maytag MGDC400VW | Installation Instructions - Page 28
-SP © 2009. All rights reserved. DURASAFE is a trademark of Whirlpool, U.S.A., Whirlpool Canada LP Licensee in Canada 2To8us droits réservés. DURASAFE est une marque de commerce de Whirlpool, U.S.A., Emploi licencié par Whirlpool Canada LP au Canada 11/09 Printed in U.S.A. Imprimé aux É.-U.
-
 1
1 -
 2
2 -
 3
3 -
 4
4 -
 5
5 -
 6
6 -
 7
7 -
8
-
9
-
10
-
11
-
12
-
13
-
14
-
15
-
16
-
17
-
18
-
19
-
20
-
21
-
22
-
23
-
24
-
25
-
26
-
27
-
28
 |
 |
W10296135A
W10296136A-SP
Table of Contents
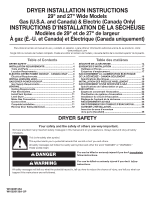
DRYER SAFETY
.........................................................................
1
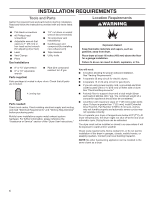
INSTALLATION REQUIREMENTS
.............................................
4
Tools and Parts
......................................................................
4
Location Requirements
.........................................................
4
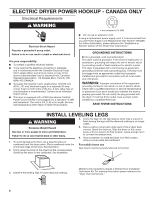
ELECTRIC DRYER POWER HOOKUP - CANADA ONLY
........
6
Electrical Requirements
........................................................
6
INSTALL LEVELING LEGS
.........................................................
6
GAS DRYER POWER HOOKUP
................................................
7
Gas Supply Requirements
.....................................................
7
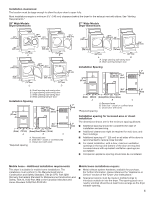
VENTING
.....................................................................................
8
Venting Requirements
...........................................................
8
Plan Vent System
...................................................................
9
Install Vent System
..............................................................
11
Level Dryer
...........................................................................
11
Make Gas Connection
.........................................................
11
Connect Vent
........................................................................
11
Complete Installation
..........................................................
11
Reverse Door Swing (Optional)
..........................................
12
DRYER INSTALLATION INSTRUCTIONS
29" and 27" Wide Models
Gas (U.S.A. and Canada) & Electric (Canada Only)
INSTRUCTIONS D’INSTALLATION DE LA SÉCHEUSE
Modèles de 29" et de 27" de largeur
À gaz (É.-U. et Canada) et Électrique (Canada uniquement)
Para obtener acceso al manual de uso y cuidado en español, o para obtener información adicional acerca de su producto, visite:
www.whirlpool.com
Tenga listo su número de modelo completo. Puede encontrar el número de modelo y de serie dentro de la cavidad superior de la puerta.
DRYER SAFETY
You
You can be killed or seriously injured if you don't immediately
can be killed or seriously injured if you don't
follow
All safety messages will tell you what the potential hazard is, tell you how to reduce the chance of injury, and tell you what can
happen if the instructions are not followed.
Your safety and the safety of others are very important.
We have provided many important safety messages in this manual and on your appliance. Always read and obey all safety
messages.
This is the safety alert symbol.
This symbol alerts you to potential hazards that can kill or hurt you and others.
All safety messages will follow the safety alert symbol and either the word “DANGER” or “WARNING.”
These words mean:
follow instructions.
instructions.
DANGER
WARNING
Table des matières
SÉCURITÉ DE LA SÉCHEUSE
................................................
14
EXIGENCES D'INSTALLATION
...............................................
17
Outillage et Pièces
...............................................................
17
Exigences d'emplacement
..................................................
17
RACCORDEMENT À L'ALIMENTATION ÉLECTRIQUE
DE LA SÉCHEUSE - CANADA SEULEMENT
.........................
19
Spécifications Électriques
..................................................
19
INSTALLATION DES PIEDS DE NIVELLEMENT
....................
20
RACCORDEMENT D'UNE SÉCHEUSE À GAZ
......................
20
Spécifications de l'alimentation en gaz
.............................
20
ÉVACUATION
...........................................................................
22
Exigences concernant l'évacuation
...................................
22
Planification du système d'évacuation
..............................
23
Installation du circuit d'évacuation
....................................
24
Réglage de l'aplomb de la sécheuse
.................................
25
RACCORDEMENT AU GAZ
.................................................
25
RACCORDEMENT DU CONDUIT D'ÉVACUATION
............
25
ACHEVER L'INSTALLATION
................................................
25
Inversion du sens d'ouverture
de la porte (facultatif)
..........................................................
26