Maytag MGDC465HW Quick Reference Sheet - Page 1
Maytag MGDC465HW Manual
 |
View all Maytag MGDC465HW manuals
Add to My Manuals
Save this manual to your list of manuals |
Page 1 highlights
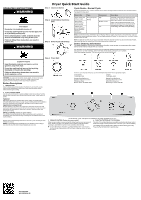
OPERATING INSTRUCTIONS WARNING Fire Hazard No washer can completely remove oil. Do not dry anything that has ever had any type of oil on it (including cooking oils). Items containing foam, rubber, or plastic must be dried on a clothesline or by using an Air Cycle. Failure to follow these instructions can result in death or fire. WARNING Dryer Quick Start Guide Step 1. Clean Lint Screen Cycle Guide - Normal Cycle Sensor Dry/Automatic Dry - Senses moisture in the load or air temperature and shuts off when the load reaches the selected dryness level. Step 2. Load Clothes; then Close Door Step 3. Select Cycle and Settings Items to Dry: Cycle: Temperature: Description: Jeans, heavy work clothes, towels Work clothes, medium-weight fabrics, sheets Casual, shirts, pants, lightweight items, synthetics, delicates, athleticwear Energy Preferred Normal High Medium or Low Low Automatic cycles give the best drying in the shortest time. Drying time varies based on fabric type, load size, and dryness setting. Select a drying temperature based on the fabrics in your load. If you are unsure of the temperature to select for a load, select the lower setting rather than the higher setting. NOTE: Government energy certifications for the Maytag® Electric models were based on the Timed Dry cycle with the Maximum drying temperature setting. The as-shipped defaults of Sensor Dry, Automatic Dry, Low Heat, Wrinkle Shield™ were not used. NOTE: If loads do not seem as dry as you would like, select Very Dry the next time you dry a similar load. If loads seem drier than you like, select Less Dry the next time you dry a similar load. Online Ordering Information For detailed installation instruction and maintenance information, winter storage, and transportation tips, please see the Owner's Manual included with your machine. For information on any of the following items, the full cycle guide, detailed product dimensions, or for complete instructions for use and installation, please visit https://www.maytag.com/owners, or in Canada https://www.maytag.ca/owners. This may save you the cost of a service call. Step 4. Press Start Explosion Hazard Keep flammable materials and vapors, such as gasoline, away from dryer. Do not dry anything that has ever had anything flammable on it (even after washing). Failure to follow these instructions can result in death, explosion, or fire. WARNING: To reduce the risk of fire, electric shock, or injury to persons, read the IMPORTANT SAFETY INSTRUCTIONS, located in your appliance's Owner's Manual, before operating this appliance. Button Descriptions 1. TEMPERATURE Select a drying temperature based on the fabrics in your load. If you are unsure of the temperature to select for a load, select the lower setting rather than the higher setting. However, if you need to contact us, use the information listed below for the appropriate region. United States: 1-800-344-1274 Canada: 1-800-688-2002 Maytag Brand Appliances Customer eXperience Center 553 Benson Road Benton Harbor, MI 49022-2692 Maytag Brand Appliances Customer eXperience Centre 200-6750 Century Ave. Mississauga, Ontario L5N 0B7 2. CYCLE CONTROL KNOB Use the Cycle Control knob to select available cycles on your dryer. Turn the knob to select a cycle for your laundry load. See the online "Cycle Guide" for details. TIMED DRY Will run the dryer for the specified time on the control. On models with a selectable temperature knob, you may choose a setting based on the fabrics in your load. Drying time and temperature will depend on your dryer model. SENSOR DRY/AUTOMATIC DRY Senses moisture in the load or air temperature and shuts off when the load reaches the selected dryness level. Gives the best drying in the shortest time. Drying time will vary based on fabric type, load size, dryness setting, and temperature setting. WRINKLE CONTROL Feature (on some models) The Wrinkle Control feature will run after your drying cycle is complete. It periodically starts and stops the dryer, tumbling the load without heat to help avoid wrinkling. Wrinkle Control automatically starts at the end of the cycle. Opening the door will stop this feature. NOTE: A signal will sound periodically when the Wrinkle Control setting is selected, but only if the End of Cycle Signal is also selected. Not all features, cycles, and options are available on all models. Appearance may vary. 3. WRINKLE CONTROL Feature (on some models) 4. PUSH TO START/END OF CYCLE SIGNAL When you are unable to remove a load of clothes from the dryer as soon as it stops, wrinkles can form. The Wrinkle Control option periodically tumbles, rearranges, and fluffs the load to help keep wrinkles from forming. Get up to 90 minutes of heat-free, periodic tumbling at the end of a cycle. Turn the Wrinkle Control knob to Off or 90 min. at any time before the cycle has ended. The End of Cycle Signal produces an audible sound when the drying cycle is finished. Promptly removing clothes at the end of the cycle reduces wrinkling. Turn the End of Cycle Signal knob to select the desired setting (On or Off). Press the Push to Start knob to start the dryer. W11355745A W11355961A-SP
-
 1
1 -
 2
2
 |
 |