Maytag MQU2057BEW Use and Care Guide - Page 4
Freezer Use - freezers
 |
View all Maytag MQU2057BEW manuals
Add to My Manuals
Save this manual to your list of manuals |
Page 4 highlights
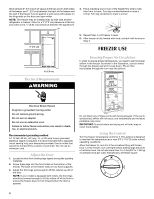
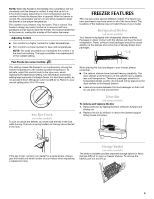
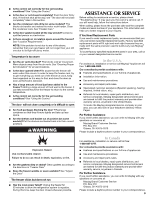
Allow at least 3" (7.5 cm) of air space at the top and on both sides of the freezer and 1" (2.5 cm) between the back of the freezer and the wall. If the freezer is to be against a wall, leave extra space on the hinge side so the door can open wider. NOTE: This freezer may be installed side by side with another refrigerator or freezer. Allow for a 3" (7.5 cm) clearance at the top and sides and a ¹⁄₄" (0.64 cm) clearance between the appliances. 4. Place a leveling tool on top of the freezer first side to side, then front to back. Turn leg counterclockwise to raise a corner. Turn leg clockwise to lower a corner. 3" (7.5 cm) 3" (7.5 cm) Electrical Requirements WARNING 5. Repeat Step 4 until freezer is level. 6. After freezer is fully loaded with food, recheck with level as in Step 4. FREEZER USE Ensuring Proper Air Circulation In order to ensure proper temperature, you need to permit proper airflow in the freezer. As shown in the illustration, cool air enters through the freezer wall and moves down. The air then recirculates through the vent near the bottom. Electrical Shock Hazard Plug into a grounded 3 prong outlet. Do not remove ground prong. Do not use an adapter. Do not use an extension cord. Failure to follow these instructions can result in death, fire, or electrical shock. Recommended grounding method A 115 Volt, 60 Hz., AC only, 15- or 20-amp fused, grounded electrical supply is required. It is recommended that a separate circuit serving only your freezer be provided. Use an outlet that cannot be turned off by a switch or pull chain. Do not use an extension cord. Adjust the Door 1. Locate the two front leveling legs taped among the packing materials. 2. Screw these legs into the front holes on the bottom of the freezer. The back of the freezer rests on two fixed supports. 3. Adjust the front legs just enough to lift the cabinet up off of the floor. NOTE: If your model is equipped with rollers, the front legs should be lowered enough to lift the rollers off of the floor to ensure the freezer does not roll forward when the door is opened. Do not block any of these vents with food packages. If the vents are blocked, airflow will not occur, and temperature and moisture problems may occur. IMPORTANT: To avoid odors and drying out of food, wrap or cover foods tightly. Using the Control Turn the freezer temperature control to 4. This setting is designed to maintain the temperature at or near 0°F (-17.8°C) under normal operating conditions. Allow the freezer to cool 6 to 8 hours before filling with frozen food. Let the freezer cool overnight before adding large amounts of unfrozen food. Do not add more than 2 to 3 lbs (907 to 1,350 g) of unfrozen food per cubic foot (28.32 L) of freezer space. 4
-
 1
1 -
 2
2 -
 3
3 -
 4
4 -
 5
5 -
 6
6 -
 7
7 -
 8
8 -
 9
9 -
 10
10 -
11
-
12
-
13
-
14
-
15
-
16
-
17
-
18
-
19
-
20
 |
 |
