Maytag UXT2030ADW Use & Care Guide - Page 8
Prepare Range Hood Vents and, Mounting Tabs, Attach Vent Damper or Transition, Mount Range Hood,
 |
View all Maytag UXT2030ADW manuals
Add to My Manuals
Save this manual to your list of manuals |
Page 8 highlights
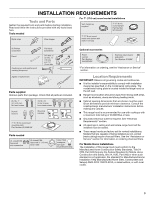
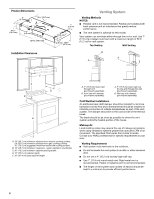
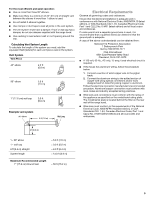
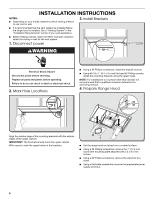
8. Prepare Range Hood Vents and Mounting Tabs D x2 C B A 10. Mount Range Hood ■ Install Strain Relief Install a UL Listed/CSA Approved ¹⁄₂" (13 mm) strain relief (A). ■ Mounting Tabs Start a #8-18 x 4.2 x 16 mm) truss-head screw into the mounting tab (D) on each side of the range hood as shown in the inset. Insert the screws approximately 2 turns into the mounting tab holes. ■ 7" (17.8 cm) Round Vent Installations Remove both top knockouts (B and C). 9. Attach Vent Damper or Transition 7" (17.8 cm) Round Vent Mounting Plate A C B ■ Lift the range hood into place, positioning the rear slots over the mounting brackets. ■ Using a Phillips screwdriver, push on the screws that are started into the top mounting tabs and bend the tabs against the cabinet side walls. Attach the screws to the cabinet side walls. IMPORTANT: Do not overtighten the screws. ■ For direct wire installations, run the home power supply cable according to the National Electric Code or CSA standards and local codes and ordinances. There must be enough wiring from the fused disconnect (or circuit breaker) box to make the connection in the range hood electrical terminal box. ■ Tighten the strain relief screws. NOTE: Do not reconnect power until the installation is complete. OPTIONAL: If you prefer, bend the rear tabs against the rear of the range hood and attach to the wall using #8-18 x 4.2 x 16 mm) truss-head screws. 11. Connect Vent System ■ Connect the ventwork to the range hood. ■ Seal joints with vent clamps or duct tape to make secure and airtight. ■ Check that the back draft dampers work properly. ■ Using (2) short Phillips head screws, install the 7" (17.8 cm) round vent mounting plate over the vent knockouts removed in Step 8. Position the wide flange (C) to the front. NOTE: An optional 7" (17.8 cm) round damper (A), Part Number W10355451 is available as an accessory. For information on ordering, see the "Assistance or Service" section. ■ If installing the optional round damper, position it over the round vent mounting plate. 8
-
 1
1 -
2
-
 3
3 -
 4
4 -
 5
5 -
 6
6 -
 7
7 -
 8
8 -
 9
9 -
 10
10 -
 11
11 -
 12
12 -
 13
13 -
14
-
15
-
16
-
17
-
18
-
19
-
20
-
21
-
22
-
23
-
24
-
25
-
26
-
27
-
28
 |
 |
