Meade ETX80 Instruction Manual - Page 13
Getting Started
 |
View all Meade ETX80 manuals
Add to My Manuals
Save this manual to your list of manuals |
Page 13 highlights
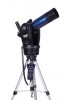
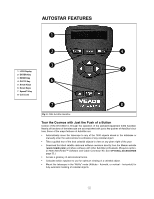
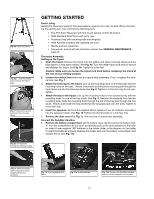
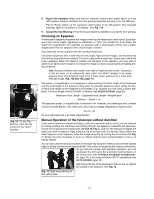
Fig. 6a: Open the tripod... Fig. 6b: ...turn the locking ring to secure the tripod legs. Fig. 7: Unlock the vertical lock and move the tube down. GETTING STARTED Parts Listing Getting the telescope ready for first observations requires only a few minutes. When first opening the packing box, note carefully the following parts: • The ETX Astro Telescope with fork mount system, built-in flip barlow. • #882 Standard Field Tripod with carry case • Accessory tray with mounting bolts and wingnuts • #494 AutoStar handbox with attached coil cord. • Meade premium eyepieces. • Hex-wrench, packed with the instruction manual. See GENERAL MAINTENANCE page 33. Telescope Assembly Setting up the Tripod 1. Open the tripod: Remove the tripod from the giftbox and stand vertically. Gently pull the legs apart to a fully open position. See Fig. 6a. Turn the center tripod lock knob to secure and stabilize the tripod. See Fig. 6b. Tighten to a firm feel. Caution: Make sure you loosen the tripod lock knob before collapsing the tripod at the end of your viewing session. 2. Loosen the vertical lock and move the optical tube downward. Then, re-tighten the vertical lock. See Fig. 7. 3. Attach the telescope to the tripod: Line up the mounting holes on the telescope with the mounting holes on the base. Reach underneath and thread the mounting bolt through the tripod base and into the telescope base. See Fig. 8. Tighten to a firm feel only, do not overtighten. 4. Attach the tray to the tripod: Line up the mounting holes on the accessory tray with the mounting holes on one of the tray struts. See Fig. 9. Remove the wingnuts from the two mounting bolts. Slide the mounting bolts through the top of the tray and through the tray struts. Reach underneath the tray and thread the wingnuts back onto the bolts. Tighten to a firm feel only. 5. Insert the eyepiece: Remove the supplied 25mm eyepiece from its container and slide it into the eyepiece holder. See Fig. 10. Tighten the thumbscrews to a firm feel only. 6. Remove the dust cover (12, Fig. 1) from the end of optical tube assembly. Connect the AutoStar Handbox 7. Remove the battery compartment: Lift the battery cover. Gently remove the battery hold- er from the compartment so you don't accidentally pull out the wires attached to the holder. Insert 6 user-supplied "AB" batteries in the holder. Refer to the diagram on the holder to orient the batteries properly. Replace the holder back into the battery compartment and replace the lid. See Fig. 11a. Fig. 8a: Thread bolts through the telescope base. Fig. 9: Attach accessory tray to leg braces using supplied bolts and wingnuts. Fig. 10: Insert eyepiece and focus. Fig. 11a: Install batteries. Fig. 11b: Connect the AutoStar handbox and turn on the computer control panel. 13
-
 1
1 -
2
-
3
-
4
-
5
-
6
-
7
-
 8
8 -
 9
9 -
 10
10 -
 11
11 -
 12
12 -
 13
13 -
 14
14 -
 15
15 -
 16
16 -
 17
17 -
 18
18 -
19
-
20
-
21
-
22
-
23
-
24
-
25
-
26
-
27
-
28
-
29
-
30
-
31
-
32
-
33
-
34
-
35
-
36
-
37
-
38
-
39
-
40
-
41
-
42
-
43
-
44
 |
 |
