Meade Infinity 70mm User Manual - Page 5
Setting Up Your Tripod, Attach The Accessory Tray, Attach The Optical Tube To The, Mount, Attach
 |
View all Meade Infinity 70mm manuals
Add to My Manuals
Save this manual to your list of manuals |
Page 5 highlights
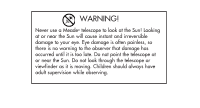
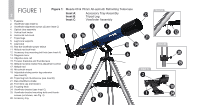
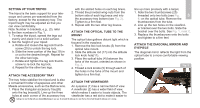
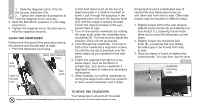
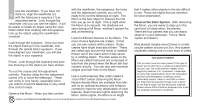
SETTING UP YOUR TRIPOD The tripod is the basic support for your telescope and comes pre-assembled from the factory; except for the accessory tray. The tripod height may be adjusted so that you can view comfortably. Note: Number in brackets, e.g., (3), refer to the item numbers in Fig. 1. 1. To setup the tripod, spread the legs out evenly and place it on a solid surface. 2. Set the height of your tripod: a. Rotate and loosen the leg lock thumbscrew (20) to unlock the leg lock. b. Slide the inner portion of the leg (19) in or out to the desired length. Repeat for the other two legs. c. Rotate and tighten the leg lock thumbscrew to re-lock the leg lock. d. Repeat for the other two legs. ATTACH THE ACCESSORY TRAY with the slotted holes on each leg brace. 2. Thread the provided wing-nuts from the bottom side of each leg brace and into the accessory tray bottom (see Fig. 2). Tighten to a firm feel. 3. Repeat with the two other leg braces. ATTACH THE OPTICAL TUBE TO THE MOUNT The optical tube gathers distant light which is focused in the eyepiece. 1. Remove the two lock knobs (5) from the optical tube mount. 2. Slide the altitude rod (17) into the altitude lock knob hole(11). 3. Place the optical tube (4) between the forks of the mount, oriented as shown in Fig. 3. 4. Thread a lock knobs (5) through each of the holes in the forks of the mount and tighten to a firm feel. The tray helps stabilize the tripod and is also a convenient holder of eyepieces and other ATTACH THE VIEWFINDER Meade accessories, such as the Barlow lens. An eyepiece (1) has a narrow field of view. 1. Place the triangular accessory tray(26) A viewfinder (2) has a wider field of view, onto the leg braces(9). Line up the three which makes it easier to locate objects. The holes at each corner of the accessory tray viewfinder has a red dot to make it easier to Looking at or near the Sun will cause irreversible damage to your eye. Do not point this telescope at or near the Sun. Do not look through the telescope as it is moving. line up more precisely with a target. 1. Note the two thumbscrews (25) threaded onto two bolts (see Fig. 3 4) on the optical tube. Remove the thumbscrews from the tube. 2. Line up the two holes on the viewfind- er bracket over the two bolts. Slide the bracket over the bolts. See Fig. 1, inset C. 3. Replace the thumbscrews onto the bolts and tighten to a firm feel. ATTACH THE DIAGONAL MIRROR AND EYEPIECE The diagonal mirror reflects the light from the optical tube to a more comfortable viewing position. Fig. 2
-
 1
1 -
 2
2 -
 3
3 -
 4
4 -
 5
5 -
 6
6 -
 7
7 -
 8
8 -
 9
9 -
 10
10 -
 11
11 -
12
-
13
-
14
-
15
-
16
-
17
-
18
-
19
-
20
 |
 |