Meade LightBridge 10 inch User Manual - Page 10
Fig. F, Fig.F
 |
View all Meade LightBridge 10 inch manuals
Add to My Manuals
Save this manual to your list of manuals |
Page 10 highlights
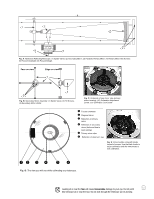
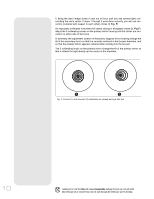
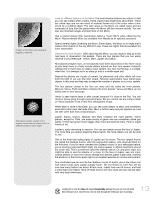
5. Bring the star's image slowly in and out of focus until you see several disks surrounding the star's center. If steps 1 through 3 were done correctly, you will see concentric (centered with respect to each other) circles (1, Fig. F). An improperly collimated instrument will reveal oblong or elongated circles (2, Fig.F). Adjust the 3 collimating screws on the primary mirror housing until the circles are concentric on either side of the focus. In summary, the adjustment screws on the plastic diagonal mirror housing change the tilt of the secondary mirror so that it is correctly centered in the focuser drawtube, and so that the primary mirror appears centered when looking into the focuser. The 3 collimating knobs on the primary mirror change the tilt of the primary mirror so that it reflects the light directly up the center of the drawtube. b c Fig. F: Correct (1) and incorrect (2) collimation as viewed during a star test. 10 Looking at or near the Sun will cause irreversable damage to your eye. Do not point this telescope at or near the Sun. Do not look through the telescope as it is moving.
-
 1
1 -
2
-
3
-
4
-
 5
5 -
 6
6 -
 7
7 -
 8
8 -
 9
9 -
 10
10 -
 11
11 -
 12
12 -
 13
13 -
 14
14 -
 15
15 -
16
-
17
-
18
-
19
-
20
-
21
-
22
-
23
-
24
 |
 |
