Meade LightBridge 12 inch User Manual - Page 7
Insert Eyepiece And Attach Red Dot Finder
 |
View all Meade LightBridge 12 inch manuals
Add to My Manuals
Save this manual to your list of manuals |
Page 7 highlights
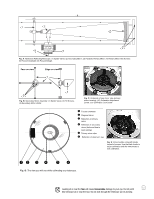
INSERT EYEPIECE AND ATTACH RED DOT FINDER STEP 10: The entire assembly should move easily up and down and from side to side. eyepiece holder holder thumbscrew STEP 11: If you wish to insert the deluxe 2 inch eyepiece, remove the 1.25" eyepiece holder (15) from the focuser assembly by loosening holder thumbscrew (as shown in photo to the left). Slide the 2 inch eyepiece into the focuser and tighten with the eyepiece locking screw. To focus the eyepiece, turn the focuser wheels (13) in or out. The focuser has both a lock knob and a tension adjustment knob. The first lock prevents the draw tube (16) from moving in and out. The second lock locks the focuser knob, thereby locking a focus position into place. Experiment with these knobs to discover which adjustments are comfortable with your viewing style. Note that the 16" model comes with a two-speed focuser. Use the large focus wheel (13A) for fast focus and the small focus knob (13B) for fine focus. groov hex screw bracket top end bracket thumbscrew STEP 12: A red dot finder projects a red dot in place of crosshairs, to make it easier to line up more precisely with a target. First, assemble the red dot finder. Slide the bracket over the groove of the red dot finder scope. Tighten the two hex screws with the supplied hex wrench to secure in place. Slide the red dot finder bracket into the slot on the top OTA. Slide it in from the top (it will only go into the slot from this end). Tighten the thumbscrew to hold the red dot bracket securely in place. You will need to align the red dot finder. See page 8. STEP 13: To move the telescope, remove the tube assembly from the base assembly. Grasp the tube assembly by the trusses and lift up. It is recommended that you relocate the telescope when it is disassembled into two pieces. STEP 14: Note that there is a fan on the bottom of the mirror tube. It is powered by a battery pack using 4 AA user-supplied batteries. If you begin observing at sunset, and the telescope has been heated by the sun or by being in your car, you may notice "turbulence" in your images. In this case, you can run the fan until your images stabilize and are steady. The fan probably needs to be used less than an hour. Note also that there are three lock screws and three collimation screws. These screws are for use with the collimation procedure. See page 14. Looking at or near the Sun will cause irreversable damage to your eye. Do not point this telescope at or near the Sun. Do not look through the telescope as it is moving. 7
-
 1
1 -
 2
2 -
 3
3 -
 4
4 -
 5
5 -
 6
6 -
 7
7 -
 8
8 -
 9
9 -
 10
10 -
 11
11 -
 12
12 -
13
-
14
-
15
-
16
-
17
-
18
-
19
-
20
-
21
-
22
-
23
-
24
 |
 |
