Meade LightBridge 16 inch User Manual - Page 6
Assemble The Tube
 |
View all Meade LightBridge 16 inch manuals
Add to My Manuals
Save this manual to your list of manuals |
Page 6 highlights
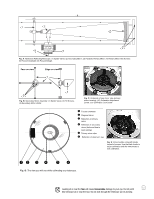
ASSEMBLE THE TUBE dust cover seam front panel truss knobs truss STEP 6: Move the circular panels. They should move easily about, without any stiffness. If not, tighten or loosen them using a screwdriver while holding the attachment nut in place (with your fingers or a wrench) on the other end of the bolt. STEP 7: Turn the base so that it is now resting on the feet. Place the rear OTA (8) into the base. Make sure that the altitude bearings fit snugly into the openings on the side panels of the base. Make sure that the seam of the tube is pointing at the front panel. Lift to remove the dust cover from the mirror. Note: You can thread the Altitude Adjustment Knob into the protrusion just below the Altitude Bearing (7). Use the Altitude Adjustment Knob when you add larger eyepieces, cameras or other accessories to the Meade LightBridge telescope without causing the tube to slip or drift. To learn how to install the Altitude Adjustment Knob, see page 21. STEP 8: Loosen the three bottom truss knobs (6). Place each truss (5) into a set of slots. slots slots 6 Tighten the truss knobs after all three trusses are in place. STEP 9: After all 3 trusses are in place, loosen the knob (4) on top of each truss. Place the secondary mirror tube (3) into the slots at the top of each truss.... STEP 10: ...and tighten the truss knobs. Make sure that the seam on the tube is also pointing towards the front panel (see step 7). Looking at or near the Sun will cause irreversable damage to your eye. Do not point this telescope at or near the Sun. Do not look through the telescope as it is moving.
-
 1
1 -
 2
2 -
 3
3 -
 4
4 -
 5
5 -
 6
6 -
 7
7 -
 8
8 -
 9
9 -
 10
10 -
 11
11 -
 12
12 -
13
-
14
-
15
-
16
-
17
-
18
-
19
-
20
-
21
-
22
-
23
-
24
 |
 |
