Memorex MLT2022 User Guide - Page 21
Feature Setup
 |
View all Memorex MLT2022 manuals
Add to My Manuals
Save this manual to your list of manuals |
Page 21 highlights
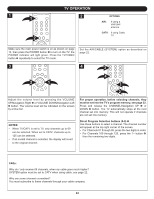
FEATURE SETUP 11 SETTING THE MENU (CONTINUED) 2 23 4 Make sure the main power switch is on as shown on page 14, then press the POWER button 1 to turn on the TV; the POWER indicator will light green. Press the ENTER/MENU button 2; the Video Menu screen will appear. Press the CHANNEL UP 3 or DOWN 4 button to select FEATURE, then press the ENTER/MENU button 2 to select it. 5 4 2 1 3 Press the CHANNEL/Navigation UP 1 or DOWN 2 button to select COLOR MODE, then press the ENTER/MENU button 5 to select it. At the next screen, Color Temp will be selected. Adjust the overall "Color Temp" to User, Cool, Normal or Warm using the VOLUME UP/Navigation Right 3 or VOLUME DOWN/Navigation Left 4 button. 3 4 5 4 2 1 3 1 3 2 You can also adjust each color temperature separately by selecting the desired color using the CHANNEL/Navigation UP 1 or DOWN 2 button, then adjusting the setting using the VOLUME UP/Navigation Right 3 or VOLUME DOWN/Navigation Left 4 button. Press the ENTER/MENU button 5 to confirm the setting. 5 4 1 2 3 When done, select RETURN using the CHANNEL/Navigation UP 1 or DOWN 2 button and press the ENTER/MENU button 3. 6 4 2 1 3 Press the CHANNEL/Navigation UP 1 or DOWN 2 button until 3D NR is selected. Set the desired 3D noise reduction setting (0-3) using the VOLUME UP/Navigation Right 3 or VOLUME DOWN/Navigation Left 4 button. NOTE: This setting is not be available for PC(VGA) mode. Press the CHANNEL/Navigation UP 1 or DOWN 2 button until ASPECT RATIO is selected. Set the aspect ratio (Full, Letter Box, LB to Full, Zoom out, Zoom In 1 or Zoom In 2) using the VOLUME UP/Navigation Right 3 or VOLUME DOWN/Navigation Left 4 button. NOTES: • This setting is not available for PC (VGA) mode. • For Component (YPbPr) mode, the Letter Box and Zoom out selection will not be available. 20
-
 1
1 -
2
-
3
-
4
-
5
-
6
-
7
-
8
-
9
-
10
-
11
-
12
-
13
-
14
-
15
-
 16
16 -
 17
17 -
 18
18 -
 19
19 -
 20
20 -
 21
21 -
 22
22 -
 23
23 -
 24
24 -
 25
25 -
 26
26 -
27
-
28
-
29
-
30
-
31
-
32
-
33
-
34
-
35
-
36
-
37
 |
 |
