Memorex Mi1006 User Guide - Page 7
Optional Features - video
 |
UPC - 749720007127
View all Memorex Mi1006 manuals
Add to My Manuals
Save this manual to your list of manuals |
Page 7 highlights
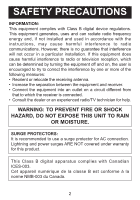
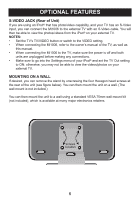
OPTIONAL FEATURES S-VIDEO JACK (Rear of Unit) If you are using an iPod® that has photo/video capability, and your TV has an S-Video input, you can connect the Mi1006 to the external TV with an S-Video cable. You will then be able to view the photos/videos from the iPod® on your external TV. NOTES: • Set the TV's TV/VIDEO button or switch to the VIDEO setting. • When connecting the Mi1006, refer to the owner's manual of the TV, as well as this manual. • When connecting the Mi1006 to the TV, make sure the power is off and both units are unplugged before making any connections. • Make sure to go into the Settings menu of your iPod® and set the TV Out setting to ON; otherwise, you may not be able to view the videos/photos on your external TV. MOUNTING ON A WALL If desired, you can remove the stand by unscrewing the four Hexagon head screws at the rear of the unit (see figure below). You can then mount the unit on a wall. (The wall mount is not included.) You can then mount the unit to a wall using a standard VESA 75mm wall-mount kit (not included), which is available at many major electronics retailers. screws location 6
-
 1
1 -
 2
2 -
 3
3 -
 4
4 -
 5
5 -
 6
6 -
 7
7 -
 8
8 -
 9
9 -
 10
10 -
 11
11 -
 12
12 -
13
-
14
-
15
-
16
-
17
 |
 |