Metabo ASE 18 LTX Operating Instructions 2 - Page 10
Assembly, Initial Operation, Setting
 |
View all Metabo ASE 18 LTX manuals
Add to My Manuals
Save this manual to your list of manuals |
Page 10 highlights
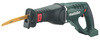
en ENGLISH 2 Hexagon wrench 3 Screw for setting the guide 4 Guide 5 Saw blade quick-clamping device 6 Lever for saw blade quick-clamping device 7 Front handle 8 Switch-on locking button 9 Trigger 10 Rear handle 11 Battery pack release 12 Battery pack 13 Capacity indicator button 14 Capacity and signal indicator 6. Assembly, Initial Operation, Setting Remove the battery pack from the machine before any adjustment or maintenance is carried out. 6.1 Battery pack Charge the battery pack before use (12). If performance diminishes, recharge the battery pack. "Li-Power" li-ion battery packs have a capacity and signal indicator: (14) - Press the (13) button, the LEDs indicate the charge level. - If one LED is flashing, the battery pack is almost flat and must be recharged. Removal: Press the battery pack release (11) button and pull the battery pack (12) forwards. Inserting: Slide in the battery pack (12) until it engages. 6.2 Inserting, removing saw blade Do not touch the saw blade immediately following operation of the tool, as it can be extremely hot and can lead to skin burns. 1 Pull up lever (6) of saw blade quick-clamping device upwards and hold in this position. 2 Insert the saw blade as far as it will go or remove it. 3 Release lever (6). 4 Check that the saw blade is securely seated. Note: If a saw blade happens to break off and cannot be removed by hand from the saw blade quick-clamping device, pull up lever (6) and hold. Engage the tip of a saw blade in the broken section and pull it out. A fine-toothed metal saw blade is best suited for this task. See Fig. A, page 3. Tip: The best possible access to the saw blade quick-clamping device (5) is achieved when it is in its outermost position. If necessary: switch of the machine, press the trigger switch (9) lightly to move the saw blade quick-clamping device into its outermost position. 10 6.3 Setting the guide The cutting depth can be limited by shifting the guide (4) (e.g. when sawing in front of a wall). Occasionally shift the guide (4) to achieve even wear of the saw blade. 1 Remove hexagon wrench (2) from its depot (1). 2 Release both screws (3) with hexagon wrench. 3 Shift guide (4) to desired position. 4 Tighten both screws (3) again with hexagon wrench. 5 Insert hexagon wrench for safekeeping in its depot. Check guide for correct seating. 7. Use 7.1 Switching on and off Switching on: Press switch-on locking button (8) and hold in; then actuate the trigger (9). (The switch-on locking button (8) can be pressed from the left and the right machine sides.) To switch off: release the trigger switch (9). 7.2 Stepless stroke rate setting The stroke rate can be changed steplessly by varying the pressure applied to the trigger switch (9), thus adapting it to the material and working conditions. 7.3 Working Directions Sawing: Use a saw blade geared to the material to be sawn. Press the machine with the guide (4) against the workpiece. Switch on the machine, and only then guide the saw blade against the workpiece. Do not make contact with any objects or with the ground with the moving saw blade (danger of recoil and saw blade fracture!) Adapt the stroke rate to the material to the sawn. Avoid excessive pressure on the saw blade (particularly in the case of long saw blades). If the saw blade jams, turn the machine off immediately. Widen the sawn gap slightly with a suitable tool and take out the machine. After completing the sawing cut, switch off the machine and only take it out of the sawn gap to place it down once the saw blade has come to a standstill (danger of recoil). Plunge cuts: Plunge cuts may only be made in soft materials such as wood or plastic. Only use short saw blades. Hold the machine with both hands at the intended handles, take a secure stance and concentrate on the work. See Fig. B, page 2: The machine is pressed with the edge of the guide (4) against the workpiece. The saw blade does not make contact with the workpiece. Switch on the machine. The corner of
-
 1
1 -
2
-
3
-
4
-
 5
5 -
 6
6 -
 7
7 -
 8
8 -
 9
9 -
 10
10 -
 11
11 -
 12
12 -
 13
13 -
 14
14 -
 15
15 -
16
-
17
-
18
-
19
-
20
-
21
-
22
-
23
-
24
-
25
-
26
-
27
-
28
-
29
-
30
-
31
-
32
-
33
-
34
-
35
-
36
-
37
-
38
-
39
-
40
-
41
-
42
-
43
-
44
-
45
-
46
-
47
-
48
-
49
-
50
-
51
-
52
-
53
-
54
-
55
-
56
-
57
-
58
-
59
-
60
 |
 |
