Metabo SBE 710 Operating Instructions 2 - Page 14
Overview, Initial Operation
 |
View all Metabo SBE 710 manuals
Add to My Manuals
Save this manual to your list of manuals |
Page 14 highlights
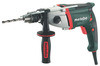
en ENGLISH 6. Overview Fig. A 1 Thumb-wheel for gear selection 2 Additional handle/Additional handle with vibration damping * 3 Depth stop 4 Geared chuck * 5 Futuro Plus keyless chuck * 6 Futuro Top keyless chuck * 7 Sliding switch (normal drilling/impact drilling) 8 Speed preselection wheel * 9 Setting wheel for torque control and impulse function * 10 Electronic signal indicator * 11 Rotation selector switch * 12 Lock button for continuous activation 13 Trigger * depending on model 7. Initial Operation Before plugging in the device, check to see that the rated mains voltage and mains frequency, as specified on the rating label, match your power supply. To guarantee secure purchase of the chuck: After initial drilling (clockwise), use a screwdriver to firmly tighten the safety screw inside the drill chuck (if available/depending on the model). THE SAFETY SCREW HAS A LEFT-HANDED THREAD! 7.1 Fitting the additional handle (2) Fig. B For safety reasons, always use the additional handle supplied. Tighten the additional handle firmly by turning it. 8. Use 8.1 Setting depth stop Fig. C 8.2 Setting direction of rotation, transporting safety device (switch-on lock) Fig. D Do not activate the rotation selector switch (11) unless the motor has completely stopped. 8.3 Setting for normal drilling, impact drilling Fig. E Impact drilling and normal drilling only in a clockwise direction. 8.4 Selecting gear Fig. F Change thumbwheel (1) only when the machine is in the process of running down (briefly switch it on and off). 8.5 Setting torque control, impulse function Fig. G Position 1-6: The motor comes to a complete stop when the preselected torque is reached. 1 = low torque 6 = high torque + = no torque control (max. torque, for drilling) = impulse function switched on constantly (to facilitate tightening and releasing of screws that are tight even when the screw heads are damaged. To enable clean drilling without centre punching in tiles, aluminium or other materials). 8.6 Preselecting rotational speed Fig. H See the table for recommended rotational speeds for drilling. 8.7 Switching On and Off Switching on, rotational speed the trigger (13). Fig. A: Press Release the trigger to switch off. Continuous operation Fig. A: With the trigger (13) pressed, push in the locking button (12) and release the trigger. Press and release the trigger (13) again to switch off. In continuous operation, the machine continues running if it is forced out of your hands. Therefore, always hold the machine with both hands using the handles provided, stand in a safe position and concentrate. 8.8 Tool change, Futuro Top keyless chuck (6) Fig. I Clamp the tool by turning the sleeve firmly to its stop. 8.9 Tool change, Plus (5) keyless chuck Fig. J The ratchet sound which can possibly be heard after opening the drill chuck is functional and is switched off by a reverse rotation of the sleeve. If the chuck is very tightly closed: Firmly grip the chuck with an open-end spanner at the chuck head and firmly turn the sleeve in the direction of the arrow -1. Clamping the tool - Insert the tool -2- as far as possible. - Using one hand, hold the retainer ring securely (depending on fittings). - Turn sleeve in direction -3- until the noticeable mechanical resistance has been overcome. - Caution! The tool is not yet fully tightened! Keep turning the sleeve (it must "click" when turning) until it cannot be turned any further - only now is the tool safely clamped. With a soft tool shank, retightening may be required after a short period of operation. 8.10 Tool change, geared chuck (4) Fig. K 14
-
 1
1 -
2
-
3
-
4
-
5
-
6
-
7
-
8
-
 9
9 -
 10
10 -
 11
11 -
 12
12 -
 13
13 -
 14
14 -
 15
15 -
 16
16 -
 17
17 -
 18
18 -
 19
19 -
20
-
21
-
22
-
23
-
24
-
25
-
26
-
27
-
28
-
29
-
30
-
31
-
32
-
33
-
34
-
35
-
36
-
37
-
38
-
39
-
40
-
41
-
42
-
43
-
44
-
45
-
46
-
47
-
48
-
49
-
50
-
51
-
52
-
53
-
54
-
55
-
56
-
57
-
58
-
59
-
60
-
61
-
62
-
63
-
64
 |
 |
