Metabo SSW 650 Operating Instructions - Page 8
Original instructions - parts
 |
View all Metabo SSW 650 manuals
Add to My Manuals
Save this manual to your list of manuals |
Page 8 highlights
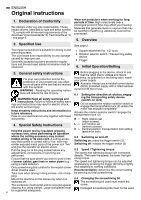
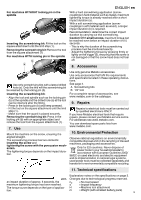
en ENGLISH Original instructions 1. Declaration of Conformity We declare under our sole responsibility: These impact drivers, identified by type and serial number *1), comply with all relevant requirements of the directives *2) and standards *3). Technical file at *4) - see page 3. 2. Specified Use The impact screwdriver is suitable for driving in and removing screws. The user bears sole responsibility for any damage caused by improper use. Generally accepted accident prevention regulations and the enclosed safety information must be observed. Wear ear protectors when working for long periods of time. High noise levels over a prolonged period of time may affect your hearing. Materials that generate dusts or vapours that may be harmful to health (e.g. asbestos) must not be processed. 5. Overview See page 2. 1 Square attachment for 1/2" tools 2 Rotation selector switch / Transporting safety device 3 Trigger 6. Initial Operation/Setting 3. General safety instructions Before plugging in the device, check to see that the rated mains voltage and mains For your own protection and for the protection of your power tool, pay attention to all parts of the text that are marked with this symbol! WARNING - Reading the operating instruc- frequency, as specified on the rating label, match your power supply. Australia: Always use a residual current device (RCD) protected supply with a rated residualcurrent of 30 mA or less. tions will reduce the risk of injury. 6.1 Setting the direction of rotation, engag- WARNING Read all safety warnings and instructions. Failure to follow all safety warnings and instructions may result in electric shock, fire and/or serious injury. Keep all safety instructions and information for future reference. Pass on your electrical tool only together with these ing the transporting safety device (switch-on lock) Do not actuate the rotation selector switch or engage the transportation lock (2) unless the motor has stopped completely! Actuate the rotation selector switch / Engage the transportation lock (2) documents. R = Right rotation set (insert screws) 4. Special Safety Instructions L = Left rotation set (remove screws) Hold the power tool by insulated gripping surfaces only, when performing an operation 0 = Central position: transportation lock setting (switch-on lock) where the cutting accessory may contact hidden wiring or its own cord. A cutting accessory that comes in contact with a "live" wire may render exposed metal parts of the power tool "live" 6.2 Switching on and off Switching on: press the trigger switch (3). Switching off: release the trigger switch (3). and give the operator an electric shock. Pull the plug out of the plug socket before any 6.3 Speed / Tightening torque adjustments, conversions or servicing are The speed and tightening torque are connected performed. directly. The lower the speed, the lower the tight- Ensure that the spot where you wish to work is free ening torque. of power cables, gas lines or water pipes (e.g. The speed and tightening torque can be adjusted using a metal detector). steplessly by pressing the trigger (3) firmly or lightly, Only screwdriving bits suitable for the impact screw- thus adapting to working conditions. driver must be used. Recommendation: determine the correct setting Take care when driving in long screws - risk of slip- by carrying out trial screwdriving. ping. Mount the machine on the screw only when it is 6.4 Changing the screwdriving bit switched off. The screwdriving bit used must match the The workpiece must lay flat and be secured against screw. slipping, e.g. using clamps. Large workpieces must 8 be supported adequately. Damaged screwdriving bits must not be used.
-
 1
1 -
2
-
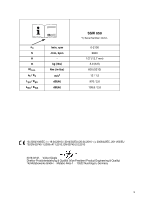 3
3 -
 4
4 -
 5
5 -
 6
6 -
 7
7 -
 8
8 -
 9
9 -
 10
10 -
 11
11 -
 12
12 -
 13
13 -
14
-
15
-
16
-
17
-
18
-
19
-
20
-
21
-
22
-
23
-
24
-
25
-
26
-
27
-
28
-
29
-
30
-
31
-
32
-
33
-
34
-
35
-
36
-
37
-
38
-
39
-
40
-
41
-
42
-
43
-
44
-
45
-
46
-
47
-
48
-
49
-
50
-
51
-
52
 |
 |
