Metabo WE 15-125 HD Operating Instructions 3 - Page 9
Commissioning, Attaching the accessory, Maintenance
 |
View all Metabo WE 15-125 HD manuals
Add to My Manuals
Save this manual to your list of manuals |
Page 9 highlights
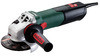
10 Cling-fit backing pad* 11 Cling-fit grinding disc* 12 Lever * 13 Safety cover 14 Extractor connection piece 15 Segment for working near walls (open by twisting) 16 Brush rim * not in scope of delivery 5. Commissioning 5.1 Attachguard at the angle grinder See illustration D on page 2. - Push and hold the lever (12). Place the safety guard (13) in the position indicated. - Release the lever and turn the safety guard until the lever engages. - Make sure that the guard is placed securely: The lever must engage and you should not be able to turn the safety guard. (Disassemble in reverse order.) 5.2 Dust extraction Always use a suitable dust extraction system: Connect an M-class vacuum cleaner to the extractor connection piece (14). For optimal dust extraction, use the connecting sleeve 6.30796. We recommend using an antistatic suction hose Ø 35 mm. 6. Attaching the accessory Prior to any conversion work: Pull the mains plug from the socket. The machine must be switched off and the spindle at a standstill. ENGLISH en Removal: - Lock the spindle (see chapter 6.1). Turn the clamping nut (5) anticlockwise using the 2-hole spanner (6) to unscrew. 6.3 Fitting/removal of backing pad for fibre discs See illustration B on page 2. To fit: - Fit the support flange (3) on the spindle (2). The flange should not turn on the spindle when properly attached. - Lock the spindle (see chapter 6.1). - Fit the backing pad (7) on the spindle (2). - Put on the fibre disc (8). - Screw the special clamping nut (9) onto the spindle (2) as follows. - Turn clockwise using the 2-hole spanner (6). Removal: - Lock the spindle (see chapter 6.1). - Turn anticlockwise using the 2-hole spanner (6). 6.4 Fitting/removal of the cling-fit backing pad See illustration C on page 2. To fit: - Remove support flange and put aside. - Lock the spindle (see chapter 6.1). - Screw the cling-fit backing pad (10) onto the spindle and tighten by hand. Removal: - Lock the spindle (see chapter 6.1). - Turn the cling-fit backing pad (10) anticlockwise by hand to unscrew. 7. Use Always guide the machine with both hands on the handles of the angle grinder provided. 6.1 Locking the spindle 7.1 Working close to walls Press in the spindle locking knob (1) only See illustration E on page 2. when the spindle is stationary! To open and close the segment (15) switch off - Press in the spindle locking button (1) and turn the spindle (2) by hand until the spindle the machine and pull the mains plug. The accessory must be stationary. locking button engages. Only open the segment (15) by twisting when 6.2 Fitting/removing the diamond cup wheel working close to walls. For all other work, the segment must be lowered. See illustration A on page 2. The open area of the safety guard must face the To fit: direction of the wall. - Fit the support flange (3) on the spindle (2). The flange should not turn on the locked spindle when properly attached. 8. Maintenance - Lay the diamond cup wheel (4) on the support flange so (3) that it lies flat along the support flange. - The 2 sides of the clamping nut (5) are different. Screw the clamping nut onto the spindle so that the band of the clamping nut (5) is facing upward. Prior to each use, check if there are parts missing, worn, broken, torn or damaged. Do not use defective or incomplete guard. Replace brush rim (16): replace worn brush rim for optimum extraction. - Lock the spindle (see chapter 6.1). Turn the clamping nut (5) clockwise using the 2-hole spanner (6) to secure. See page 2, illustration F. Pull out worn brush rim and fully insert new brush tim (order no. 6.26733). 9
-
 1
1 -
2
-
3
-
 4
4 -
 5
5 -
 6
6 -
 7
7 -
 8
8 -
 9
9 -
 10
10 -
 11
11 -
 12
12 -
 13
13 -
 14
14 -
15
-
16
-
17
-
18
-
19
-
20
-
21
-
22
-
23
-
24
-
25
-
26
-
27
-
28
-
29
-
30
-
31
-
32
-
33
-
34
-
35
-
36
-
37
-
38
-
39
-
40
-
41
-
42
-
43
-
44
-
45
-
46
-
47
-
48
-
49
-
50
-
51
-
52
-
53
-
54
-
55
-
56
-
57
-
58
-
59
-
60
-
61
-
62
-
63
-
64
-
65
 |
 |
