Miele KF 1801 Vi Operating and Installation manual
Miele KF 1801 Vi Manual
 |
View all Miele KF 1801 Vi manuals
Add to My Manuals
Save this manual to your list of manuals |
Miele KF 1801 Vi manual content summary:
- Miele KF 1801 Vi | Operating and Installation manual - Page 1
Operating and Installation Instructions Fridge-Freezer Combination KF 1801 Vi KF 1811 Vi KF 1901 Vi KF 1911 Vi To prevent accidents and appliance damage read these instructions before installation or use. en - US, CA M.-Nr. 09 169 250 - Miele KF 1801 Vi | Operating and Installation manual - Page 2
INSTRUCTIONS 4 Guide to the Fridge-Freezer combination 7 Before use 9 Turning the appliance On/Off 9 Settings 10 Turning the button sound On/Off 11 refrigerator efficiently 18 Using the freezer freezer basket 27 Cleaning and care 28 Cleaning the interior and accessories 29 Humidity filters - Miele KF 1801 Vi | Operating and Installation manual - Page 3
Water filter 33 Water filter change indicator 33 Exchanging the water filter 34 Confirming the filter change 35 Using an external water filter 35 Lead free certificate 38 Frequently asked questions 39 After sales service 47 Caring for the environment 50 Installation 51 Installation - Miele KF 1801 Vi | Operating and Installation manual - Page 4
instructions before installation and use to prevent accidents and machine damage. This appliance is intended for residential use only. Use only as described in this Operating manual electrician if in doubt. ~ Before installation or service, disconnect the power supply to the work area by unplugging - Miele KF 1801 Vi | Operating and Installation manual - Page 5
Miele's Technical Service Department. ~ This appliance must not be used in a non-stationary location (e.g. on a ship). ~ Do not install the fridge/freezer the refrigerator is plugged in. ~ Do not use water that should not use it without supervision or instruction by a responsible person. ~ To reduce - Miele KF 1801 Vi | Operating and Installation manual - Page 6
other appliance. ~ Do not deactivate the water filter display. ~ Do not use sharp-edged refrigerant, you can be subject to fines and imprisonment under provisions of environmental legislation. Make sure the CFC refrigerant is removed and disposed of by a qualified technician. SAVE THESE INSTRUCTIONS - Miele KF 1801 Vi | Operating and Installation manual - Page 7
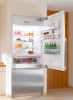
Guide to the Fridge-Freezer combination a Hinged door shelf b Shelves (height adjustable) c Door shelves (height adjustable) d Floating drawer e Control panel f Humidity filter g Main switch to turn the appliance On/Off h SmartFresh drawer i Ice maker j Water filter k Small freezer basket l Large - Miele KF 1801 Vi | Operating and Installation manual - Page 8
Guide to the Fridge-Freezer combination Control panel a Access button "p" activates the control panel b Refrigerator c Left SmartFresh drawer d Right SmartFresh drawer e Freezer f Temperature display X colder; Y warmer Allows you to set the desired temperature in the refrigerator or freezer section - Miele KF 1801 Vi | Operating and Installation manual - Page 9
for the first time ^ Clean the inside of the appliance and the accessories with a mild solution of warm water and liquid dish soap. Dry with a soft cloth. Turning the appliance On/Off ^ Open the upper appliance the appliance with the main switch does not safely isolate it from the power supply. 9 - Miele KF 1801 Vi | Operating and Installation manual - Page 10
. - select settings for the SmartFresh drawers by food type, or - turn on the ice cube maker. For additional information, see the corresponding sections in this manual. On the control panel you will now see the sensor buttons of the four appliance zones. At the right of the control panel there is - Miele KF 1801 Vi | Operating and Installation manual - Page 11
possibilities are described in the respective chapters of this manual. Function Temperature unit °C - °F (see " the access button "p" so it turns yellow. ^ Touch the sensor button for the refrigerator section so it turns yellow. ^ Note the position of the X button, but do button "p" to confirm. 11 - Miele KF 1801 Vi | Operating and Installation manual - Page 12
(for example, during a vacation) some precautions should be taken. ^ Shut off the water supply line, (several hours before switching off the appliance) ^ Take all food out of the the interior ^ Remove and discard the water filter (secure the filter cap) ^ Leave the doors open to prevent odors 12 - Miele KF 1801 Vi | Operating and Installation manual - Page 13
, for example when food is being loaded, re-arranged, or taken out. - large amounts of food are being frozen at once. - the power fails. If the temperature in the freezer zone reaches 0°F (-18°C) or higher, check that food has not defrosted. Door alarm If one of the appliance doors is left open - Miele KF 1801 Vi | Operating and Installation manual - Page 14
independently of each other. 36°F to 46°F (2°C to 8°C) ^ Touch the access button "p" so it turns yellow. A temperature of 37°F (4°C) in the refrigerator section is recommended. - Freezer: 7°F to -11°F (-14°C to -24°C). ^ Touch the sensor button for the refrigerator or freezer section so it turns - Miele KF 1801 Vi | Operating and Installation manual - Page 15
X button until a ; appears in the display. ^ Touch the access button "p". You have left the Custom settings mode. ^ Touch the sensor button for the refrigerator section so it turns yellow. ^ Note the position of the X button, but do not touch. ^ Touch the access button "p" again so it turns white - Miele KF 1801 Vi | Operating and Installation manual - Page 16
provide the right combination of temperature and humidity. The result is freshness up to three times longer than in the other zones of the refrigerator. Storage temperatures For fresh foods that are not adversely affected by cold, the best range is 32° - 37°F (0° - 3°C). This helps to keep the food - Miele KF 1801 Vi | Operating and Installation manual - Page 17
For optimal storage conditions, it is always best to store similar foods together in one crisper. Foods that are best stored under dry conditions - fresh fish and shellfish, meats, poultry, sausage, dairy products and deli salads. Foods that are best stored under moist conditions - fresh produce, - Miele KF 1801 Vi | Operating and Installation manual - Page 18
air in the appliance, there are different temperature zones in the refrigerator. Cold, heavy air sinks to the lowest section of the appliance is tightly closed and stored upright. Do not store cooking oil in the refrigerator door. Traces of oil can cause stress cracks to occur in the plastic - Miele KF 1801 Vi | Operating and Installation manual - Page 19
with a protective boost of cold air. Placing food in the freezer Food to be frozen can be placed anywhere in the freezer section. Use the large freezer basket for large quantities of food. Load bearing capacity of the baskets: KF 18X Vi/SF KF 19X Vi/SF Small basket 30 lbs (14 kg) 41 lbs (19 kg - Miele KF 1801 Vi | Operating and Installation manual - Page 20
refrigerator (the cold given off by the frozen food helps to keep the other food cold), To cool drinks quickly, switch on the SuperCool function. See "SuperCool" for more information. Do not leave bottles in the freezer while still frozen. Simply place directly into boiling water or hot oil. 20 - Miele KF 1801 Vi | Operating and Installation manual - Page 21
selected. Switching off SuperCool The SuperCool function automatically switches off after: Refrigerator: approx. 6 hours Freezer: approx. 52 hours The sensor button turns white, and the appliance continues running at normal power. To save energy, the SuperCool function can be switched off early - Miele KF 1801 Vi | Operating and Installation manual - Page 22
. This applies for the very first use, and whenever the appliance has been out of service for an extended period of time. As soon as the freezer has cooled to a freezing temperature, the ice cube container fills with water. Cold air is blown directly over the container. As soon as the ice cubes - Miele KF 1801 Vi | Operating and Installation manual - Page 23
and frost can form on the rear wall of the refrigerator and drawers. You do not need to remove this build-up, it will defrost and evaporate automatically with the heat generated by the appliance. Freezer section The freezer section defrosts automatically. The moisture generated in the appliance - Miele KF 1801 Vi | Operating and Installation manual - Page 24
, e.g., coin, turn the safety lock to a horizontal position a. ^ On both sides of the drawer, pull the latches b upward and lift the drawer out of the refrigerator. Push the tracks back into the - Miele KF 1801 Vi | Operating and Installation manual - Page 25
Adjusting the interior fittings The divider in the drawer can also be removed for cleaning. ^ Remove the drawer. ^ Lift the divider upward and out. To re-insert the divider, slide it back down along the tracks. Important: If the divider is not in place, the SmartFresh drawer will not work properly. - Miele KF 1801 Vi | Operating and Installation manual - Page 26
Adjusting the interior fittings Adjusting the door shelves For easier loading, unloading, and cleaning, the door shelves can be shifted or completely removed. Removing the hinged door shelf ^ Pull the stops upward and out of the shelf, and remove the shelf lid upward. ^ Now remove the hinged - Miele KF 1801 Vi | Operating and Installation manual - Page 27
resistance is felt. ^ On both sides of the container, pull the latches (see arrow) upward and lift the container out of the freezer. Small freezer basket The small freezer basket can be removed for cleaning. ^ Slide the basket forward until resistance is felt. On the hinged-side of the door is - Miele KF 1801 Vi | Operating and Installation manual - Page 28
power cord before maintenance. Never use cleaning agents containing abrasive substances such as sand, soda, acids, chlorides or chemical solvents. Non-abrasive cleaning agents are also unsuitable, as they can cause matte areas to appear. Only use a mild solution of warm water of a service call. 28 - Miele KF 1801 Vi | Operating and Installation manual - Page 29
is located on the right side underneath the control panel. ^ Unplug the power cord. ^ Remove any food from the appliance and store it in a e.g., shelves. Cleaning the interior and accessories Use a mild solution of warm water and liquid dish soap. Wash all accessories and drawers by hand. Do not - Miele KF 1801 Vi | Operating and Installation manual - Page 30
for cleaning. ^ Clean the filters by rinsing them with lukewarm water. Do not clean in a dishwasher or washing machine. This will damage the filter. ^ Remove the SmartFresh drawer. ^ Air-dry the filters. ^ Place the filters back in the filter cover. ^ Put the filter cover back in place, inserting - Miele KF 1801 Vi | Operating and Installation manual - Page 31
all shelves and accessories. ^ Place food back in the refrigerator section, close the appliance doors, insert the plug in the power outlet and turn the appliance on. ^ Switch on the SuperCool function for the freezer section. The freezer section will cool down quickly. ^ Once the temperature in - Miele KF 1801 Vi | Operating and Installation manual - Page 32
socket. ^ Place the new bulb in the socket. Halogen bulb type: 5 W/12 V/socket G 4. ^ Put the light cover back on and turn clockwise into place. ^ Restore power to the appliance. 32 - Miele KF 1801 Vi | Operating and Installation manual - Page 33
other substances from the incoming tap water. Note: - After installing a new water filter and switching on the ice maker, freezer, empty the container and discard the ice production of the next 24 hours. Additional water filters are available from Miele. It is important to change the water filter - Miele KF 1801 Vi | Operating and Installation manual - Page 34
Water filter Exchanging the water filter Note: Air trapped in the system may cause water and the filter cartridge to eject forcefully. Use caution when removing. ^ Remove the cap from the used filter, 3. ^ Take a new filter cartridge out of the packaging and remove the protective cap. ^ Push the cap - Miele KF 1801 Vi | Operating and Installation manual - Page 35
in the electronic. Using an external water filter If your household water supply already has an external water filter installed, leave the standard water filter (bypass cartridge) installed in the appliance. Confirming the filter change ^ Press and hold the filter change sensor button. ^ At the - Miele KF 1801 Vi | Operating and Installation manual - Page 36
Rated Service Capacity: 740 gals Rated Service Flow: 0.75 gpm Conditions of Certification: Do not use where water is microbiologically unsafe or with water of unknown quality, except that systems certified for cyst reduction may be used on disinfected waters that may contain filterable cysts. 36 - Miele KF 1801 Vi | Operating and Installation manual - Page 37
. Failure to do so may void warranty. Change filter at least every 6 months. Flush new cartridge for 3 minutes. CAUTION: To avoid property damage due to water leakage, you MUST read and follow these operating instructions before installation and use of this product. For estimated costs of - Miele KF 1801 Vi | Operating and Installation manual - Page 38
Lead free certificate This product KF 1801 Vi, KF 1811 Vi (KIMBM30US) / KF 1901 Vi, KF 1911 Vi (KIMBM36US) is tested and certified by WQA against ORD0902 for California "lead free" compliance. Miele & Cie. KG Carl-Miele-Straße 29 D-33332 Gütersloh 38 - Miele KF 1801 Vi | Operating and Installation manual - Page 39
power outlet. Check that the fuse has not tripped. Reset the circuit breaker. If the breaker trips again the appliance or the outlet may be defective. Contact Miele or a qualified electrician. The temperature is set Check the display. incorrectly. The temperature in the refrigerator or freezer - Miele KF 1801 Vi | Operating and Installation manual - Page 40
Frequently asked questions Problems with temperature Issue Possible fault Solution The freezer section is too warm. temperature display This is not a fault. If the ice maker is turned on while for the freezer shows the ambient temperature of the room is ( - Miele KF 1801 Vi | Operating and Installation manual - Page 41
water Contact Miele Technical pipe in the appliance is Service. defective. Check whether the water Contact a plumber. pressure is too low. Check whether the correct water valve has been installed vacuum or brush. The doors have been Once the fridge gets down opened too frequently, or a to the - Miele KF 1801 Vi | Operating and Installation manual - Page 42
being frozen at the same time. There has been a power failure. Once the alarm condition has been corrected, the alarm filter display is red. This is a warning that the Order replacement filters water filter needs to be from Miele. changed soon. The filter display is flashing red. The water filter - Miele KF 1801 Vi | Operating and Installation manual - Page 43
cube container is in the right position. - the freezer compartment temperature is too high. - the water pressure is too low. The water pressure must be between 25 and 120 psi (1.72-8.25 bar). Check whether the correct water valve has been installed. Self-tapping valves and 3/16" (4.76 mm) saddle - Miele KF 1801 Vi | Operating and Installation manual - Page 44
water filter needs changing. See "Water filter" for more information. Check the water pressure. The water pressure must be between 25 and 120 psi (1.72-8.25 bar). Consult a plumber. Check whether the correct water valve has been installed in the freezer will transfer odor/flavor particles to - Miele KF 1801 Vi | Operating and Installation manual - Page 45
Problems with the ice maker Issue Possible fault The ice maker is not producing enough ice or the ice cubes are misshapen. Check the water pressure. The water pressure must be between 25 and 120 psi (1.72-8.25 bar). Check that the freezer temperature is not too low. Change the water filter - Miele KF 1801 Vi | Operating and Installation manual - Page 46
Frequently asked questions The appliance is making noises. Issue Possible fault Solution Brrrrr... Blubb, blubb... Humming noise made by the compressor. This noise can get louder for brief periods when the motor is switching on. A gurgling noise can be heard when coolant is circulating through - Miele KF 1801 Vi | Operating and Installation manual - Page 47
by 5 years of worry-free ownership. MieleCare is the only Extended Service Contract in the industry that guarantees repairs by a Miele Authorized Service Provider using genuine Miele parts. Only genuine Miele parts installed by factory-trained professionals can guarantee the safety, reliability and - Miele KF 1801 Vi | Operating and Installation manual - Page 48
48 - Miele KF 1801 Vi | Operating and Installation manual - Page 49
Installation instructions Information is subject to change. Please refer to our website to obtain the most current product specification, technical & warranty information. To prevent accidents and machine damage read these instructions before installation or use. - Miele KF 1801 Vi | Operating and Installation manual - Page 50
local recycling center about the possibility of recycling these materials. Before discarding an old appliance, disconnect it from the electrical supply and cut off the power cord to prevent it from becoming a hazard. 50 - Miele KF 1801 Vi | Operating and Installation manual - Page 51
instructions. Do not install the appliance: - outdoors - in an environment with dripping water - in rooms that are at risk of frost. The installation location should not be exposed to direct sunlight, nor near a heat source, such as an oven, radiator, etc. Empty weight of your machine: KF 18X1 Vi - Miele KF 1801 Vi | Operating and Installation manual - Page 52
950 lbs (431 kg) KF 19X1 Vi 1,185 lbs (537 kg) To ensure that the appliance is installed securely and functions properly, the base must be flat, level and made of a hard, rigid material. If in doubt, contact Miele. Furniture/fixtures The air intake and outlet must not be blocked or covered in any - Miele KF 1801 Vi | Operating and Installation manual - Page 53
47 kg) Lower door 22 lbs (10 kg) KF 19X1 Vi Upper door 84 lbs (38 kg) Lower door 31 lbs (14 kg) This appliance can be installed "side-by-side" with another fridge/freezer using a "Merging Kit". The "Merging Kit" is available from Miele. Contact Miele or your dealer for specific information about - Miele KF 1801 Vi | Operating and Installation manual - Page 54
in the cavity. The dimensions of the side panel are taken from the opposite wall of the installation space. During installation, ensure that the Kit" will also be needed. The "Merging Kit" is available from Miele. Installation with partition without using the "Merging Kit" If there is a partition - Miele KF 1801 Vi | Operating and Installation manual - Page 55
door opening angle to 90°. ^ Open the door. Installation Front panel gap kit (optional accessory) Two adjacent furniture doors furniture doors, a metal strip can be purchased as an optional accessory. Contact Miele. When attaching the metal strip to the furniture doors, observe the maximum length - Miele KF 1801 Vi | Operating and Installation manual - Page 56
according to each individual kitchen. 3/8" (10 mm) KF 18X1 Vi KF 19X1 Vi A B 32 5/8" (829 mm) Door front max. 1 1/2" (38 mm)* 38 11/16" (982 mm) Door front max. 1 1/2" (38 mm)* C Door handle* Door handle* Door dimensions (opening angle 115°) *The dimensions of the door fronts and handles will - Miele KF 1801 Vi | Operating and Installation manual - Page 57
Niche dimensions Dimensions Niche width (A) KF 1801 Vi, KF 1811 Vi 30" (762 mm) KF 1901 Vi, KF 1911 Vi 36" (915 mm) 57 - Miele KF 1801 Vi | Operating and Installation manual - Page 58
Dimensions Power supply and water connection 1. Power supply 2. Water connection KF 18X1 Vi KF 19X1 Vi A 15" (381 mm) 18" (458 mm) Door front dimensions A B KF 18X1 Vi 53 5/16" 29 1354 mm 13/16" 758 mm KF 19X1 Vi 53 5/16" 35 3/4" 1354 mm 908 mm C 26 7/16" 672 mm 26 7/16" 672 mm 4" - 5 3/16 - Miele KF 1801 Vi | Operating and Installation manual - Page 59
of injury or damage to the product, two people should be used for installation. These installation instructions are intended for use by qualified installers. In addition to these instructions, the appliance must be installed in accordance with all local codes. In the absence of a local code, the - Miele KF 1801 Vi | Operating and Installation manual - Page 60
mm thick (or preferably 19 mm). ^ Check the base (see "Installation"). ^ Check the dimensions of the cavity. ^ Check that the cavity is square. ^ Check the location of the power outlet. ^ Check the location of the water connection (see "Plumbing"). ^ Check that all furniture parts in the vicinity - Miele KF 1801 Vi | Operating and Installation manual - Page 61
^ Do not remove the installation supports from the appliance doors. They will be used later in the installation niche. There are transportation installation (optional accessory) Always disconnect the appliance from the power supply when performing installation, maintenance or service work. Install - Miele KF 1801 Vi | Operating and Installation manual - Page 62
does not correct the problem, contact Miele. ^ Pull the antenna d straight out. ^ Guide the cover b over the antenna d and screw on the cover. ^ Angle the antenna d so that it faces to the right or left. ^ If necessary, disconnect the power supply and continue installing the appliance. Preparing - Miele KF 1801 Vi | Operating and Installation manual - Page 63
brackets b so the appliance can be securely attached to the base or wall. The length of the wooden beam a should be the width of the installation space. If the anti-tip brackets cannot be attached securely with the screws supplied, an alternative anti-tip device can be used. Assure that there - Miele KF 1801 Vi | Operating and Installation manual - Page 64
Installing the appliance ^ Drill pilot holes: In a cabinet with a back wall - 1/8" (3 mm) for 5 x 60 mm wood screws - 1/16" (2 mm) for 4 x 15 mm wood screws. ^ Tightly secure - Miele KF 1801 Vi | Operating and Installation manual - Page 65
must cover the appliance by at least 2" (50.8 mm). ^ Mark the installation height (lower edge of the beam) on the rear wall of the niche. ^ Attach the wooden beam to the rear wall of the niche. Now prepare the water connection from the appliance to the main supply line (see "Plumbing"). ^ Cut a - Miele KF 1801 Vi | Operating and Installation manual - Page 66
installation niche If a side-by-side installation is desired, connect the two appliances together. See the Installation Manual included with the "Merging Kit". ^ Plug the appliance into the power when attempting to slide the appliance into the installation niche - for example, because the floor is - Miele KF 1801 Vi | Operating and Installation manual - Page 67
Unscrew the height-adjustable feet until the mark on the base has reached the indicated guide dimension 1 1/4" (32 mm). The guide dimension of 1 1/4" (32 mm) is related to a niche height of 84" (2134 mm). The installation aids e on the appliance door have been designed for the following custom door - Miele KF 1801 Vi | Operating and Installation manual - Page 68
). If there is no way to attach the top of the appliance, it can be attached to the sides of the installation niche. Attaching the appliance to the installation niche ^ Pull out the plate side lugs i. ^ Secure the attachment plate side lugs. ^ Screw the attachment plate lugs h to the overhead - Miele KF 1801 Vi | Operating and Installation manual - Page 69
the appliance ^ Insert both filler strips into the installation space above the appliance, until they click into place. ^ Open both appliance doors. ^ If necessary, shorten the filler strip j to the required height. ^ Place the 2 - Miele KF 1801 Vi | Operating and Installation manual - Page 70
the appliance Now connect the water supply to the appliance (see "Plumbing"). Preparing the custom door For best results, it is important to mount the upper door before the lower door. ^ Open the appliance door. ^ Unscrew the installation supports n from the appliance door. ^ Loosen the remaining - Miele KF 1801 Vi | Operating and Installation manual - Page 71
Installing the appliance ^ Mark the distance X on the back-side of the custom door. ^ Also calculate and mark the center of the custom door Y. ^ Remove the - Miele KF 1801 Vi | Operating and Installation manual - Page 72
Installing the appliance Attaching and aligning the custom door front ^ Align the custom door height with the threaded bolts p. ^ Now tighten the nuts q on top. This - Miele KF 1801 Vi | Operating and Installation manual - Page 73
Installing the appliance Note the size of the upper custom door front: The fixing brackets are used to secure the custom door front to the bottom - Miele KF 1801 Vi | Operating and Installation manual - Page 74
Installing the appliance Attaching the covers ^ To mount the cover strips on both sides of the upper and lower doors, click them into place from bottom - Miele KF 1801 Vi | Operating and Installation manual - Page 75
Installing the appliance ^ Remove the foil from the adhesive strips. ^ Insert the cover plate on the freezer compartment door. Attaching the toe-kick cover The maximum height of the toe-kick cover is 4" (101 mm) from the top of the floor. Do - Miele KF 1801 Vi | Operating and Installation manual - Page 76
Installing the appliance Mounting the air separator The air separator keeps the supply and exhaust air separate. This prevents warm the air separator, left and right of the partition, in the exhaust grille. Be sure that it clicks into place and guides the foam partition under the exhaust grille. 76 - Miele KF 1801 Vi | Operating and Installation manual - Page 77
120 psi (1.72-8.25 bar). - A separate shut-off valve must be installed, so that the water supply can be interrupted as needed. - The maximum outer diameter of the water pipe (without fittings): 3/8" (10 mm). The shut-off valve for the water connection must not be located behind the appliance. It is - Miele KF 1801 Vi | Operating and Installation manual - Page 78
to prevent damage caused by leaking water. ^ Attach the connecting pipe to the shut-off valve, according to the instructions supplied by the manufacturer of the ice cube maker installation kit. ^ Install the connecting pipe. Always observe the indicated clearance dimensions to prevent damage to the - Miele KF 1801 Vi | Operating and Installation manual - Page 79
pipe to the solenoid valve of the appliance, follow the instructions supplied by the manufacturer of the ice cube maker installation kit. When bending the water pipe, be sure not to kink it, otherwise there is a risk of leaks and water damage. Use bending aids. ^ Push the union nut and seal onto - Miele KF 1801 Vi | Operating and Installation manual - Page 80
Failure to follow these instructions can result in service technician. Installation, repairs and other work by unqualified persons could be dangerous. The appliance is supplied with a UL-listed, 3-wire power power supply, please consult a licensed electrician or call the Miele Technical Service. - Miele KF 1801 Vi | Operating and Installation manual - Page 81
access to your appliance to fix the problem. For information on set-up and installation of the RemoteVision module see the "Installation" section of this manual. Be sure your wireless system meets the following requirements - A wireless router that supports an IEEE 802.11b protocol - Windows XP - Miele KF 1801 Vi | Operating and Installation manual - Page 82
connected to the network when ; # appears in the display. If ; # does not appear, refer to the "Network options" section of the XKM 2000 Installation Instruction manual. ^ Press and hold the access button "p" for 2 seconds to confirm the change. ^ To return to the main menu, tap the X button until - Miele KF 1801 Vi | Operating and Installation manual - Page 83
RemoteVision (optional accessory) MasterCool control panel options for RemoteVision Status indicators Description of function Flashing ; ~ Module booting phase Flashing ; ‡ Not connected Note: If you cannot select any option (other than ; - "Back", the module has not been installed correctly. 83 - Miele KF 1801 Vi | Operating and Installation manual - Page 84
Alteration rights reserved / 4811 M.-Nr. 09 169 250 / 01 INFORMATION IS SUBJECT TO CHANGE. PLEASE REFER TO OUR WEBSITE TO OBTAIN THE MOST CURRENT PRODUCT SPECIFICATIONS, TECHNICAL & WARRANTY INFORMATION.
-
 1
1 -
 2
2 -
 3
3 -
 4
4 -
 5
5 -
 6
6 -
 7
7 -
8
-
9
-
10
-
11
-
12
-
13
-
14
-
15
-
16
-
17
-
18
-
19
-
20
-
21
-
22
-
23
-
24
-
25
-
26
-
27
-
28
-
29
-
30
-
31
-
32
-
33
-
34
-
35
-
36
-
37
-
38
-
39
-
40
-
41
-
42
-
43
-
44
-
45
-
46
-
47
-
48
-
49
-
50
-
51
-
52
-
53
-
54
-
55
-
56
-
57
-
58
-
59
-
60
-
61
-
62
-
63
-
64
-
65
-
66
-
67
-
68
-
69
-
70
-
71
-
72
-
73
-
74
-
75
-
76
-
77
-
78
-
79
-
80
-
81
-
82
-
83
-
84
 |
 |
Operating and Installation
Instructions
Fridge-Freezer Combination
KF 1801 Vi
KF 1811 Vi
KF 1901 Vi
KF 1911 Vi
To prevent accidents
and appliance damage
read these instructions
before
installation or use.
M.-Nr. 09 169 250
en - US, CA