Motorola H560 BLACK User Guide - Page 5
Before you begin, Charging your headset
 |
View all Motorola H560 BLACK manuals
Add to My Manuals
Save this manual to your list of manuals |
Page 5 highlights
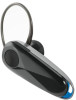
English Before you begin See figure 1 on page 1. Take a moment before you get started to familiarize yourself with your new H560 Headset. 1. Volume buttons 2. Speaker 3. Call button 4. Power switch 5. Indicator light 6. Microphone Charging your headset See figure 2 on page 1 Verify slide switch is in the off position (toward the charging port). The indicator light turns red or yellow when the battery is charging. It may take up to 1 minute for the indicator light to turn on. When the headset's battery is fully charged (about 2 hours), the indicator light turns green. Note: Headset is not functional while charging. This product uses a lithium ion, rechargeable, non-replaceable battery. Your battery is designed to last the life of the product. It should only be removed by a recycling facility. ANY ATTEMPT TO REMOVE OR REPLACE YOUR BATTERY WILL DAMAGE THE PRODUCT. 4
-
 1
1 -
 2
2 -
 3
3 -
 4
4 -
 5
5 -
 6
6 -
 7
7 -
 8
8 -
 9
9 -
 10
10 -
 11
11 -
12
-
13
-
14
 |
 |
