Motorola HMVC3050 Quick Start Guide - Page 4
Wall Mount Your Wireless Camera, Table Mount Your Wireless Camera
 |
UPC - 612572121955
View all Motorola HMVC3050 manuals
Add to My Manuals
Save this manual to your list of manuals |
Page 4 highlights
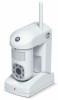
Installing Your Camera Your camera can either be mounted on a wall or just sit on a level surface. Wall Mount Your Wireless Camera Make sure the power adapter cord is long enough to reach your mounting location. Also, be sure the AC outlet cannot be switched on and off with a wall switch. Warning: When mounting near a window, drilling too close to the glass could break the glass and possibly cause it to shatter. The window extends deeper into the frame than can be seen; therefore, ensure your screw is beyond the glass before drilling. 1 Using the holes on the drilling template found later in this guide, mark the position of the holes to be drilled. For drywall or other composite surfaces use a 7/32" drill bit. Drill a hole for each of the mounting screws and insert a plastic wall anchor into each hole. For other solid surfaces, use a 1/16" drill bit. Drill a pilot hole for each of the mounting screws. 2 Using the screws provided, secure the camera mounting bracket to the wall. Pull off the camera base by pulling straight down. The base detaches from the upper back side. Slide the camera down on to the bracket until it is firmly seated and you feel it click as the contacts engage. Discovery button Detach base 3 Position the camera to view the desired area and plug in the power supply. Please keep in mind that the field of view is 80 degrees and motion sensor distance works up to 12-14 feet (3.5-4 m). 4 Make adjustments to the camera viewing angle by tilting and panning the camera head with your hand. Table Mount Your Wireless Camera The camera can be placed on any horizontal surface. 1 Locate the camera on a horizontal surface. 2 Plug the power supply into camera and then to a wall outlet. 3 Make adjustments to the camera viewing angle by tilting and panning the camera head with your hand. 4
-
 1
1 -
 2
2 -
 3
3 -
 4
4 -
 5
5 -
 6
6 -
 7
7 -
 8
8 -
 9
9 -
 10
10
 |
 |
