Mr. Coffee BVMC-EHX33 User Manual - Page 10
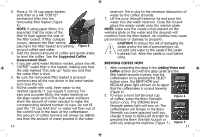
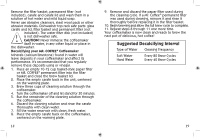
Suggested Decalcifying Interval
 |
View all Mr. Coffee BVMC-EHX33 manuals
Add to My Manuals
Save this manual to your list of manuals |
Page 10 highlights
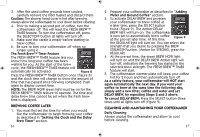
Remove the filter basket, permanent filter (not included), carafe and carafe lid and wash them in a solution of hot water and mild liquid soap. Never use abrasive cleansers, steel wool pads or other abrasive materials. Dishwasher top rack safe parts: glass carafe and lid, filter basket and permanent filter (not included). The water filter disk (not included) is not dishwasher safe. CAUTION! Never immerse the coffeemaker itself in water, in any other liquid or place in the dishwasher. Decalcifying your MR. COFFEE® Coffeemaker Minerals (calcium/limestone) found in water will leave deposits in your coffeemaker and affect its performance. It's recommended that you regularly remove these deposits using or vinegar. 1. Place an empty 10-12 cup basket-style paper filter or MR. COFFEE® permanent filter into the filter basket and close the brew basket lid. 2. Place the empty carafe back in the unit, centered on the warming plate. 3. Brew three cups of cleaning solution through the coffeemaker. 4. Turn the coffeemaker off and let stand for 30 minutes. 5. Run the remainder of the cleaning solution through the coffeemaker. 6. Discard the cleaning solution and rinse the carafe thoroughly with clean water. 7. Fill the water reservoir with clean, fresh water. 8. Place the empty carafe back on the coffeemaker, centered on the warming plate. 18 9. Remove and discard the paper filter used during the cleaning cycle. If a Mr. Coffee® permanent filter was used during cleaning, remove it and rinse it thoroughly before replacing it in the filter basket. 10. Begin brewing and allow the full brew cycle to complete. 11. Repeat steps 8 through 11 one more time. Your coffeemaker is now clean and ready to brew the next pot of delicious, hot coffee! Suggested Decalcifying Interval Type of Water Cleaning Frequency Soft Water Hard Water Every 80 Brew Cycles Every 40 Brew Cycles 19
-
 1
1 -
2
-
3
-
4
-
 5
5 -
 6
6 -
 7
7 -
 8
8 -
 9
9 -
 10
10 -
 11
11 -
 12
12 -
 13
13 -
 14
14 -
 15
15 -
16
-
17
-
18
-
19
-
20
-
21
-
22
-
23
-
24
-
25
-
26
-
27
-
28
-
29
-
30
 |
 |
