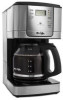
Mr. Coffee JWX31-RB User Manual - Page 8
Brewing Coffee Now
 |
View all Mr. Coffee JWX31-RB manuals
Add to My Manuals
Save this manual to your list of manuals |
Page 8 highlights
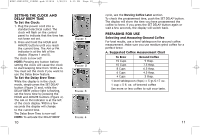
BVMC-JWX12CUP_15ESM1.qxd:133834 1/28/15 2:35 PM Page 14 filling, the water markings on the glass decanter and on the water window show the amount of water needed to make the corresponding desired number of cups. Do not fill past the "12 cup MAX line" or water will flow out of the overfill hole in the back of the coffeemaker. The amount of coffee brewed will always be slightly less than the amount of water poured in the water reservoir. This is due to the minimum absorption of water by the coffee grounds. 7. Lift the pour through reservoir lid and pour the water into the water reservoir. Close the lid and place the empty decanter onto the warmer plate. NOTE: Make sure the decanter is fully placed on the warming plate or the water and the grounds will overflow from the filter basket. An overflow may cause personal injury or damage to property. CAUTION! To reduce the risk of damaging the decanter and/or the risk of personal injury, do ! not add cold water to the decanter if the decanter is already hot. Allow the decanter to cool before using. BREWING COFFEE NOW 1. After completing the steps in the Adding Water and Coffee section and with the glass decanter and the filter basket securely in place, turn the coffeemaker on by pressing the SELECT button once. The BREW NOW green light will turn on to signal that the coffeemaker is on and brewing (Figure 6). FIGURE 6 14 2. To enjoy a more full flavored cup of coffee, press the Brew Strength button once. The STRONG Brew Strength red light will turn on. The coffeemaker will remain in the Brew Strength you have selected until you change it back to regular strength by pressing the Brew Strength button or until you FIGURE 7 unplug the machine (Figure 7). 3. After the used coffee grounds have cooled, carefully remove the filter basket and discard them. NOTE: Always allow the coffeemaker to cool down before cleaning. 4. Prior to making a second pot of coffee, turn the coffeemaker off. This will reset the Fresh Brew™ Timer feature. To turn the coffeemaker off, press the SELECT/OFF button until all lights turn off. 5. Make sure the decanter is empty before starting to brew coffee. 6. Be sure to turn your coffeemaker off when no longer using it. NOTE: Scalding may occur if the lid is removed during brewing cycles. The Fresh Brew™ Timer Feature The Fresh Brew™ Timer feature lets you know how long your coffee has been waiting for you. At the start of the brew cycle, The Fresh Brew™ Timer TIMER feature will automatically be activated. NOTE: Fresh Brew™ Timer display and Fresh Brew™ Timer button not included on all JW series models. 15
-
 1
1 -
2
-
 3
3 -
 4
4 -
 5
5 -
 6
6 -
 7
7 -
 8
8 -
 9
9 -
 10
10 -
 11
11 -
 12
12 -
 13
13 -
14
-
15
-
16
-
17
-
18
-
19
-
20
-
21
-
22
-
23
-
24
-
25
-
26
-
27
-
28
 |
 |
